All companies have to make sure that their accounting matches the bank. Any transaction that appears on the bank statement, whether it is a payment from a customer, payment to a supplier, bank fee, or an interest charge, must be linked to the correct entry in the ledger. It takes hours to do this job at the end of each month manually, and usually some mistakes happen.
Odoo 20 enhances the accounting module by providing a new bank matching widget. The widget lets you see the statement line, suggested counterparties, and possible actions. From here, you can view suggested matches, create multiple invoice matches, manage discrepancies, and confirm entries. In this tutorial, we are going to explain how you can use this widget from the journal dashboard for the automatic reconciliation cron.
What is bank reconciliation in Odoo 20?
The process of bank reconciliation will enable you to reconcile entries in the Odoo bank journal with the entries on your bank statement. In this process, all the entries on the statement must be reconciled to the right entries in the journal (invoices, bills, payments, among others), or an explanation is provided for any unmatched entries by posting a new entry, such as bank fees. Once the process is done, all the entries will be reconciled, and the balance in Odoo will tally with the balance in your bank account. The Bank Matching widget helps you do this.
Setting Up the Outstanding Accounts
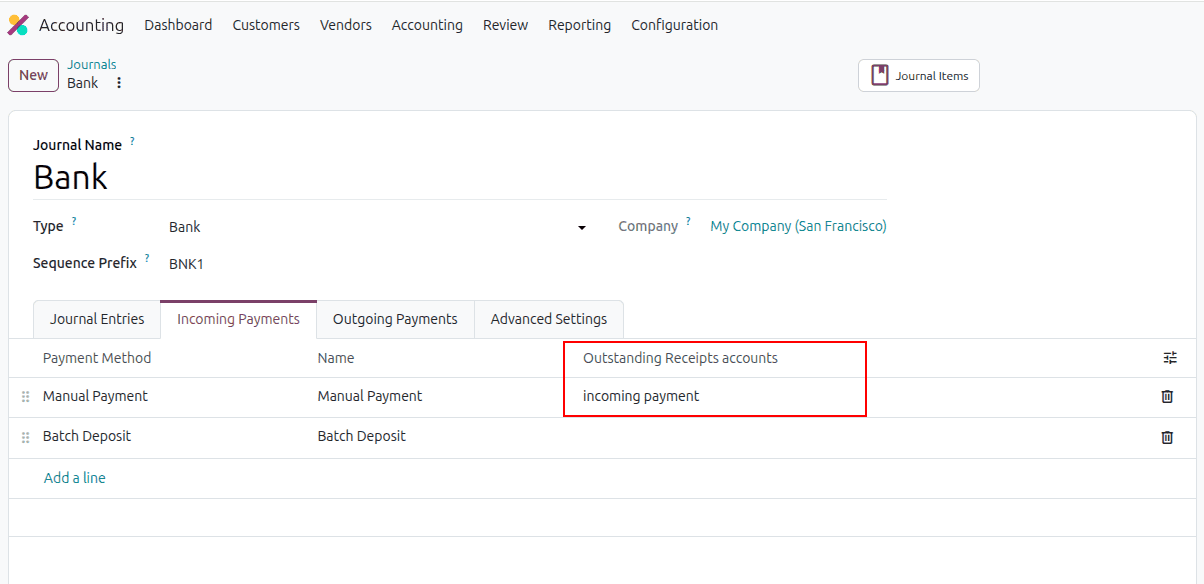
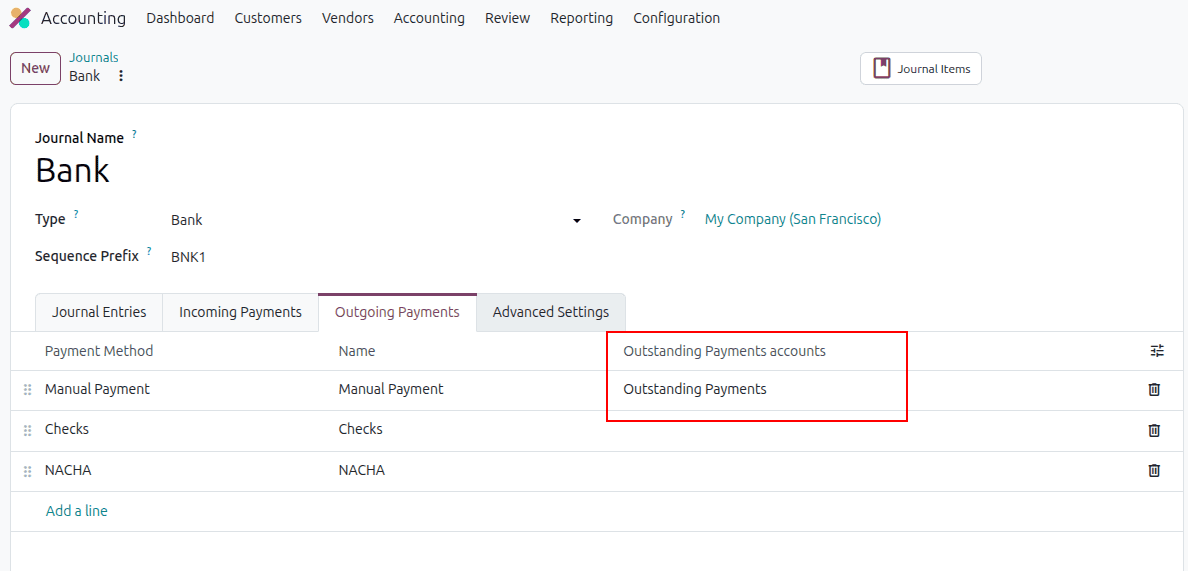
Before registering any payment, the bank journal needs outstanding accounts. These hold a payment temporarily while it waits for the bank to confirm it. Go to Accounting > Configuration > Journals and open the bank journal. In the Incoming Payments tab, select an Outstanding Receipts account, and in the Outgoing Payments tab, select an Outstanding Payments account. If you need to create them, make the receipts account a Current Assets type and the payments account a Current Liabilities type. Enable Allow Reconciliation on both so Odoo can match them later.
Create Customer Invoice
Go to Accounting > Customers > Invoices
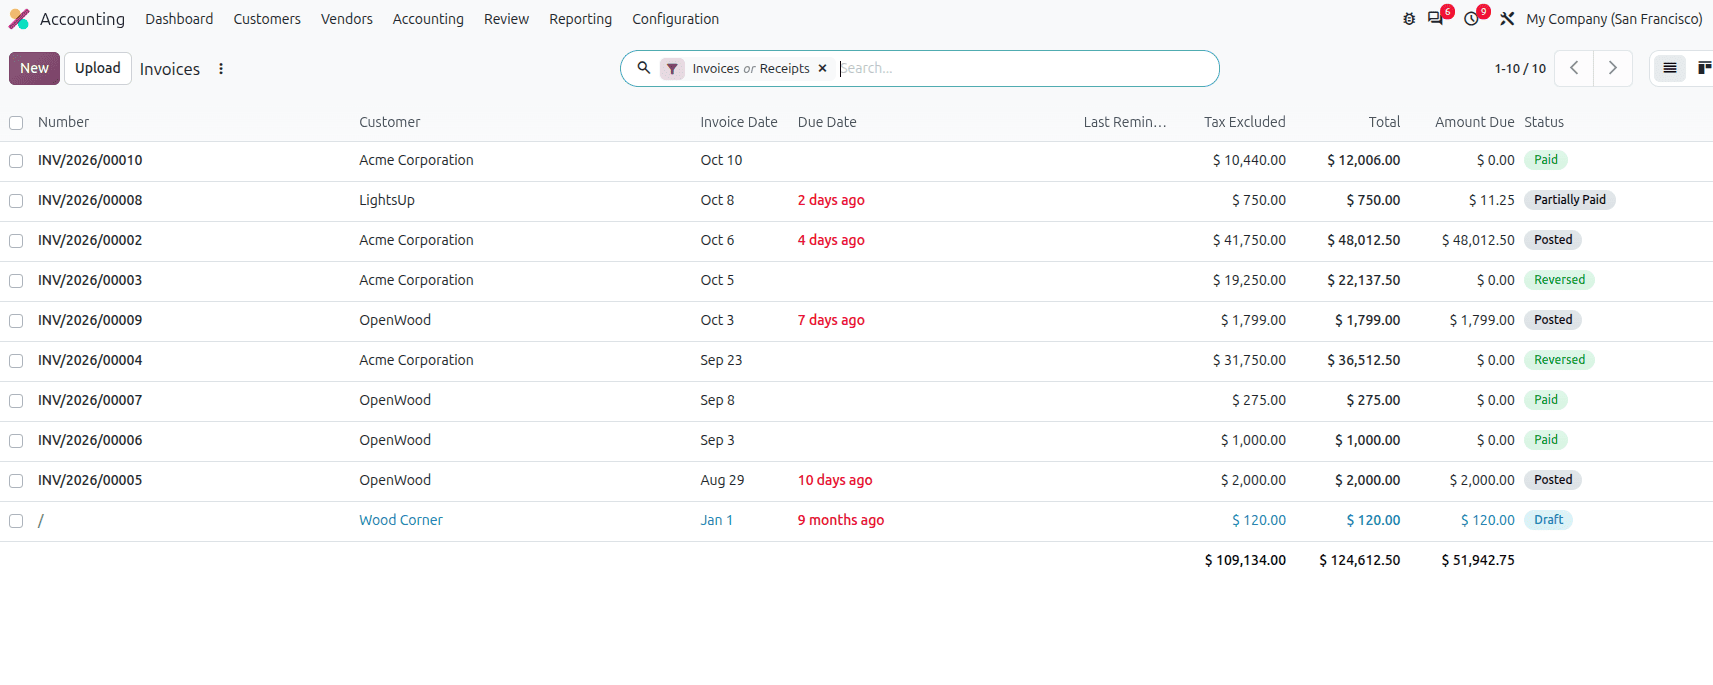
The invoice list view displays all existing customer invoices with details such as invoice number, customer name, invoice date, due date, total amount, amount due, and invoice status. By clicking the New button in the top-left corner, the user can open a new invoice form to enter the required invoice details.
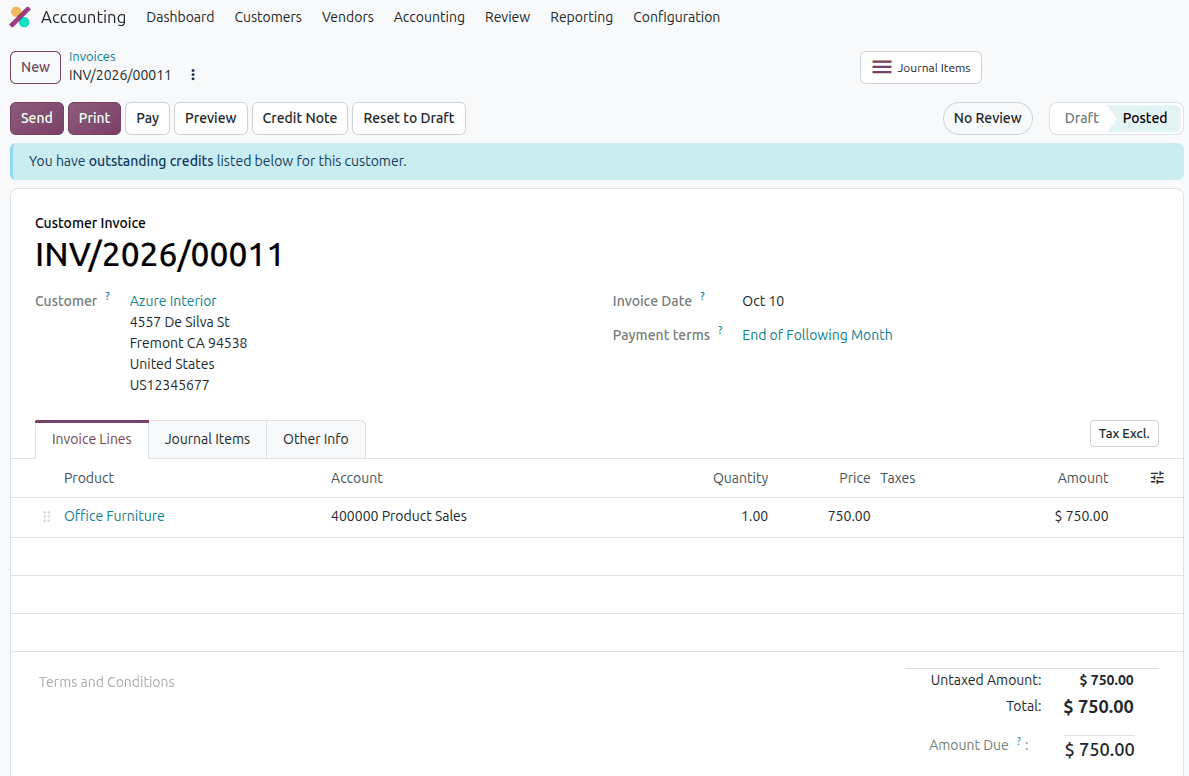
Select the customer, in our example, Azure Interior, then add a product line such as Office Furniture with a quantity of 1 and a price of $750.00. Click Confirm to post the invoice. Odoo assigns the number INV/2026/00011 and sets the status to Posted.
Register the Payment
Once the customer pays, record it against the invoice. Click the Pay button at the top left of the invoice, and the payment wizard opens.
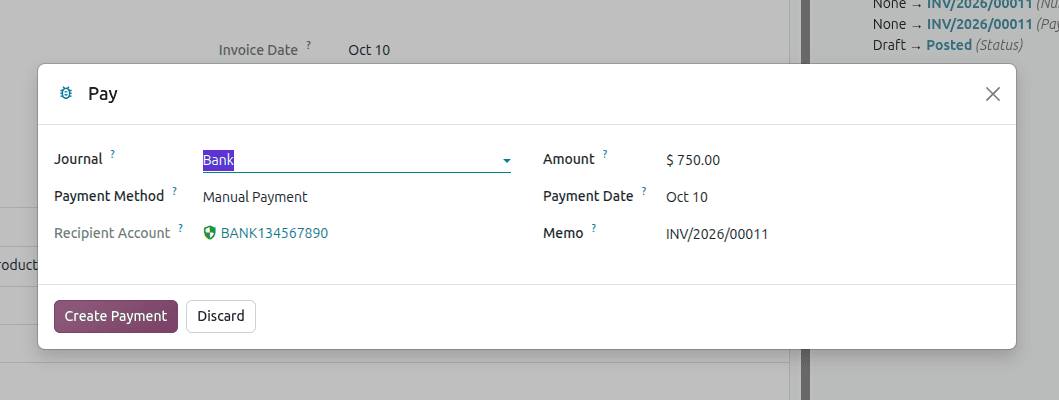
Choose the bank journal and a payment method such as manual payment, and confirm the amount of $750.00, the payment date, and the memo, which Odoo fills with the invoice number. Click Create Payment.
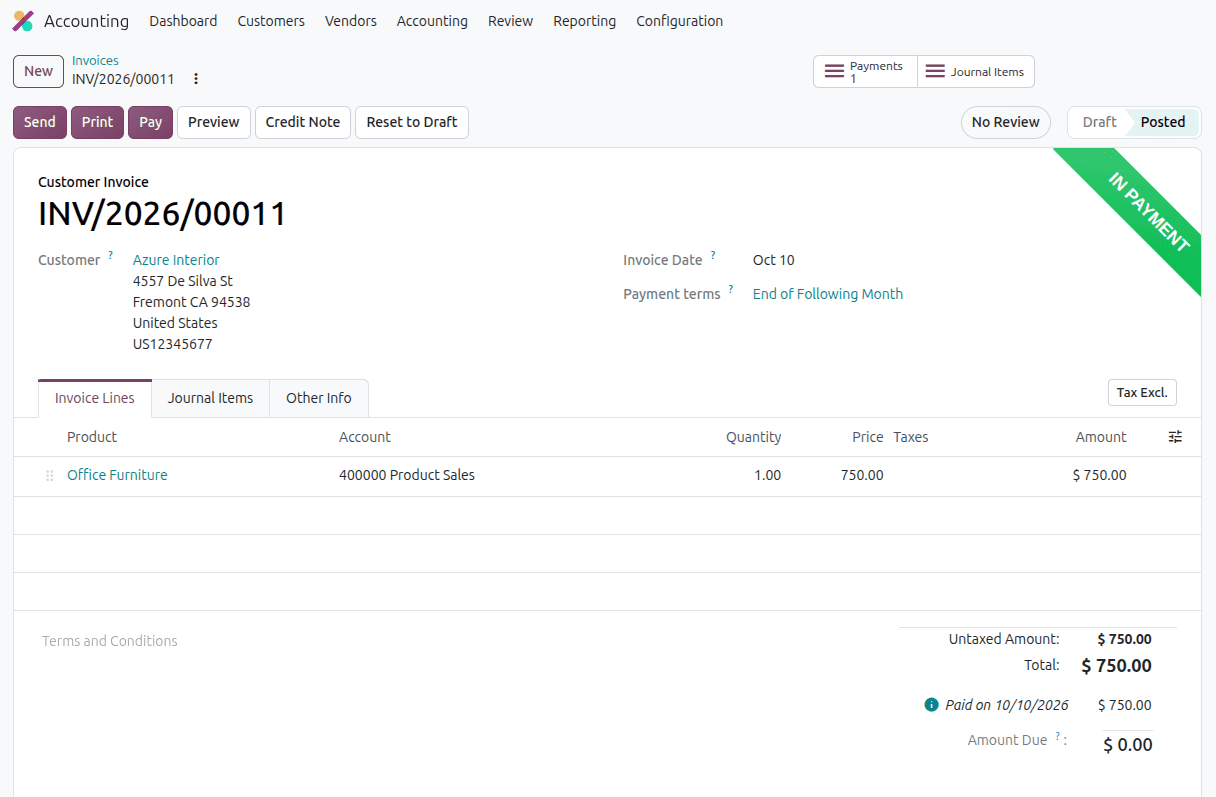
The invoice status changes to In Payment. The money is not in the bank yet, so Odoo records it in the Outstanding Receipts account, debiting Outstanding Receipts and crediting Accounts Receivable. This links the payment to the invoice, which is the payment matching stage.
Add the bank statement line.
The bank has reported the $750.00 payment, so the transaction must appear in the Bank Matching screen. In a live setup, it arrives through a bank synchronization or an uploaded statement file. For this walkthrough, we create it manually.
Go to Accounting > Dashboard and open the Bank journal, which opens the Bank Matching screen with the Journal: Bank filter already applied.
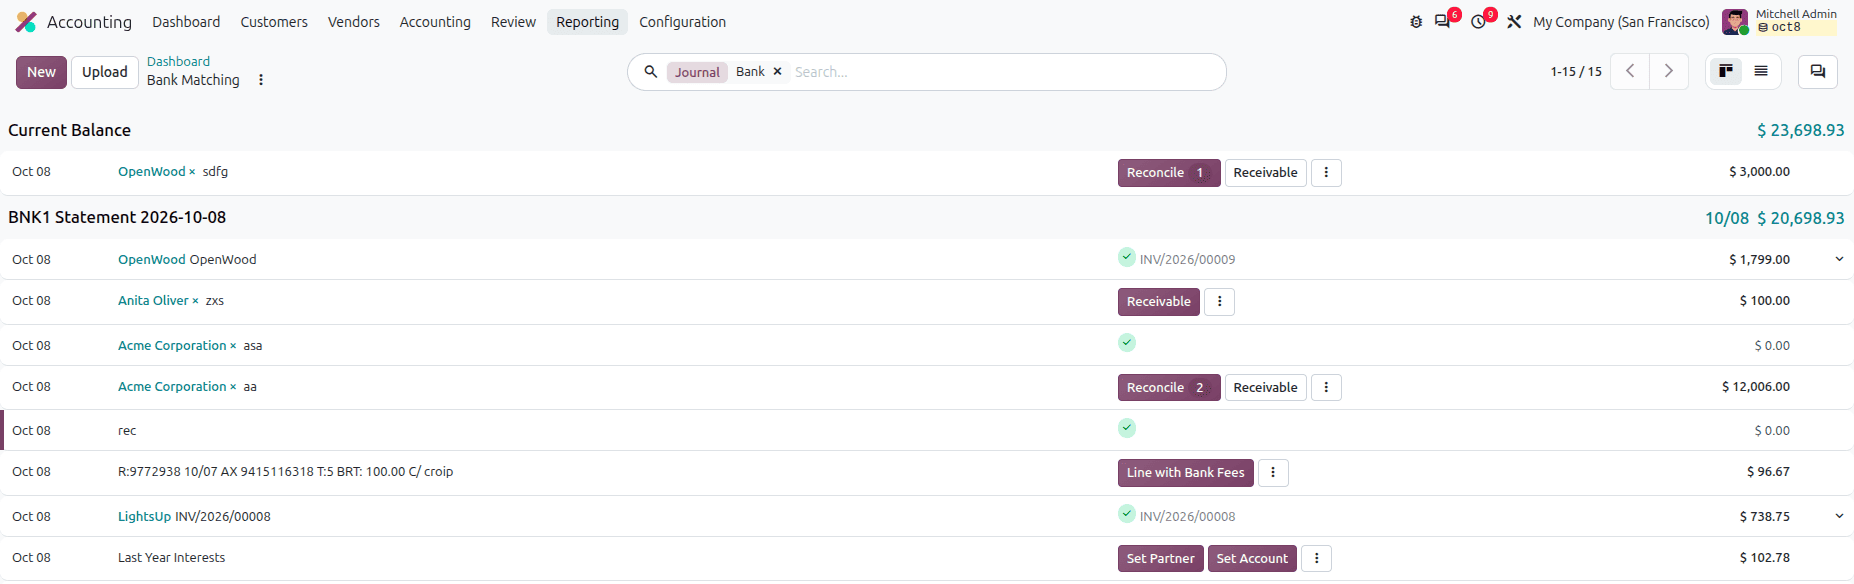
The new line appears in the list with today’s date, the partner name and label, and the amount on the right. Lines that belong to a statement are grouped under a heading such as “BNK1 Statement 2026-10-08", which shows the statement date and closing balance. Lines not yet assigned to a statement appear at the top, under the Current Balance heading. Every new transaction is also logged in the chatter on the right as “Bank transaction created".
At the top left, there are two buttons, 'New' and 'Upload'. Click New to enter a transaction with today’s date, the label INV/2026/00011, the partner Azure Interior, and the amount $750.00, and click Create. and Close.
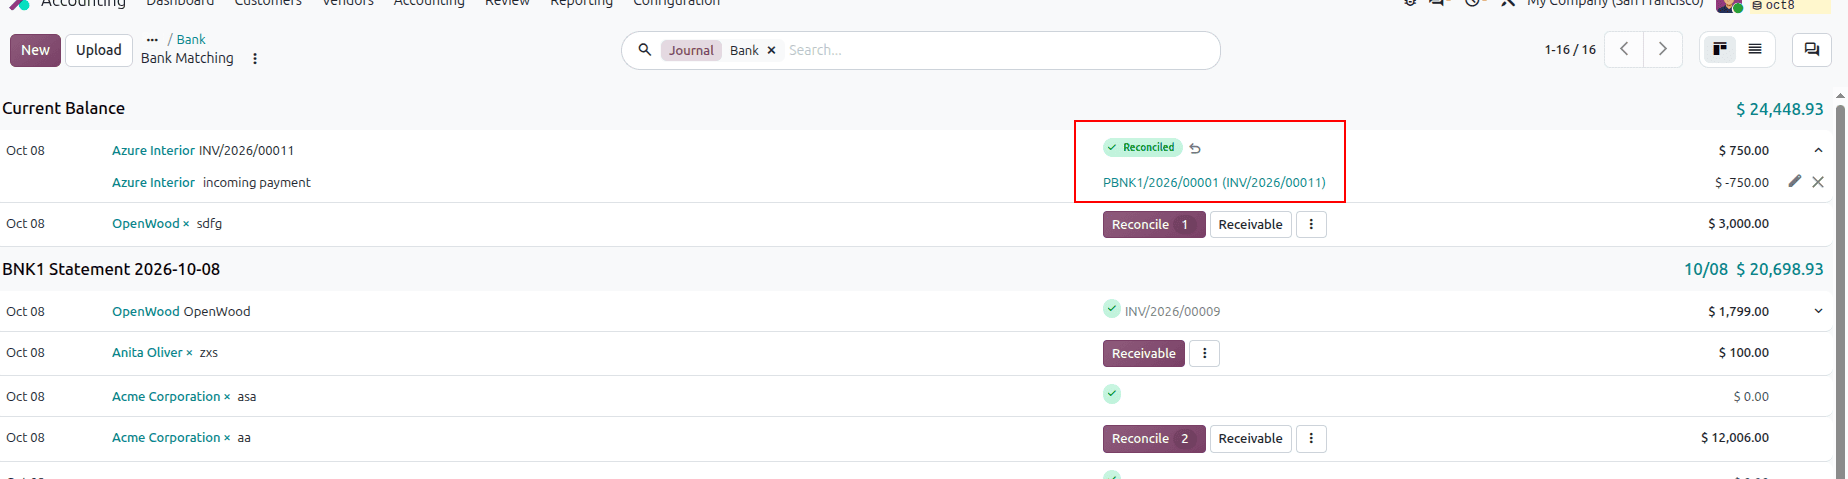
The form closes, and you return to the bank matching list. Nothing else is needed at this point. You do not open any reconciliation screen, because Odoo starts looking for a match as soon as the line is saved. Look at the middle column of the Azure Interior row. It shows a green check and the reference PBNK1/2026/00001, with no Reconcile button. This means the line is already matched to the payment. If you have a statement file from your bank, click Upload instead, and Odoo creates all the lines at once.
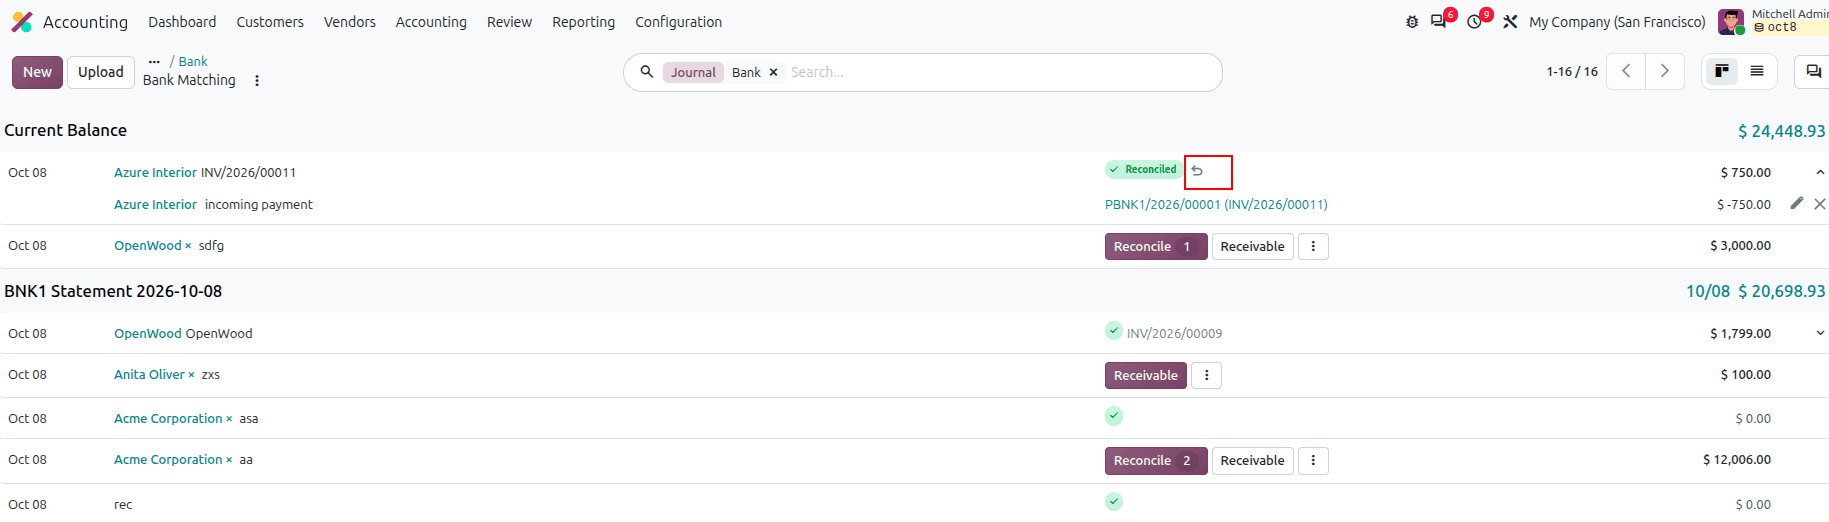
If the line was matched to the wrong payment or invoice, click the curved-arrow undo icon next to the Reconciled badge. Odoo removes the match between the bank line and the payment PBNK1/2026/00001. The green check and the badge disappear, and the row returns to the unreconciled state, showing a Reconcile button or Set Partner and Set Account, depending on what Odoo finds.
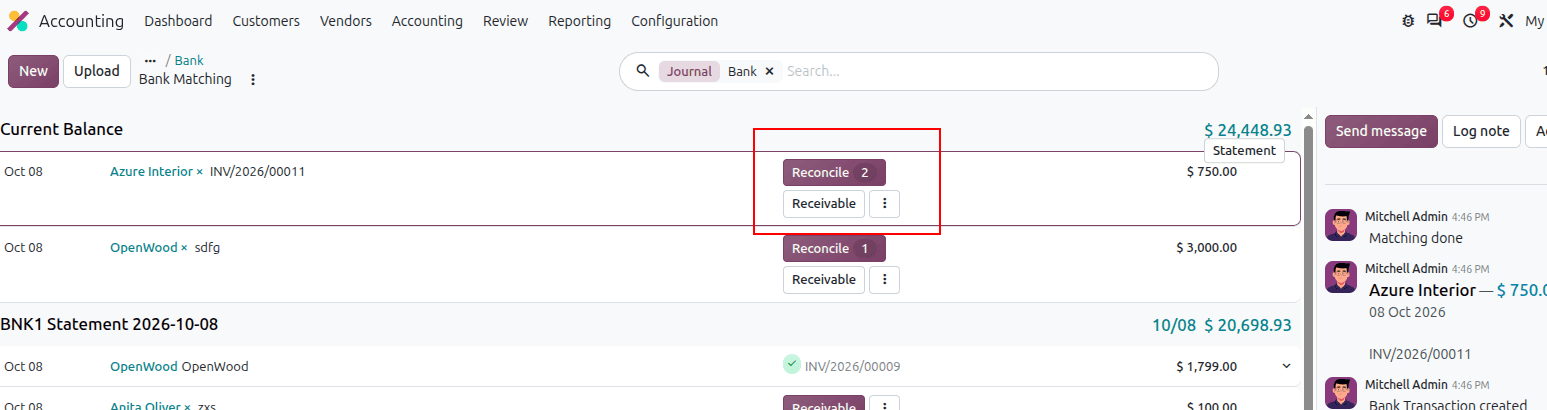
Click the Reconcile button to choose the entry you want to match. Clicking it opens the Search: Journal Items to Match window, which lists the entries that could settle this bank line.
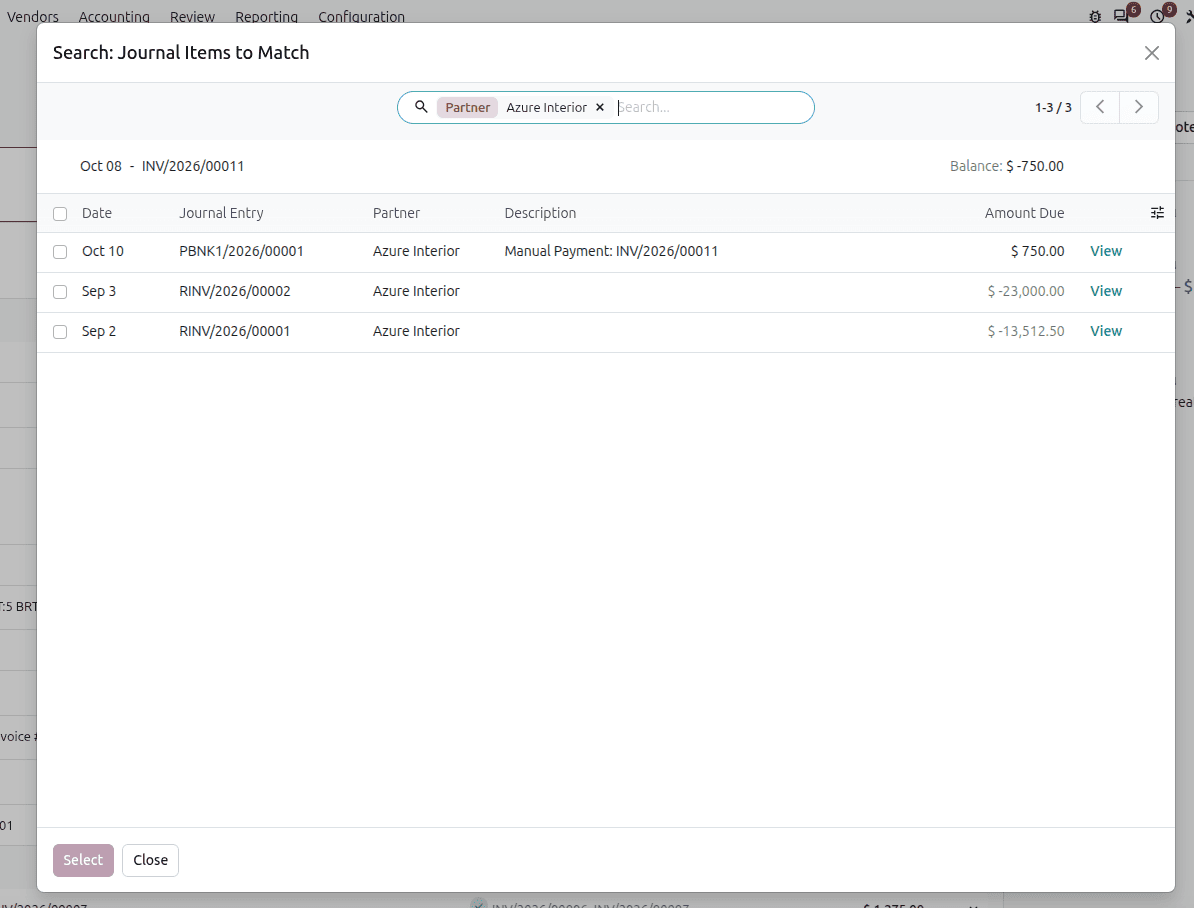
The partner filter is already set to Azure Interior, and the header shows the line you are matching, Oct 08 INV/2026/00011, with a balance of -$750.00. That balance is still waiting to be matched.
The first row is the one you want: PBNK1/2026/00001, a manual payment for INV/2026/00011 with an amount due of $750.00. It is the payment we registered earlier, and its amount equals the bank line. Tick its checkbox, and the Select button, which is greyed out until you tick something, becomes active. Click Select, then the line is reconciled again with a green check.
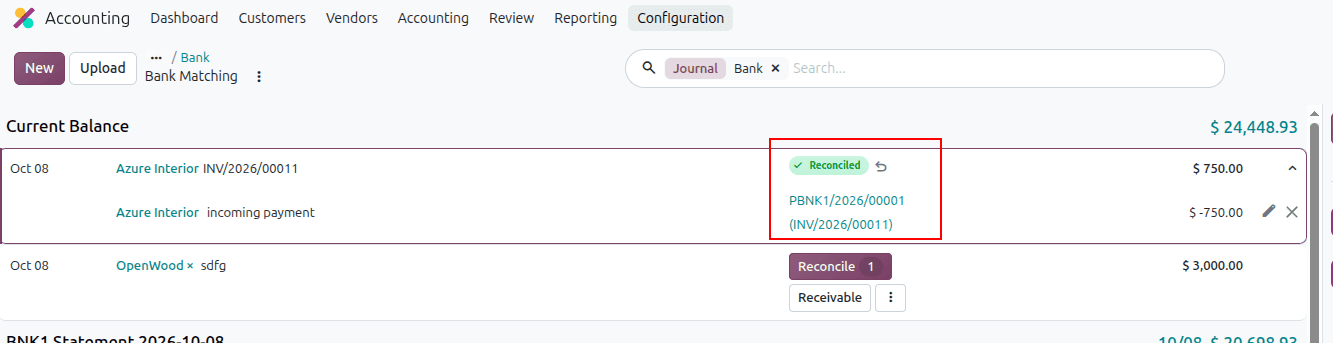
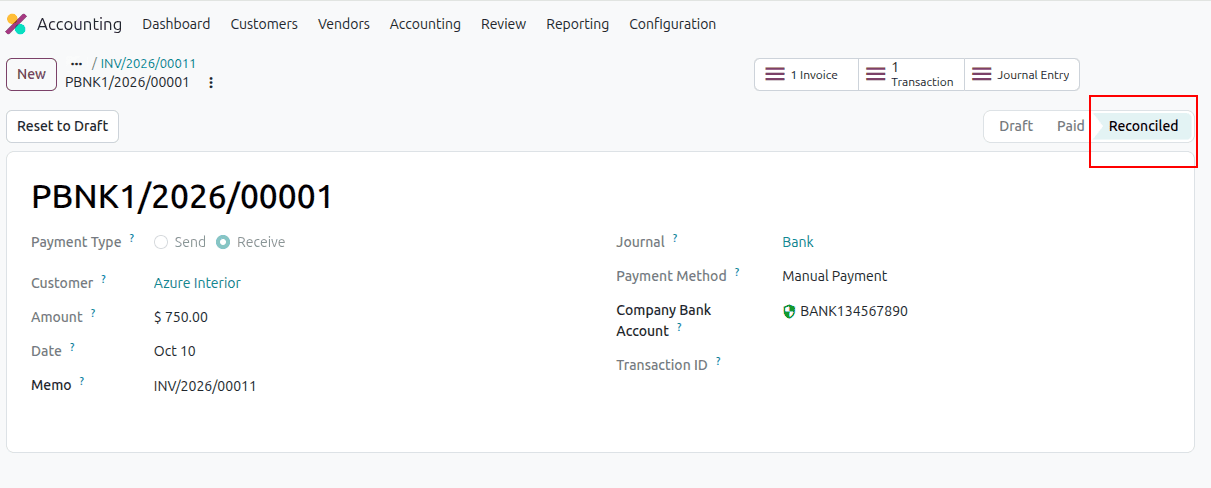
In the Customer Payments list, payment PBNK1/2026/00001 for Azure Interior ($750.00) now shows the status Reconciled, confirming that the bank statement line has been matched to it. Before reconciliation, the payment was recorded in Odoo but was still awaiting bank confirmation. Once you select the payment in the Journal Items to Match window and click Select, Odoo marks it as reconciled.
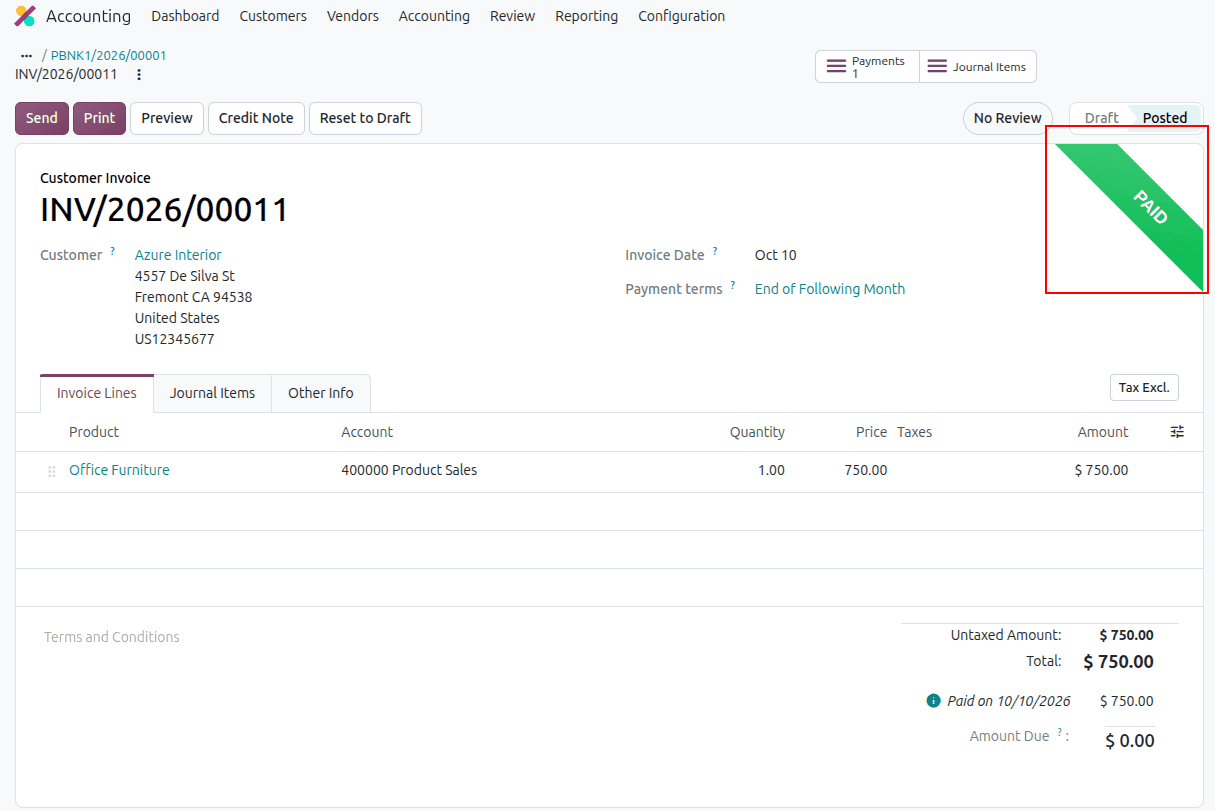
The invoice. INV/2026/00011 now shows the green PAID ribbon, the line “Paid on 10/10/2026” for $750.00, and an Amount Due of $0.00. The invoice moves from "In Payment" to "Paid" because the bank has now confirmed the money.
Payment Matching
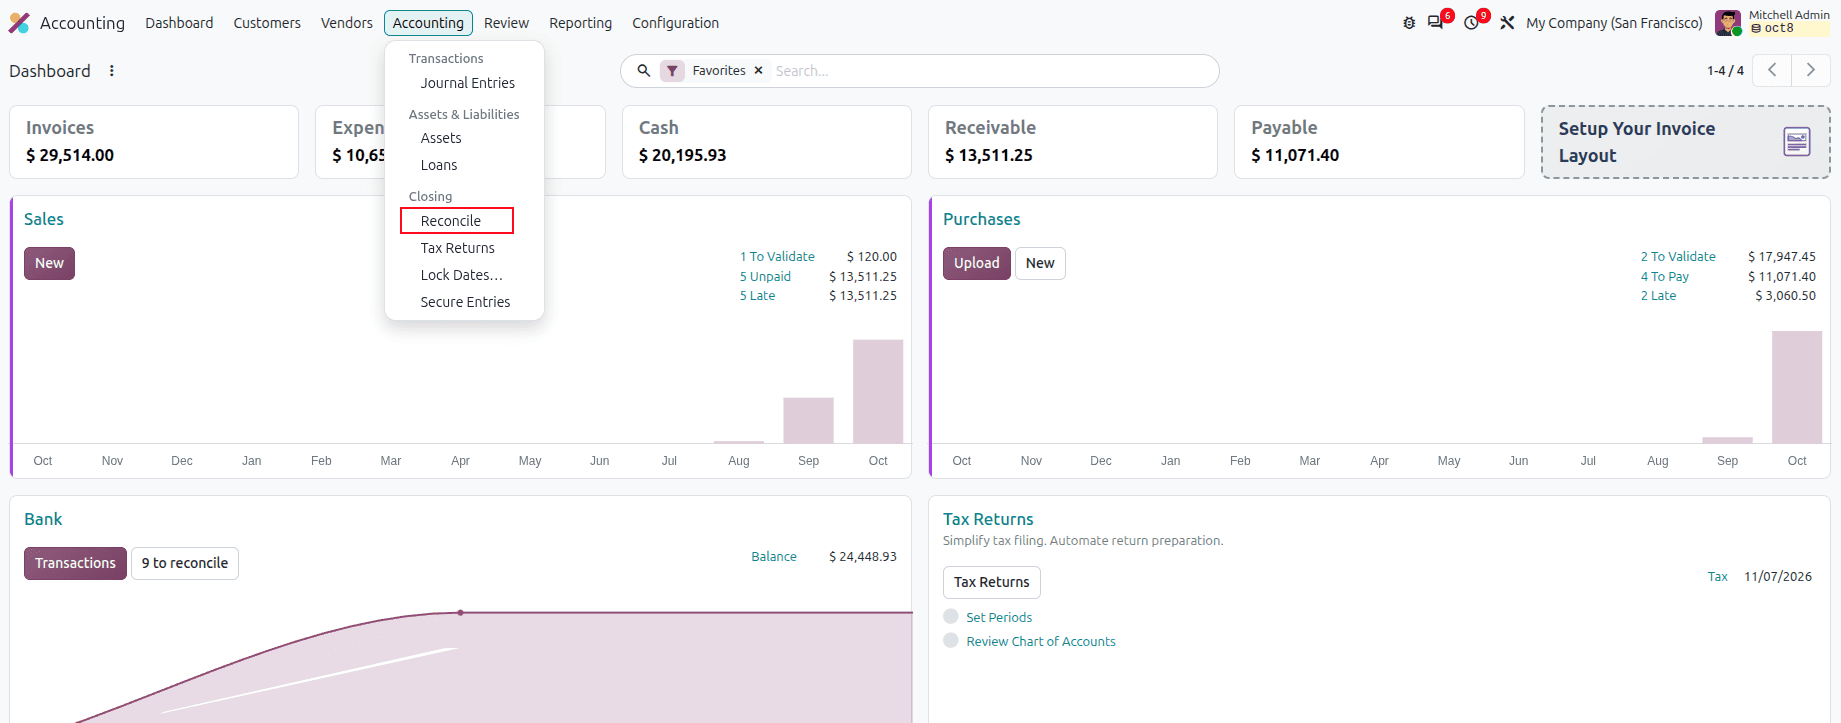
Reconciliation in Odoo is not only about the bank statement. Invoices, vendor bills, credit notes, and payments also need to be matched with each other so that a paid invoice shows as paid and a payment is linked to the document it settles. In Odoo 20, you do this on the Journal Items reconcile screen, under Accounting > Closing > Reconcile. The screen lists the open items for each customer and vendor.
Manual Reconcile
Manual reconciliation means you choose which items settle with each other. Odoo matches journal items of the same account and partner, a debit against a credit, until they cancel out.
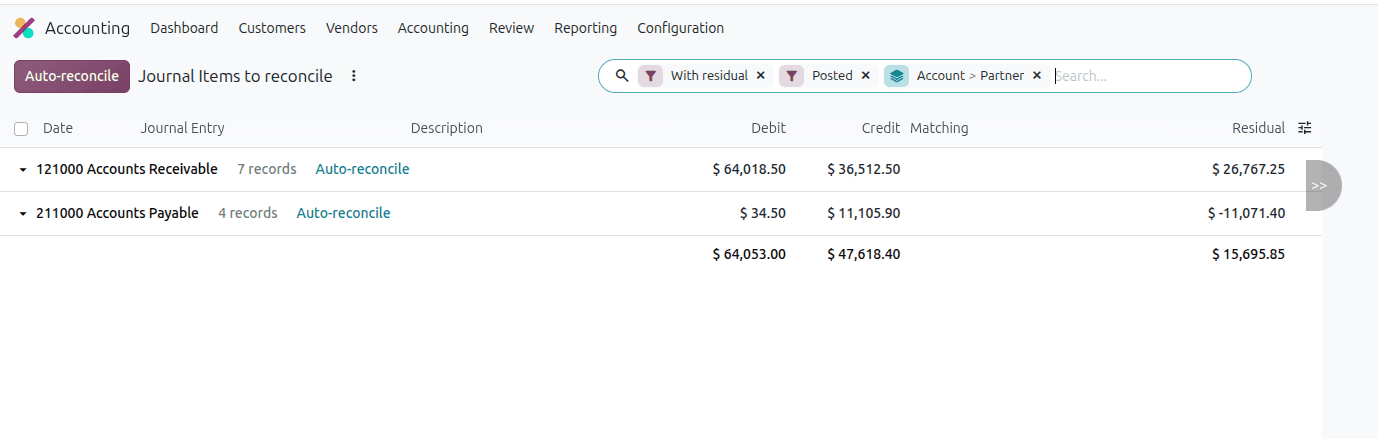
We create an invoice for $1,250.00 and a customer payment for the same amount, but we deliberately do not link them. The payment is made from the Payments menu and not from the invoice’s Pay button. Then, we match them manually on the Journal Items to reconcile the screen.
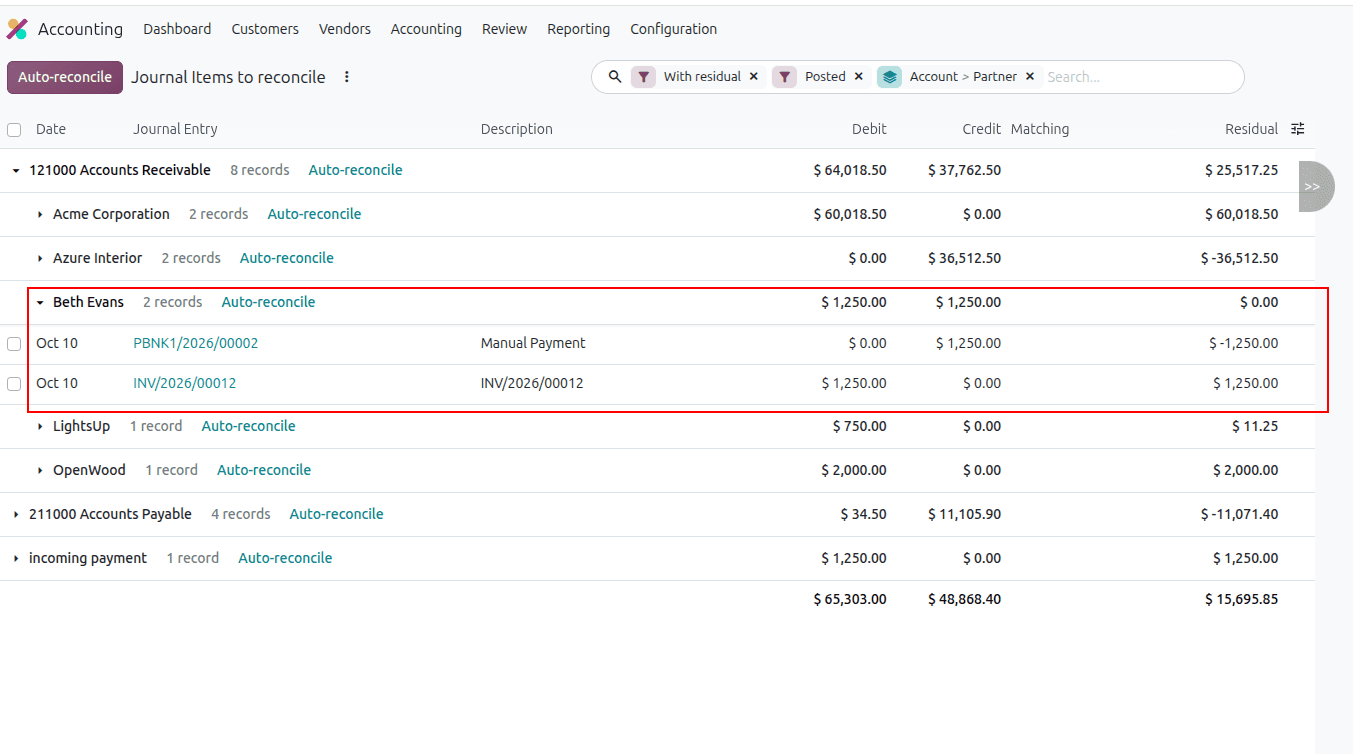
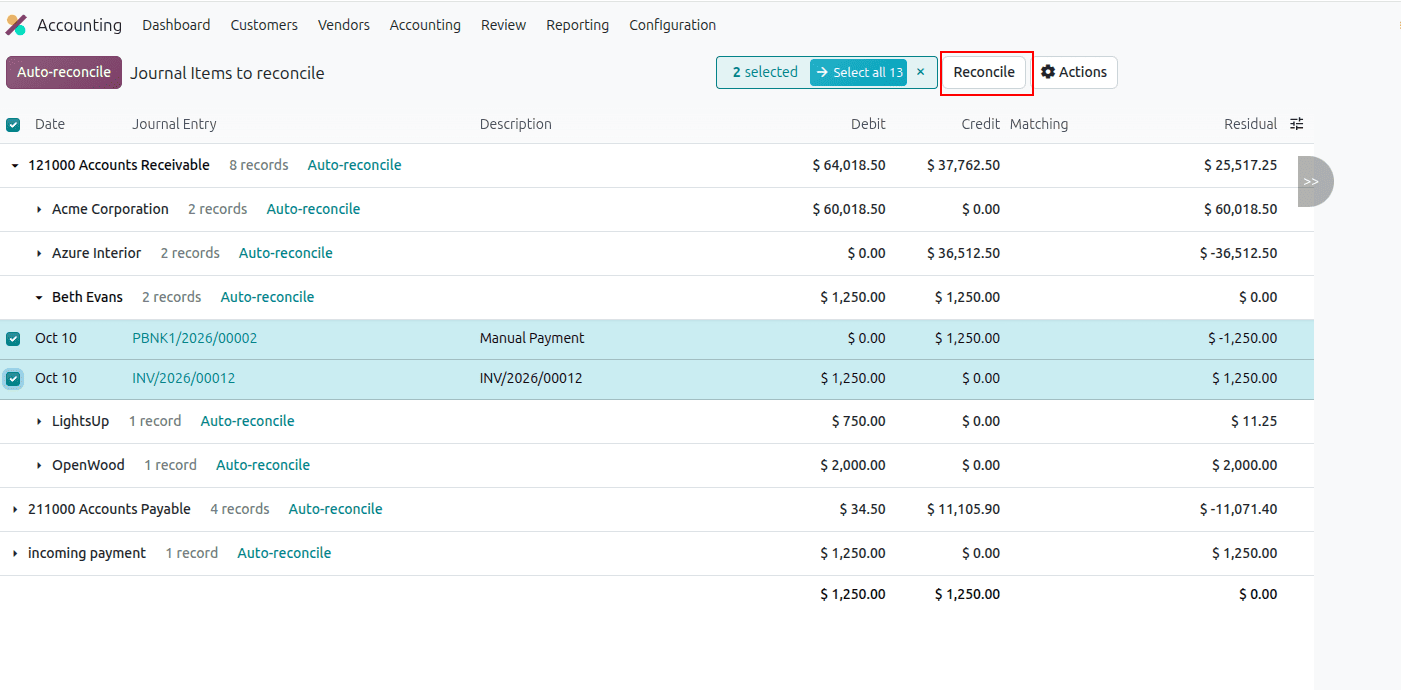
The Journal Items reconcile screen lists open items grouped by account and partner. Expand 121000 Accounts Receivable, then Beth Evans. You will see two records. Tick the checkbox for the invoice line and the checkbox for the payment line. Odoo shows a Reconcile button for the selected items. Click it. The two items drop out of the list because their residual is now zero. This is the manual reconcile: you chose the items, and Odoo matched them against each other.
After the manual reconcile, the invoice shows In Payment, and the payment is in the Paid state. Neither is final yet, because the payment has not been matched to a bank statement line. Once the bank line is matched on the Bank Matching screen, the invoice changes to Paid, and the payment changes to Reconciled.
Auto-Reconcile
Auto-reconcile lets Odoo match your open items for you, so you do not have to select them one by one. On the Journal Items to reconcile screen, click the Auto-reconcile button, and Odoo finds the invoices and payments that cancel each other out and reconciles them in one step. It works best when the amounts balance exactly.
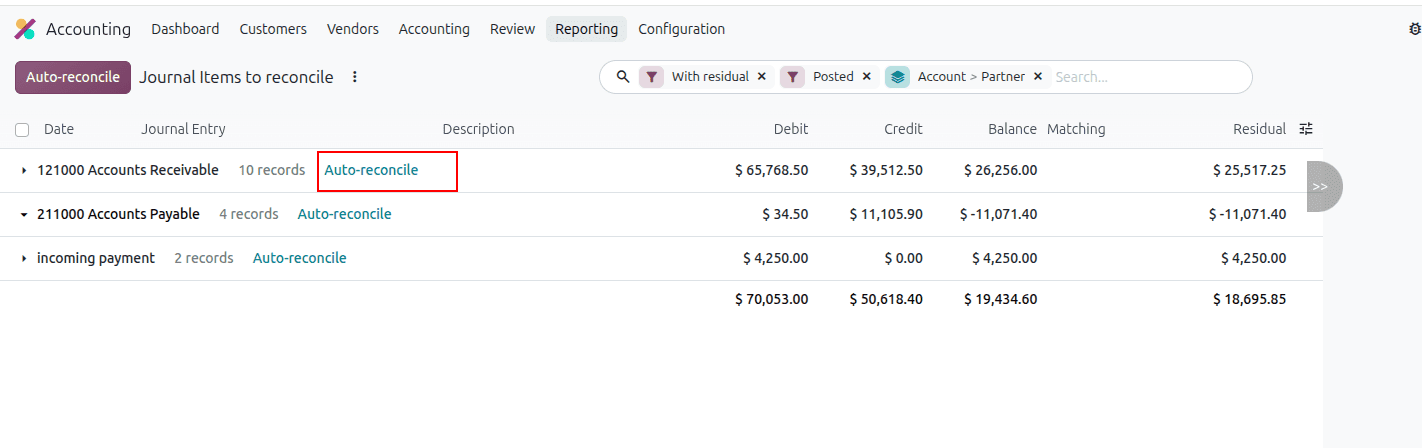
We created three invoices for the customer Jeffrey Kelly: INV/2026/00013 for $1,397.00, INV/2026/00014 for $1,250.00, and INV/2026/00015 for $353.00. Together they total $3,000.00. We then recorded a single payment of $3,000.00 from Accounting > Customers > Payments, which Odoo numbered PBNK1/2026/00003 and labelled Manual Payment. Because the payment was created from the Payments menu and not from the Pay button on an invoice, Odoo has not linked it to any of the three invoices. All four items therefore stay open on the Journal Items to reconcile screen, and the invoices still show their full Amount Due.
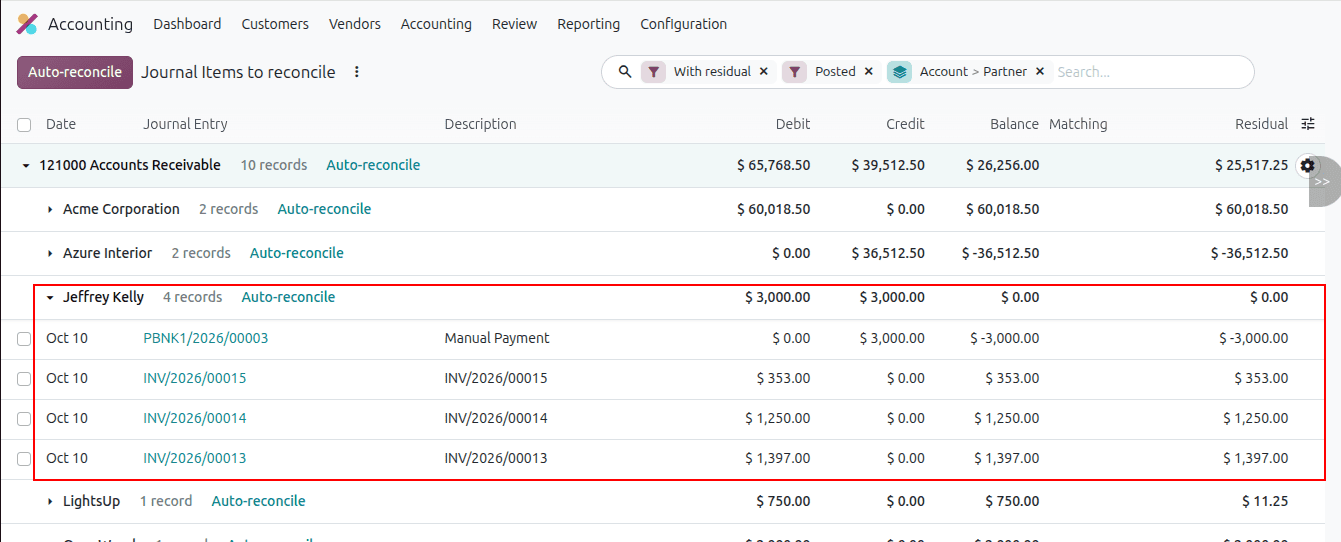
Clicking the Auto-reconcile link next to Jeffrey Kelly opens this wizard.
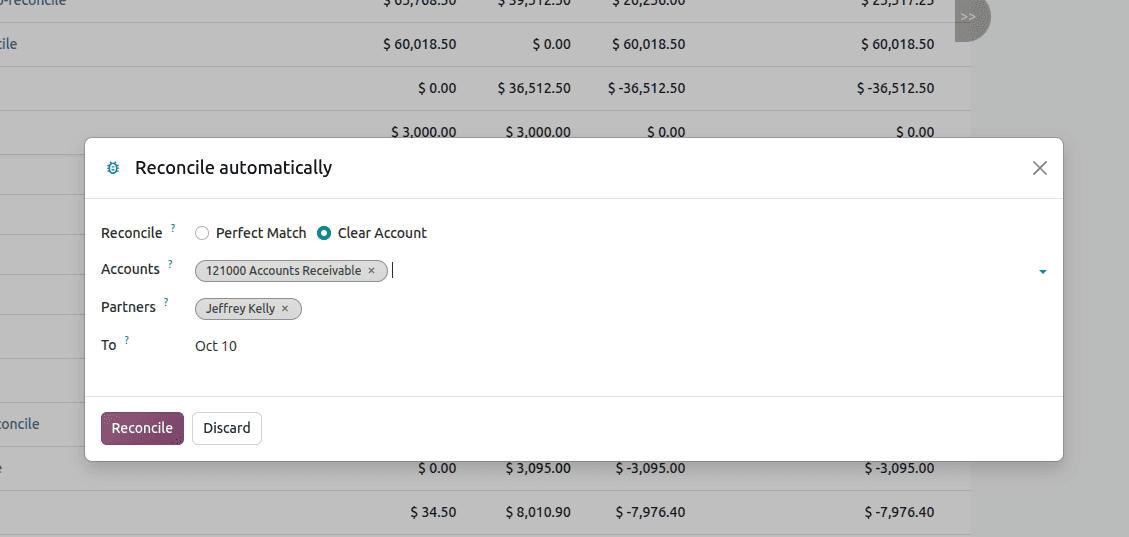
- Perfect Match pairs one debit with one credit of the same amount. For example, an invoice of $1,250.00 with a payment of exactly $1,250.00.
- Clear Account takes all the open items of the selected account and partner and reconciles them together when their total balance is zero.
Clear Account is selected, which is the right choice for our example. Jeffrey Kelly has one payment of $3,000.00 and three invoices of $1,397.00, $1,250.00, and $353.00. No single invoice equals the payment, so Perfect Match would find no pair. The four items add up to zero, though, so Clear Account matches them all in one go.
Click Reconcile to run the matching. Odoo reconciles the payment and the three invoices together, and they drop out of the Journal Items to reconcile list. Click Discard to close the wizard and change nothing.
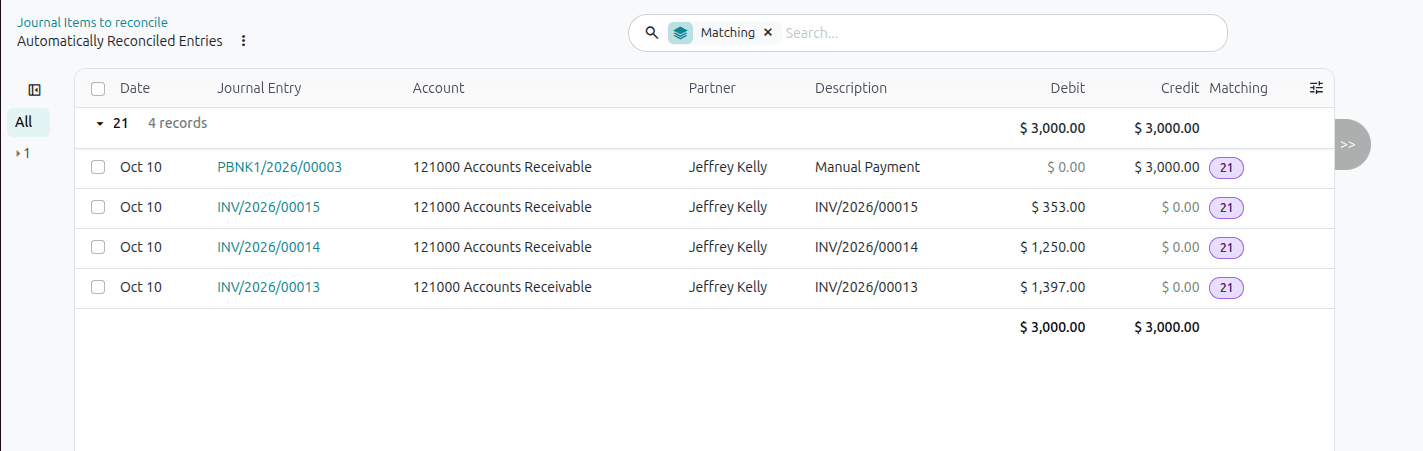
Automatically Reconciled Entries appears after you click Reconcile in the wizard. It shows what Odoo just matched for Jeffrey Kelly. The four items from the earlier screen are listed here: the payment PBNK1/2026/00003 for $3,000.00 as a credit and the three invoices INV/2026/00015 ($353.00), INV/2026/00014 ($1,250.00), and INV/2026/00013 ($1,397.00) as debits. All four sit on 121000 Accounts Receivable, and the totals at the bottom are equal: $3,000.00 in debit and $3,000.00 in credit, so nothing is left open.
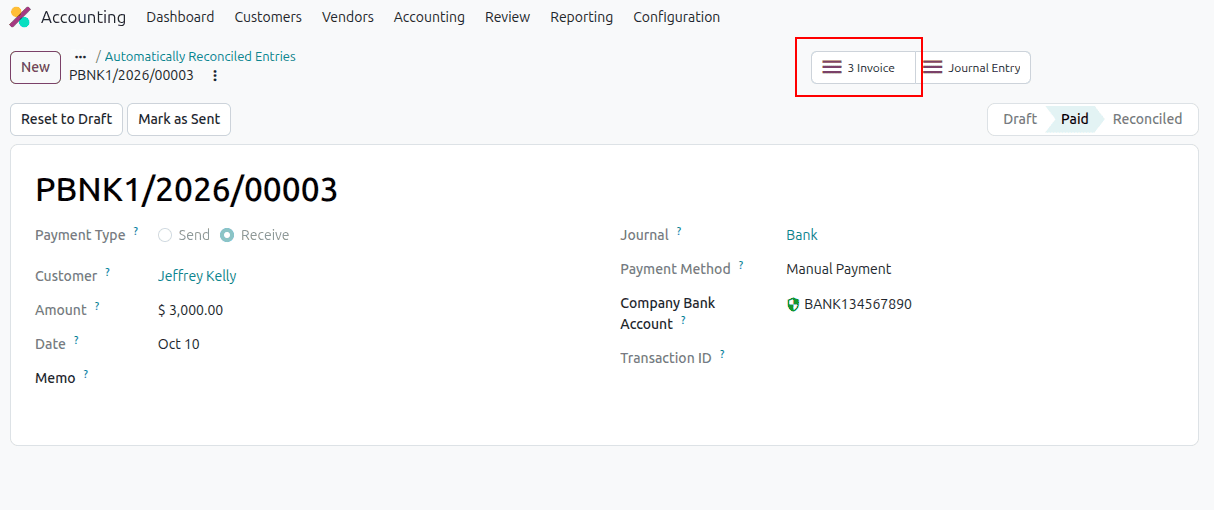
When we open the payment, we can see a smart tab named "3 Invoices" at the top. It shows that the payment of $3,000.00 is now reconciled with three invoices. Click it to see the three invoices, INV/2026/00013, INV/2026/00014, and INV/2026/00015. This confirms that the auto-reconcile linked one payment to all three invoices in a single step.
Partial Reconciliation
Partial reconciliation means matching a payment with only a part of an invoice. For example, if an invoice is 1,000 and the customer pays 600, Odoo matches that 600 with the invoice and keeps the remaining 400 open. The invoice shows as “Partial” until the rest is paid. This helps you see clearly how much is paid and how much is still pending.
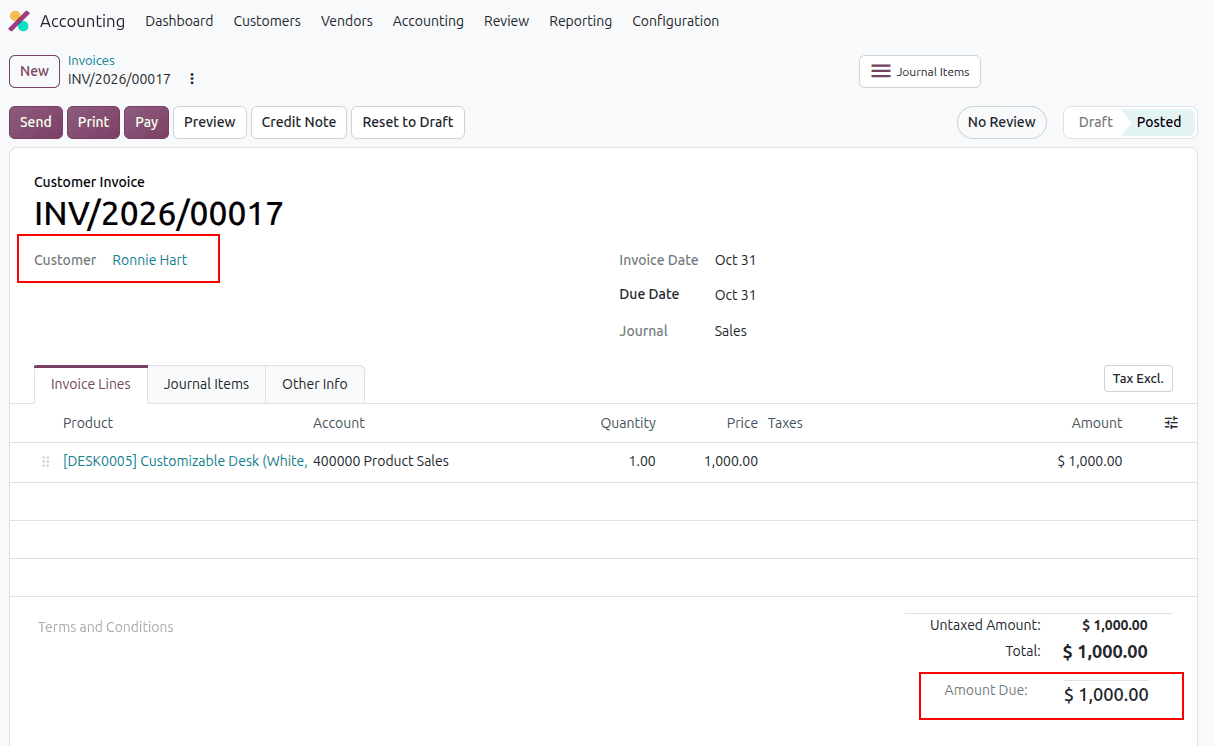
The invoice is posted for customer Ronnie Hart with a total amount of $1,000, which is still unpaid.
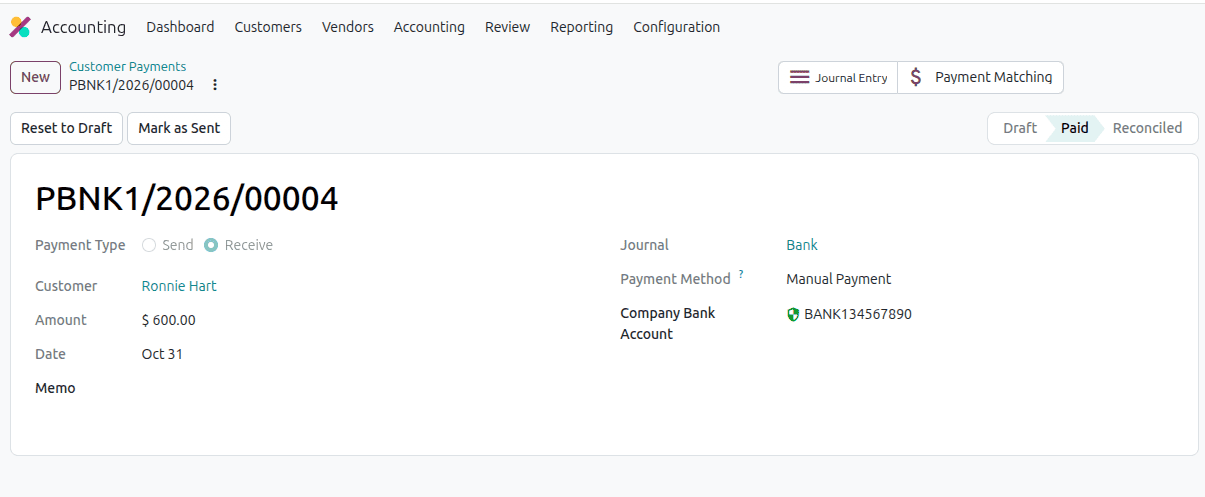
This is a customer payment of $600 received from Ronnie Hart in the bank journal. Its status is paid but not yet reconciled, so it isn’t matched with any invoice. Open Accounting > Accounting > Closing > Reconcile.
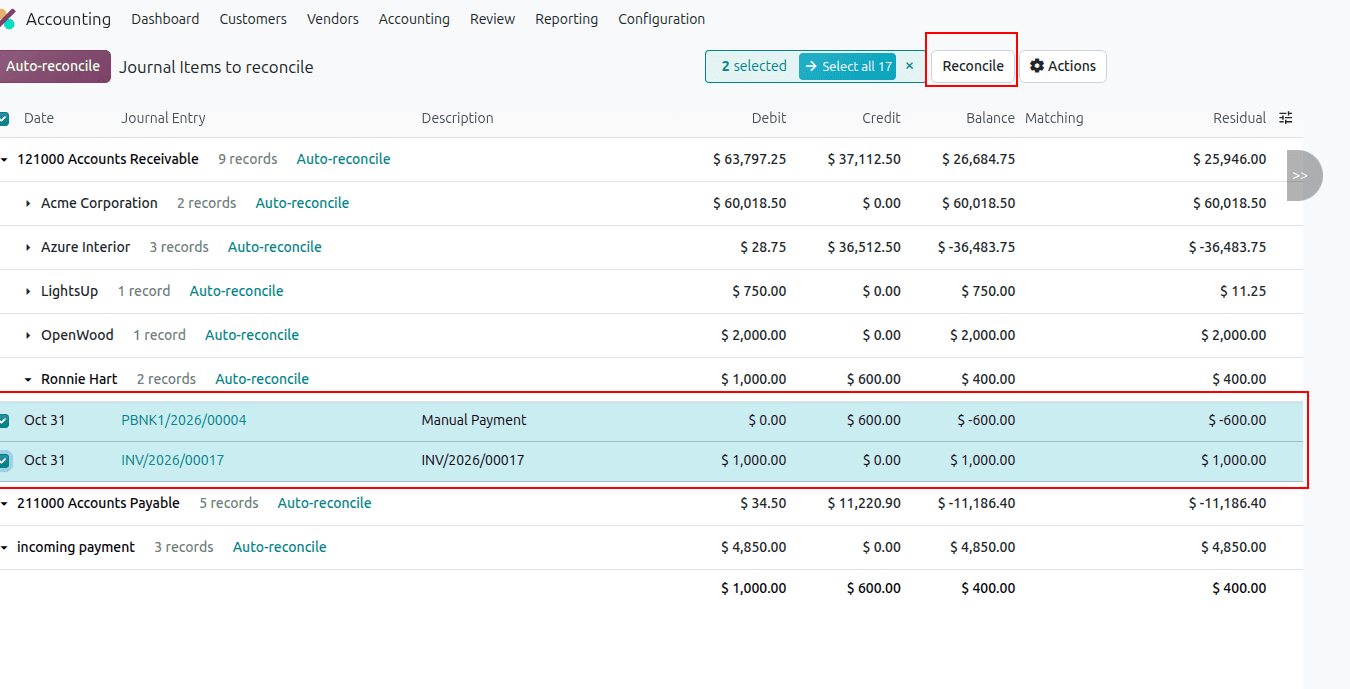
Under Ronnie Hart’s account (121000 Accounts Receivable), two lines are selected: the payment PBNK1/2026/00004 for $600 (credit) and the invoice INV/2026/00017 for $1,000 (debit). The selection shows a balance of $400, which is the amount that will stay unpaid. When you click the Reconcile button, Odoo matches the $600 payment with the invoice. The invoice then becomes partial, with $400 still due, and that remaining amount can be matched later when the customer pays the rest.
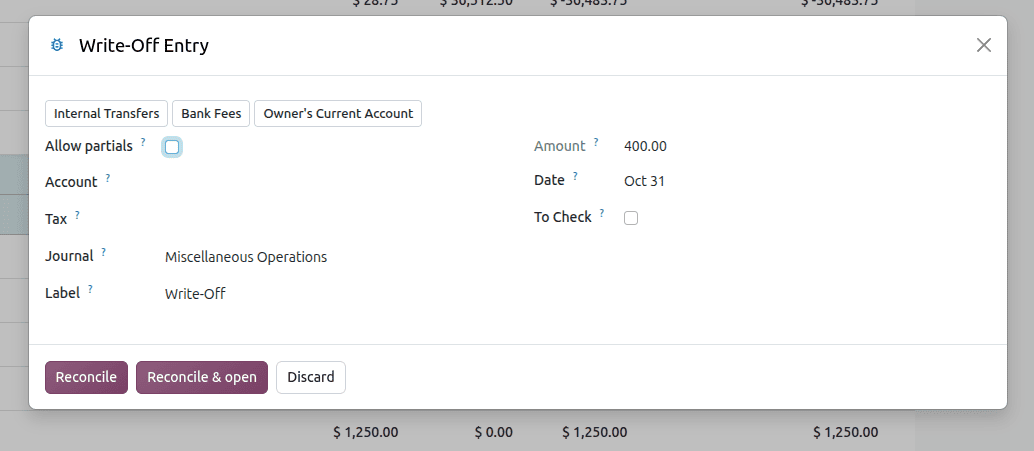
This is the same Write-Off Entry pop-up, but with Allow partials unticked, so Odoo shows the full write-off form for the $400 difference. It asks you to choose an account where the $400 will be booked (like bank fees), with the entry going in the Miscellaneous Operations journal and labelled "Write-Off". If you fill this in and click Reconcile, the $400 is written off and the invoice becomes fully paid, so the remaining amount is gone. If you want the invoice to stay Partial with $400 still due, tick Allow partials instead, leave the account empty, and then click Reconcile.
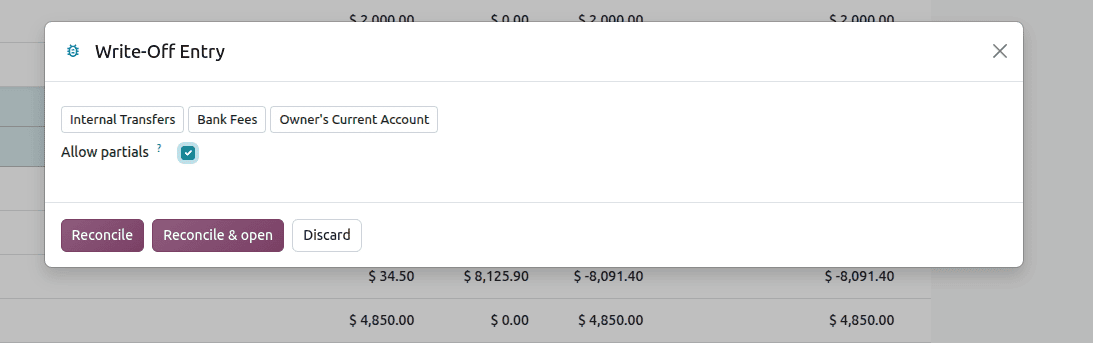
With the 'Allow partials' ticked, the write-off fields (Account, Tax, Journal, Label) disappear, which means Odoo will not write off anything. Instead, it will match only the $600 payment with the invoice and leave the remaining $400 open. You don’t need to pick an account or click any of the write-off buttons. Just click Reconcile, and the invoice will change to Partial with $400 still due, ready to be matched with the next payment.
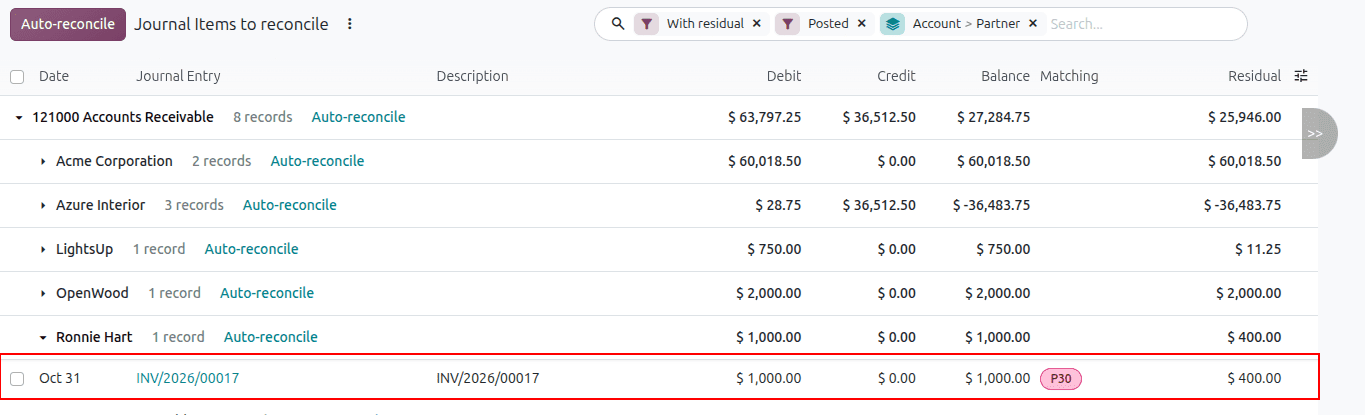
The invoice INV/2026/00017 ($1,000) is still listed with a residual of $400 because only $600 has been matched so far. The pink P30 tag marks that partial match, and once the remaining $400 is paid and reconciled, the invoice will be fully paid.
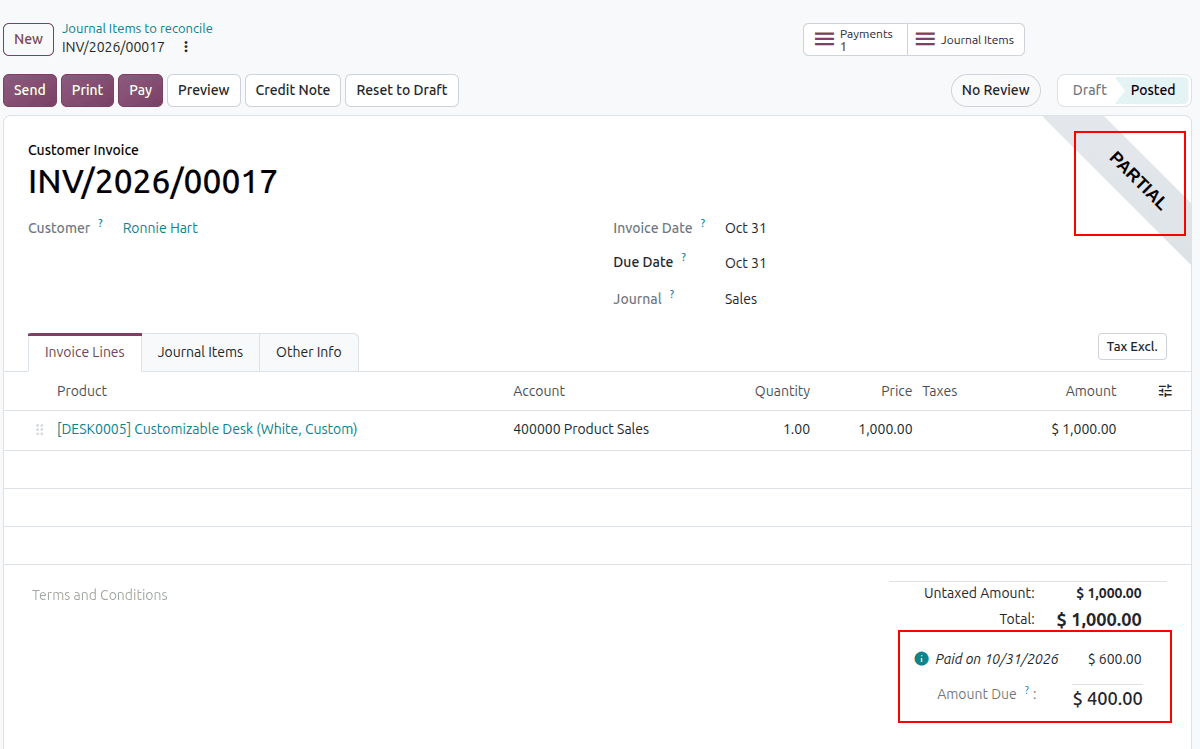
Invoice INV/2026/00017 for Ronnie Hart now shows a PARTIAL ribbon in the corner. At the bottom, it shows $600 as paid on 10/31/2026 and an amount due of $400, so the partial reconciliation worked, and the invoice will become paid once the remaining $400 is received and matched.
In Odoo 20, reconciliation helps you keep your books matched with your bank and your customer payments. The Bank Matching screen links each bank line to the right payment, and the Reconcile screen links payments to invoices. You can match items yourself (manual), let Odoo do it for you (auto-reconcile), or match only part of an invoice (partial). For a partial payment, keep the Allow partials ticked so the unpaid balance stays open and the invoice shows as Partial. Write off the balance only when you are sure it will not be collected. Together, these tools show clearly what is paid, what is still due, and which payment settled which invoice, and they save a lot of time at month-end.
To read more about How to Manage Batch Payments and Reconciliations in Odoo 19, refer to our blog, How to Manage Batch Payments and Reconciliations in Odoo 19.