There are many situations in Odoo development in which additional data needs to be provided before performing an action. Situations could include applying a discount to a sales order, confirmation of a stock transfer, reporting, import of records, or processing of records at once.
Instead of having additional and permanent records or adding unnecessary fields in existing forms, Odoo provides a concept called Wizards.
Wizards are pop-up dialogs that help in data entry, data preview, and data manipulation. These are mostly generated in Odoo using a model.TransientModel, and they store temporary records that are automatically handled by Odoo.
In this blog post, we will look into wizard generation and management in Odoo 20. We will be going through the new access security architecture using ir.access, form view, window action, context variables, and transient record management settings.
1. What Is a Wizard in Odoo 20?
A wizard is an interactive dialog box that facilitates the user in performing a specific operation. It takes some temporary data and makes use of it to perform any action.
Let’s suppose a scenario where a discount is to be applied to a sales order by a sales manager. Rather than creating new fields on the sales order form, we can design a wizard to ask for the discount value from the user.
When the task is done, the wizard can be closed, and its temporary data can be automatically deleted after some time.
How Does a Wizard Work?
A Wizard is an interactive dialog box that helps the user perform a particular task. It collects some temporary data and uses that data to perform some action.
For example, let us consider a case where a sales manager wants to apply some discount on a sales order. In such a case, instead of adding more fields to the sales order form, one can create a wizard to ask for the discount value from the user.
After the task is completed, the wizard can be closed, and its temporary data can be removed after some time.
Workflow of Odoo Wizard in General
The workflow of an Odoo Wizard includes four basic steps:
- Step 1 - Create a transient model to store temporary user data.
- Step 2 - Create a form view for showing wizard fields.
- Step 3 - Create an action for opening the wizard dialog box.
- Step 4 - Implement the button method to process the information.
2. Understanding models.TransientModel in Odoo 20
There are various types of models in Odoo used to manage application data. There are two most popular models used as follows:
- models.Model: Used for business objects.
- models.TransientModel: Used for transient objects, usually wizards.
Transient models work like other ORM models when accessing the database, but there are some exceptions when dealing with transient objects.
Properties of TransientModel
- Management of Temporary Data
These records are created through models.TransientModel are saved in the database table, but these records are not intended to be saved permanently. Odoo automatically removes these transient records after some time.
- Automatic Management of Records
Odoo makes use of the transient vacuum to remove the expired records as well as control the number of temporary records kept in the database.
- Access of Records According to the User
Transient models possess certain characteristics for accessing the records. Users can access only those records that belong to them, but they cannot access other users' records.
These transient models can have fields like Many2one and Many2many for interaction with normal business models.
However, the normal model is not supposed to refer to the transient model using the Many2one relationship.
Creating a Transient Model
Now, let’s work on the Sales Discount Wizard.
To start with, create a folder for the Wizard in your custom module.
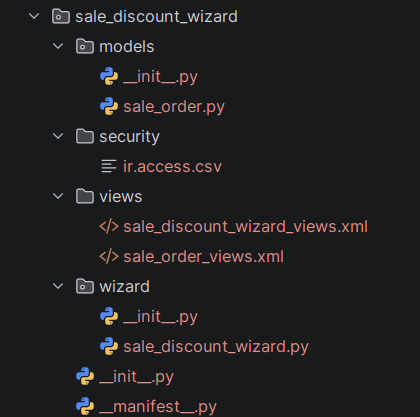
Now, define the transient model.
wizard/sale_discount_wizard.py
from odoo import models, fields, api, _
from odoo.exceptions import ValidationError

class SaleDiscountWizard(models.TransientModel):
    _name = 'sale.discount.wizard'
    _description = 'Sales Discount Wizard'
    order_id = fields.Many2one('sale.order',string='Sales Order',
        required=True)
    discount_percent = fields.Float(string='Discount (%)',
        required=True,default=10.0)
    reason = fields.Char(string='Discount Reason')
    def action_apply_discount(self):
        self.ensure_one()
        if not self.order_id:
            raise ValidationError(
                _("Please select a sales order."))
        if not 0 <= self.discount_percent <= 100:
            raise ValidationError(
                _("Discount must be between 0 and 100.")
            )
        order_lines = self.order_id.order_line.filtered(
            lambda line: not line.display_type)
        if not order_lines:
            raise ValidationError(
                _("There are no order lines to update."))
        order_lines.write({
            'discount': self.discount_percent
        })
        return {'type': 'ir.actions.act_window_close'}
Here, the model extends models.TransientModel and not models.Model.
The order_id will link the wizard to the sales order, while discount_percent and reason store the input made by the user.
The action_apply_discount() method will validate and apply the discount on the sales order lines.
3. Configuring Access Rights for Wizards Using ir.access in Odoo 20
Security settings are among the critical components of Odoo development.
With Odoo 20, there has been a restructuring in the security framework. The old method of ir.model.access and ir.rule has been upgraded to ir.access.
This means that Odoo 20 is now adopting a security/ir.access.csv method, as opposed to security/ir.model.access.csv.
The new CSV method is as follows:
id,name,model_id,group_id/id,operation,domain
The critical fields are as follows:
- id: Unique ID outside.
- name: Description of the access item.
- model_id: Model ID.
- group_id/id: Security group ID.
- operation: Access permission with CRUD.
- domain: Domain limitation, optional.
Adding Access Rights for the Wizard
An example of an Access entry for the sales discount wizard is:
security/ir.access.csv
id,name,model_id,group_id/id,operation,domain
access_sale_discount_wizard,access.sale.discount.wizard,sale.discount.wizard,base.group_user,crud,
This access entry provides the right to create, read, write, and delete for the internal user group of the model.
TransientModel is also provided with an individual ownership access mechanism. The access entry should be created depending on the target user group and validated with the transient access entries of the model.
Odoo 20 is different from the other versions of Odoo because there is no need for ir.model.access.csv.
4. Creating a Form View for the Wizard
Once we make the Transient Model, we now move on to Form View creation.
Wizard form views are like other form views of Odoo, but the difference is that wizard form views usually contain a footer with buttons for execution and cancellation of operations.
The following XML code is to be created:
views/sale_discount_wizard_views.xml
<?xml version="1.0" encoding="UTF-8"?>
<odoo>
    <record id="view_sale_discount_wizard_form" model="ir.ui.view">
        <field name="name">sale.discount.wizard.form</field>
        <field name="model">sale.discount.wizard</field>
        <field name="arch" type="xml">
            <form string="Apply Discount">
                <group>
                    <field name="order_id"/>
                    <field name="discount_percent"/>
                    <field name="reason"/>
                </group>
                <footer>
                    <button name="action_apply_discount"
                            string="Apply Discount"
                            type="object"
                            class="btn-primary"/>
                    <button string="Cancel"
                            special="cancel"
                            class="btn-secondary"/>
                </footer>
            </form>
        </field>
    </record>
</odoo>
Understanding the Footer Buttons
There are two buttons in the footer.
Apply Discount
<button name="action_apply_discount"
        string="Apply Discount"
        type="object"
        class="btn-primary"/>
<button string="Cancel"
        special="cancel"/>
Type="object" attribute calls the method in Python specified by the name attribute.
Here, clicking the button that calls the method action_apply_discount().
The "Special="cancel" attribute does not call any method in Python and leaves the wizard.
This can be very handy when users want to cancel their actions.
5. Opening a Wizard Using ir.actions.act_window
After having the model and form view defined, it will need an action to fire off the wizard.
Wizards are normally fired off using the ir.actions.act_window module in Odoo.
The key point to take note of here is the “target=’new’” parameter.
Odoo will then display the form in a popup dialog box instead of navigating to the form page due to the “target=’new’” parameter.
Window Action Creation
Include the following in the wizard’s XML code:
<record id="action_sale_discount_wizard"
        model="ir.actions.act_window">
    <field name="name">Apply Discount</field>
    <field name="res_model">sale.discount.wizard</field>
    <field name="view_mode">form</field>
    <field name="view_id"
           ref="view_sale_discount_wizard_form"/>
    <field name="target">new</field>
</record>
These include:
- name: This is the name of the operation performed.
- res_model: This gives the transient model.
- view_mode: It gives the view to open.
- view_id: This gives the wizard form view.
- target: The wizard appears in a popup window when target = new.
Opening the Wizard from a Python Method
We can use the button on the Sales Order Form to open the wizard.
The code below should be inserted into the sale.order model:
def action_open_discount_wizard(self):
    self.ensure_one()
    return {
        'type': 'ir.actions.act_window',
        'name': 'Apply Discount',
        'res_model': 'sale.discount.wizard',
        'view_mode': 'form',
        'target': 'new',
        'context': {
            'default_order_id': self.id,
            'active_model': self._name,
            'active_id': self.id,
            'active_ids': self.ids,
        },
    }
The process will open the Discount Wizard and fill the sales order details based on the context provided.
The default_order_id field will automatically fill the sales order field every time the wizard is launched.
And the XML file is:
sale_order_views.xml
<?xml version="1.0" encoding="UTF-8"?>
<odoo>
    <record id="view_order_form_inherit_discount_wizard" model="ir.ui.view">
        <field name="name">sale.order.form.discount.wizard </field>
        <field name="model">sale.order</field>
        <field name="inherit_id" ref="sale.view_order_form"/>
        <field name="arch" type="xml">
            <xpath expr="//header" position="inside">
                <button name="action_open_discount_wizard"
                        string="Apply Discount"
                        type="object"
                        class="btn-secondary"/>
            </xpath>
        </field>
    </record>
</odoo>
6. Using binding_model_id to Launch Wizards from the Action Menu
Another useful trick may include adding the possibility of accessing the wizard from the Action menu in one specific model.
For example, there is a necessity to select several sales orders from the list view and to launch the wizard.
What is binding_model_id?
The ‘binding_model_id’ is what ties the window action to the model.
In this case:
<record id="action_sale_discount_wizard"
        model="ir.actions.act_window">
    <field name="name">Apply Discount</field>
    <field name="res_model">
        sale.discount.wizard
    </field>
    <field name="view_mode">form</field>
    <field name="view_id"
           ref="view_sale_discount_wizard_form"/>
    <field name="target">new</field>
    <field name="binding_model_id"
           ref="sale.model_sale_order"/>
    <field name="binding_view_types">list,form</field>
</record>
The action will be available from the menu through the Sales Order model.
The "binding_view_types" field will have the view types on which the action will appear.
In this case, the wizard will be available in both list and form views.
This method of adding an action is highly effective in batch operations, as users will be able to select multiple entries and launch the wizard.
7. Understanding active_id, active_ids, and active_model in Odoo 20
The context is an important part of the wizard generation process.
Whenever a wizard is generated from an existing Odoo record, the Odoo framework normally sends some information about the current record through the context:
There are three important context variables, and they are.
It contains the ID of the currently selected record.
Example:
active_id = self.env.context.get('active_id')If the wizard is launched through a sales order whose ID is 25, active_id would have the value 25.
Holds the IDs of the selected records.
active_ids = self.env.context.get('active_ids')In case the user selects three sales orders, then the context will be like:
active_ids = [25, 26, 27]
This is useful when doing bulk actions.
Contains the technical name of the model that the wizard has been called from.
For example:
active_model = self.env.context.get('active_model')The value that is obtained from a sale order will be:
active_model = 'sale.order'
Context Variables Usage Inside a Wizard
These variables can be used for the automatic retrieval of the selected data.
For instance:
@api.model
def default_get(self, fields_list):
    defaults = super().default_get(fields_list)
    if self.env.context.get('active_model') == 'sale.order':
        active_id = self.env.context.get('active_id')
        if active_id and 'order_id' in fields_list:
            defaults['order_id'] = active_id
    return defaults
The method automatically completes the sales order field once the wizard is invoked from the sales order.
8. Managing Transient Records and Automatic Cleanup
Automatic record deletion is another advantage of utilizing TransientModel.
The difference between the usual models lies in the fact that the records of transient models are supposed to exist in the database for a finite time period only.
There exists a vacuum function in Odoo that deletes the transient records automatically from the database.
There are two main parameters used for configuring the record deletion from the transient table:
--transient-age-limit
This determines how long the transient records will live in the database.
For example:
./odoo-bin --transient-age-limit=2
Here the age limit of the transient record would be set as two hours.
The age limit is usually one hour but this depends upon the Odoo version and server settings.
--osv-memory-count-limit
This determines the number of records that should be stored in the transient/old osv_memory table.
For example:
./odoo-bin --osv-memory-count-limit=500
Here the count limit of 500 records will be set for the transient tables.
When it is 0 that indicates that there is no limit to record count.
Following are some of the parameters that can be configured using the Odoo configuration file:
[options]
transient_age_limit = 2
osv_memory_count_limit = 500
Please note that this is a server-side parameter used for cleaning up and should not be confused with the count limit of a particular model record.
It is very important to remember that the clean-up process will be automatic and that a wizard record should never be treated as a permanent business record.
9. Why Should We Keep _log_access Enabled in Transient Models?
Another key aspect while designing transient models is access logging.
Odoo offers the _log_access property to keep track of the creation and modification of records.
The following four fields are available:
| Field | Purpose |
| create_uid | User who created the record |
| create_date | Record creation date |
| write_uid | User who last modified the record |
| write_date | Last modification date |
Such properties can be used for tracking the ownership of records and handling transient data.
Access logging needs to be turned on for transient models.
Odoo comes with access logging for transient models by default. Do not use:
_log_access = False
Creation metadata is significant when it comes to the framework's transient record ownership and cleanup policy.
Hence, it is suggested to keep the default _log_access setting unless there is some specific framework-related reason to change it.
10. Updating the Module Manifest
Once you have created the files for Python and XML, ensure that they are imported into the module manifest.
manifest.py
{
    'name': 'Sales Discount Wizard',
    'version': '20.0.1.0.0',
    'category': 'Sales',
    'summary': 'Apply discounts using a transient wizard',
    'depends': [
        'sale',
    ],
    'data': [
        'security/ir.access.csv',
        'views/sale_discount_wizard_views.xml',
        'views/sale_order_views.xml',
    ],
    'installable': True,
    'application': False,
}
11. Testing the Sales Discount Wizard
After updating the module, you can access the Sales application.
Choose an existing sales order and invoke the Discount Wizard using the defined button or the Action button.
It should contain the following fields:
- Sales Order
- Discount Percentage
- Discount Reason
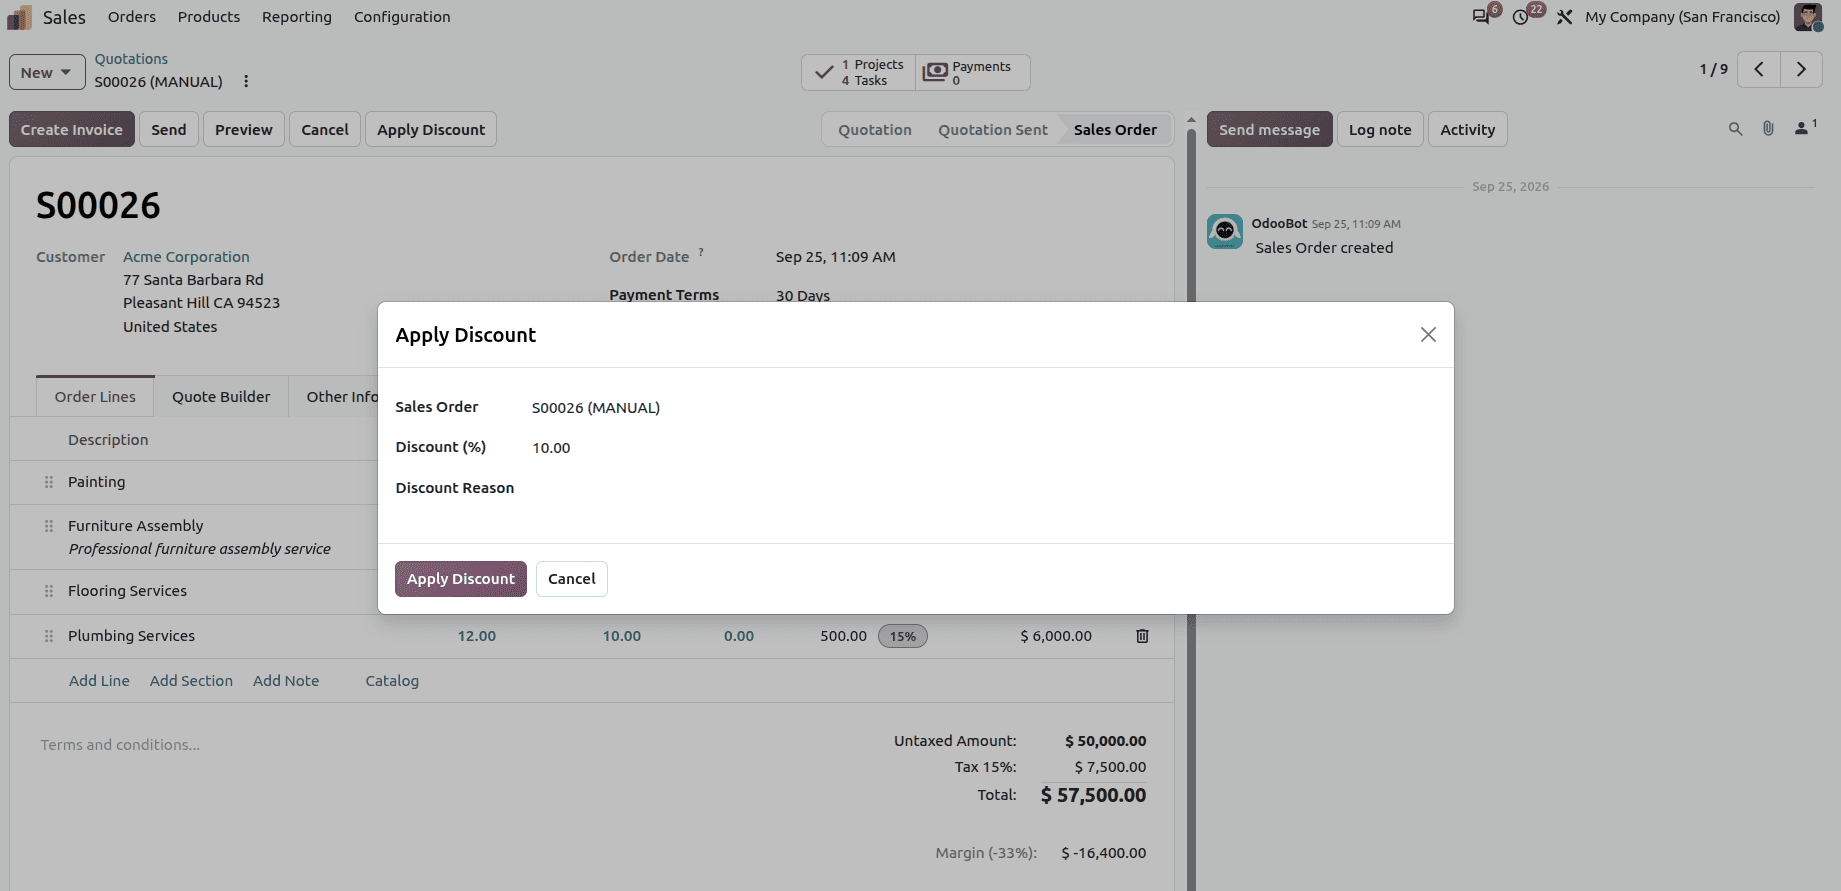
Define the discount percentage and press the Apply Discount button.
Odoo runs the Python function and applies the discount to the lines of the sales order.
On successful completion of the process, the popup window closes.
The Cancel button should close the popup without making any changes.
Wizards play an integral role in Odoo development, since they offer an easy way to automate intricate processes while enabling interactive collection of data from end-users. By implementing models.TransientModel, programmers will be able to work with transient records without increasing unnecessary amounts of persistent data about the business. The combination of transient models, forms, window actions, context, and ir.access the security mechanism from Odoo 20 is what helps create wizards.
It is equally important for developers to understand the cleanup of transient records, access control logs, and transient record ownership by the user.
It may include discounting, reporting, handling multiple records at once, or confirmation of some business processes.
To read more about A Complete Guide to Transient Model Wizards in Odoo 19, refer to our blog A Complete Guide to Transient Model Wizards in Odoo 19.