Reports are an integral part of any business management system. Whether it is invoices, sales orders, purchase orders, delivery slips, or financial statements, reports act as the primary communication tool between a company and its customers, vendors, or stakeholders. Odoo, being one of the most popular open-source ERP systems, provides a variety of standard reports by default in each of its modules. These reports are designed in a general way to suit most businesses. However, in practice, every organization has unique requirements when it comes to reporting. A company may want to add a tax registration number, include special terms and conditions, highlight a customer reference field, or even redesign the layout to match corporate branding.
This is where report customization in Odoo becomes significant. Odoo uses the QWeb reporting engine, which is flexible enough to adapt to almost any kind of modification. Developers can easily inherit existing report templates, extend them with new fields, change the design layout, or even create new headers and footers to reflect the company identity. With the release of Odoo 19, the structure remains very similar to earlier versions, but the framework has been refined, making it easier to work with reports while ensuring compatibility across modules.
In this blog, we will explore in detail how to customize existing reports in Odoo 19. We will walk through identifying the right report, inheriting templates, adding new fields, modifying layouts, and ensuring that the customized reports remain upgrade-safe.
Steps to Customize Existing Reports
In Odoo 19, most standard reports are built using QWeb, the XML-based templating system, in combination with Python and the Odoo ORM. These reports play a critical role in presenting transactional data in a structured way, whether it’s invoices, sales orders, purchase orders, or delivery notes.
Before diving into customization, it’s essential to recognize the three main building blocks behind any report:
- Models – Provide the actual data fields and logic that feed the report.
- Views – Decide how and where the data is accessed within the system.
- QWeb Templates – Define the structure, style, and layout of the printed report.
Having a clear picture of these elements helps you make precise and upgrade-safe changes.
Locating the Report to Modify
To modify a report, first enable Developer Mode, then go to Settings > Technical > Reports. From there, search for the report you want to customize. The record will display details such as the model (account.move) and the QWeb template (account.report_invoice_document).
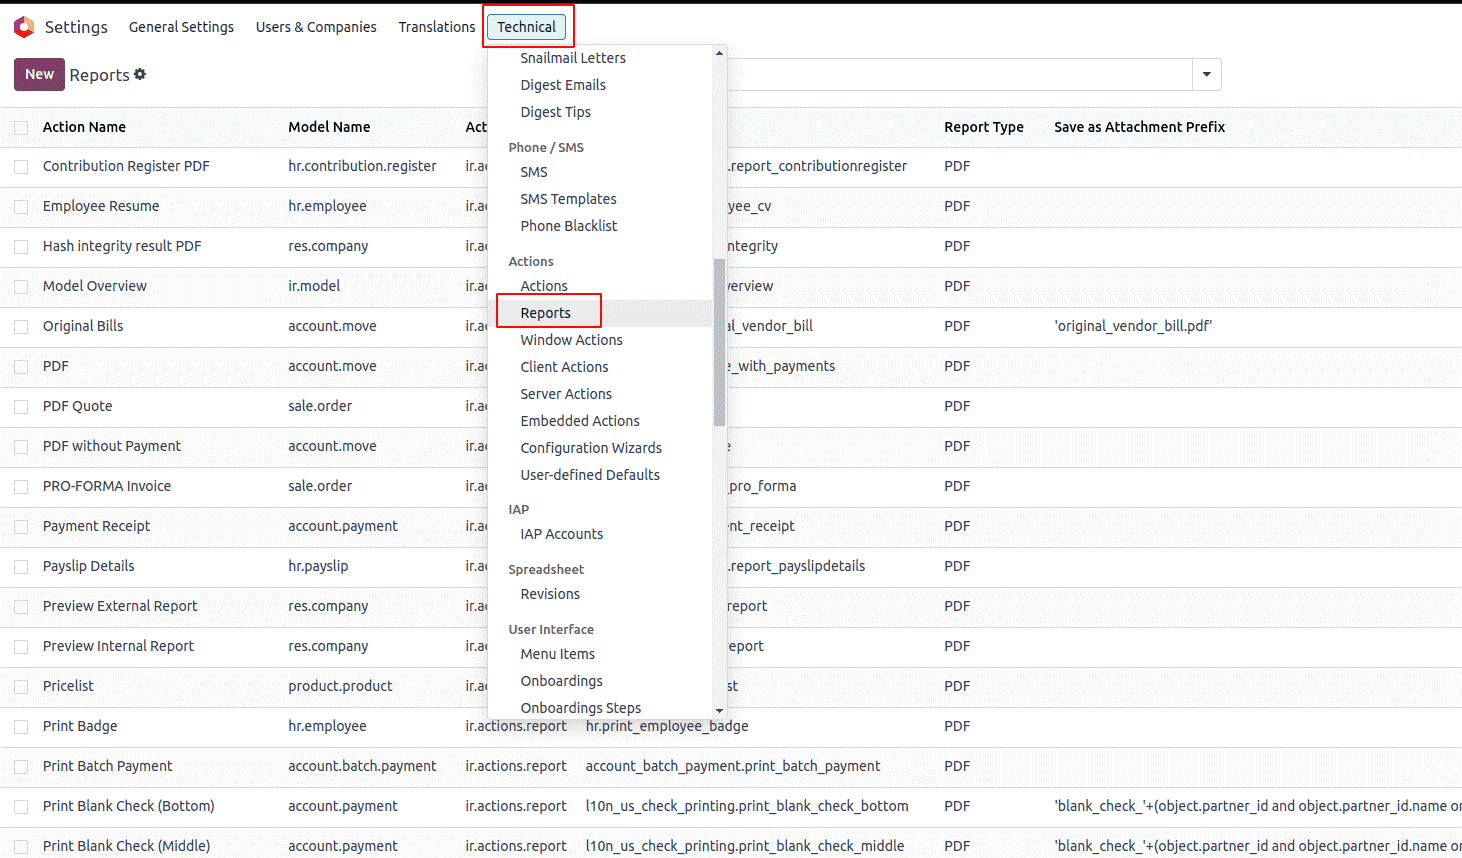
Once you know the exact template, you can target it for customization.
Extending and Updating the Report
Instead of editing the original files, the correct way to modify a report is to extend it inside your own custom module. This makes sure your changes remain intact during upgrades.
Step 1: Add a New Field to the Model
Suppose we want to include a Customer Code on invoices. Since this field does not exist by default, we first extend the res.partner model:
class ResPartner(models.Model):
    """Extend res.partner to store a customer code"""
    _inherit = 'res.partner'
    customer_code = fields.Char(
        string='Customer ID',
        help='Unique identification number for partners'
    )
This ensures that every customer record can store a unique identifier, which later becomes accessible in reports.
Step 2: Inherit the Report Template
Next, we need to adjust the invoice PDF template to display this field. We achieve this by inheriting the existing report and inserting our code using XPath:
<?xml version="1.0" encoding="utf-8"?>
<odoo>
    <!-- Inheriting the invoice PDF template to add customer code -->
    <template id="report_invoice_document" inherit_id="account.report_invoice_document">
        <xpath expr="//div[@name='address_same_as_shipping']//t[@t-set='address']" position="inside">
            <div t-if="o.partner_id.customer_code">
                Customer ID: <span t-out="o.partner_id.customer_code"/>
            </div>
        </xpath>
        <xpath expr="//div[@name='address_not_same_as_shipping']//t[@t-set='address']" position="inside">
            <div t-if="o.partner_id.customer_code">
                Customer ID: <span t-out="o.partner_id.customer_code"/>
            </div>
        </xpath>
        <xpath expr="//div[@name='no_shipping']//t[@t-set='address']" position="inside">
            <div t-if="o.partner_id.customer_code">
                Customer ID: <span t-out="o.partner_id.customer_code"/>
            </div>
        </xpath>
    </template>
</odoo>
Here, three different XPath expressions are used, because Odoo’s invoice template has multiple ways of displaying addresses:
- When the invoice and shipping address are the same.
- When the invoice and shipping address differ.
- When no shipping address is provided.
By adding the field in all three cases, we guarantee the Customer ID always appears correctly on the invoice.
Step 3: Testing the Customization
Once the module is installed and updated, generate a few invoices to confirm the new field is showing correctly. Always test:
- With customers who have a customer code.
- With customers without a code (to ensure the field doesn’t display empty labels).
- With different address setups (same shipping, different shipping, no shipping).
Thorough testing helps catch edge cases before the module is used in production.
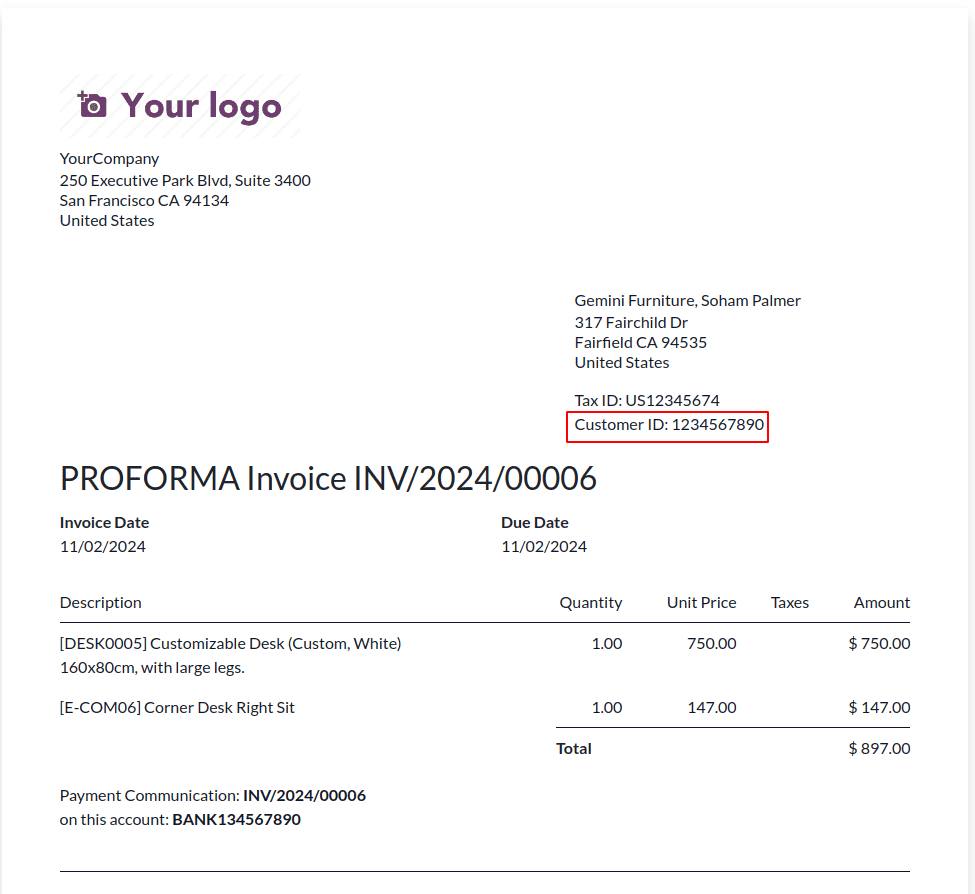
After applying these changes, whenever a user prints an invoice, the system automatically retrieves the customer’s unique code and displays it under the address section.
Conclusion
Customizing reports in Odoo 19 is a straightforward but powerful way to adapt the system to unique business requirements. By understanding the structure of Odoo reports, locating the correct templates, and extending them through custom modules, companies can add fields, adjust layouts, and improve the clarity of their documents. The example of adding a Customer Code to invoices demonstrates how even small modifications can make a big difference in daily operations. With proper use of XPath, conditional logic, and testing, businesses can ensure their reports remain accurate, professional, and aligned with their workflows. In the end, these customizations enhance both efficiency and the quality of communication with clients and partners.
To read more about How to Customize Existing Reports in Odoo 18, refer to our blog How to Customize Existing Reports in Odoo 18.