When working with Odoo, it is common to guide users through a new feature when they first open a particular screen. For example, when a user opens the Department list for the first time, we want to show a small panel explaining what they can do and provide a button to create their first department.
Odoo provides an onboarding framework for this purpose. The onboarding panel can contain a title, description, action button, and an option to close the panel. This blog explains how to integrate an onboarding panel into a list view in Odoo 18 with the help of a custom module.
What is an Onboarding Panel in Odoo 18?
An onboarding panel provides users with helpful guidance directly within an Odoo view. It can be used to introduce users to a feature or help them complete an initial setup. For example, we can display a panel in the Department list view with the following information:
Create a department to organize employees in your company. The panel can also contain a Create Department button. When the user clicks the button, Odoo opens the Department form view. In this blog, we will add the onboarding panel to the hr.department list view.
Creating the Module
First, create a custom module named department_onboarding_panel.
The basic module structure is:
department_onboarding_panel/
+-- __init__.py
+-- __manifest__.py
+-- controllers/
¦   +-- __init__.py
¦   +-- main.py
+-- data/
¦   +-- onboarding_data.xml
+-- models/
¦   +-- __init__.py
¦   +-- hr_department.py
¦   +-- onboarding_onboarding.py
+-- static/
¦   +-- src/
¦       +-- js/
¦       ¦   +-- department_onboarding_list.js
¦       +-- xml/
¦           +-- department_onboarding_list.xml
+-- views/
    +-- hr_department_views.xml
The module depends on the hr and onboarding modules.
Manifest File
Create the __manifest__.py file:
{
    "name": "Department Onboarding Panel",
    "version": "18.0.1.0.0",
    "category": "Human Resources",
    "summary": "Adds an onboarding panel to the Department list view",
    "depends": ["hr", "onboarding"],
    "data": [
        "data/onboarding_data.xml",
        "views/hr_department_views.xml",
    ],
    "assets": {
        "web.assets_backend": [
            "department_onboarding_panel/static/src/js/department_onboarding_list.js",
            "department_onboarding_panel/static/src/xml/department_onboarding_list.xml",
        ],
    },
    "installable": True,
    "application": False,
    "license": "LGPL-3",
}
Here, the onboarding module is added as a dependency because the onboarding models and templates are provided by it. The JavaScript and XML files are also added to the backend assets so they can be loaded when the Odoo web client starts.
Creating the Onboarding Data
Next, create data/onboarding_data.xml.
This file contains the definitions for both the onboarding step and onboarding record.
<?xml version="1.0" encoding="UTF-8"?>
<odoo>
    <record id="onboarding_department_step"
            model="onboarding.onboarding.step">
        <field name="title">
            Create your first department
        </field>
        <field name="description">
            Create a department to organize employees in your company.
        </field>
        <field name="button_text">
            Create Department
        </field>
        <field name="panel_step_open_action_name">
            action_open_department_step
        </field>
    </record>
    <record id="onboarding_department"
            model="onboarding.onboarding">
        <field name="name">Department Setup</field>
        <field name="route_name">
            department_onboarding_panel.department_onboarding_panel
        </field>
        <field name="panel_close_action_name">
            action_close_department_onboarding
        </field>
        <field name="step_ids"
               eval="[(4, ref('onboarding_department_step'))]"/>
    </record>
</odoo>
The onboarding.onboarding.step record contains the information displayed to the user. The title defines the heading of the onboarding step, while the description provides additional information. The button_text defines the text displayed on the action button. The panel_step_open_action_name points to the Python method that will be called when the user clicks the button.
The second record defines the main onboarding configuration. Its route_name points to the controller route that will provide the onboarding panel to the list view. The panel_close_action_name is used when the user closes the onboarding panel.
Adding the Department Action
The onboarding button needs an action to perform when it is clicked.
Create models/hr_department.py:
from odoo import api, models

class OnboardingStep(models.Model):
    _inherit = 'onboarding.onboarding.step'
    @api.model
    def action_open_department_step(self):
        """Open the department creation form view."""
        return {
            'type': 'ir.actions.act_window',
            'name': 'Create Department',
            'res_model': 'hr.department',
            'view_mode': 'form',
            'views': [(False, 'form')],
            'target': 'current',
            'context': {},
        }
Here, we inherit the onboarding.onboarding.step model and define the action_open_department_step() method. When the Create Department button is clicked, this method returns an ir.actions.act_window action.
The action opens the hr.department form view, allowing the user to create a department directly from the onboarding panel.
Closing the Onboarding Panel
We also need a method to close the onboarding panel.
Create models/onboarding_onboarding.py:
from odoo import api, models

class DepartmentOnboarding(models.Model):
    _inherit = 'onboarding.onboarding'
    @api.model
    def action_close_department_onboarding(self):
        """Close the department onboarding panel for the current user/company."""
        onboarding = self.env.ref(
            'department_onboarding_panel.onboarding_department',
            raise_if_not_found=False,
        )
        if onboarding:
            onboarding.action_close()
The method gets the onboarding record using its external ID and calls action_close().
The @api.model decorator is used because this method is called without passing record IDs.
Creating the Controller
The onboarding panel needs to be requested from the server. For this, create controllers/main.py.
from odoo import http
from odoo.http import request

class DepartmentOnboardingController(http.Controller):
    @http.route("/onboarding/department", type="json", auth="user")
    def department_onboarding_panel(self):
        onboarding = request.env.ref(
            "department_onboarding_panel.onboarding_department"
        )
        onboarding._search_or_create_progress()
        if onboarding.is_onboarding_closed:
            return {"html": None}
        values = onboarding._prepare_rendering_values()
        state = values.get("state", {})
        if isinstance(state, dict) and state.get("onboarding_state") == "done":
            return {"html": None}
        html = request.env["ir.qweb"]._render(
            "onboarding.onboarding_panel",
            values
        )
        return {"html": str(html)}
The /onboarding/department route is called from the JavaScript code. First, the onboarding record is retrieved:
onboarding = request.env.ref(
    "department_onboarding_panel.onboarding_department"
)
The onboarding progress is then searched or created:
onboarding._search_or_create_progress()
Before returning the panel, we check whether the onboarding has already been closed.
if onboarding.is_onboarding_closed:
    return {"html": None}
We also check whether all onboarding steps have been completed:
if isinstance(state, dict) and state.get("onboarding_state") == "done":
    return {"html": None}
If the panel still needs to be displayed, _prepare_rendering_values() prepare the values required by the onboarding template. The standard Odoo onboarding template is then rendered:
html = request.env["ir.qweb"]._render(
    "onboarding.onboarding_panel",
    values
)
This is useful because the module does not need to recreate the complete onboarding panel HTML. It uses Odoo's existing onboarding.onboarding_panel template.
Connecting the Onboarding Panel to the List View
Now, we need to tell Odoo which list view should display the onboarding panel.
Create views/hr_department_views.xml:
<?xml version="1.0" encoding="UTF-8"?>
<odoo>
    <record id="view_department_list_onboarding"
            model="ir.ui.view">
        <field name="name">
            hr.department.list.onboarding
        </field>
        <field name="model">
            hr.department
        </field>
        <field name="inherit_id"
               ref="hr.view_department_tree"/>
        <field name="arch" type="xml">
            <xpath expr="//list" position="attributes">
                <attribute name="js_class">
                    department_onboarding_list
                </attribute>
            </xpath>
        </field>
    </record>
</odoo>
The important part here is:
<attribute name="js_class">
    department_onboarding_list
</attribute>
This connects the Department list view with the custom JavaScript view registered using the same name.
Creating the Custom List Controller
Next, create:
static/src/js/department_onboarding_list.js
The JavaScript extends Odoo's existing ListController.
/** @odoo-module **/
import { ListController } from "@web/views/list/list_controller";
import { listView } from "@web/views/list/list_view";
import { registry } from "@web/core/registry";
import { rpc } from "@web/core/network/rpc";
import { useActionLinks } from "@web/views/view_hook";
import { markup, onWillStart, useState } from "@odoo/owl";
export class DepartmentOnboardingListController extends ListController {
    static template =
        "department_onboarding_panel.DepartmentOnboardingList";
    setup() {
        super.setup();
        this.onboardingState = useState({ html: null });
        const defaultHandleActionLinks = useActionLinks({
            resModel: this.props.resModel,
            reload: () => this._refreshOnboarding(),
        });
        this.handleActionLinks = async (ev) => {
            let target = ev.target;
            if (target.tagName !== "A") {
                target = target.closest("a");
            }
            const isHideBanner =
                target && target.dataset.oHideBanner === "true";
            await defaultHandleActionLinks(ev);
            if (isHideBanner) {
                this.onboardingState.html = null;
            }
        };
        onWillStart(async () => {
            await this._refreshOnboarding();
        });
    }
    async _refreshOnboarding() {
        const data = await rpc("/onboarding/department");
        this.onboardingState.html =
            data?.html ? markup(data.html) : null;
    }
    get showOnboarding() {
        return Boolean(this.onboardingState.html);
    }
}
export const departmentOnboardingListView = {
    ...listView,
    Controller: DepartmentOnboardingListController,
};
registry.category("views").add(
    "department_onboarding_list",
    departmentOnboardingListView
);
The custom controller extends the normal Odoo ListController, so the existing list view behaviour remains available. The onboarding information is stored in:
this.onboardingState = useState({ html: null });When the list view starts, _refreshOnboarding() calls the controller route:
const data = await rpc("/onboarding/department");When the list view starts, _refreshOnboarding() calls the controller route:
const data = await rpc("/onboarding/department");The returned HTML is converted into Owl markup:
this.onboardingState.html =
    data?.html ? markup(data.html) : null;
The showOnboarding getter is then used to determine whether the panel should be displayed. The custom list view is registered using:
registry.category("views").add(
    "department_onboarding_list",
    departmentOnboardingListView
);
This name matches the js_class added to the Department list view.
Adding the Owl Template
The final part is to place the onboarding panel inside the list view.
Create:
static/src/xml/department_onboarding_list.xml
<?xml version="1.0" encoding="UTF-8"?>
<templates xml:space="preserve">
    <t t-name="department_onboarding_panel.DepartmentOnboardingList"
       t-inherit="web.ListView"
       t-inherit-mode="primary">
        <xpath expr="//t[@t-component='props.Renderer']"
               position="before">
            <div t-if="this.showOnboarding"
                 t-on-click="this.handleActionLinks">
                <t t-out="this.onboardingState.html"/>
            </div>
        </xpath>
    </t>
</templates>
The template inherits from the standard Odoo web.ListView. The onboarding panel is inserted before the list renderer:
<xpath expr="//t[@t-component='props.Renderer']"
       position="before">
The panel is displayed only when onboarding HTML is available:
<div t-if="this.showOnboarding"
     t-on-click="this.handleActionLinks">
The rendered onboarding HTML is then inserted with:
<t t-out="this.onboardingState.html"/>
The handleActionLinks function allows the action links inside the standard onboarding panel to work correctly.
Result
The Department list view displays the onboarding panel. The panel contains the configured title and description along with the Create Department button.
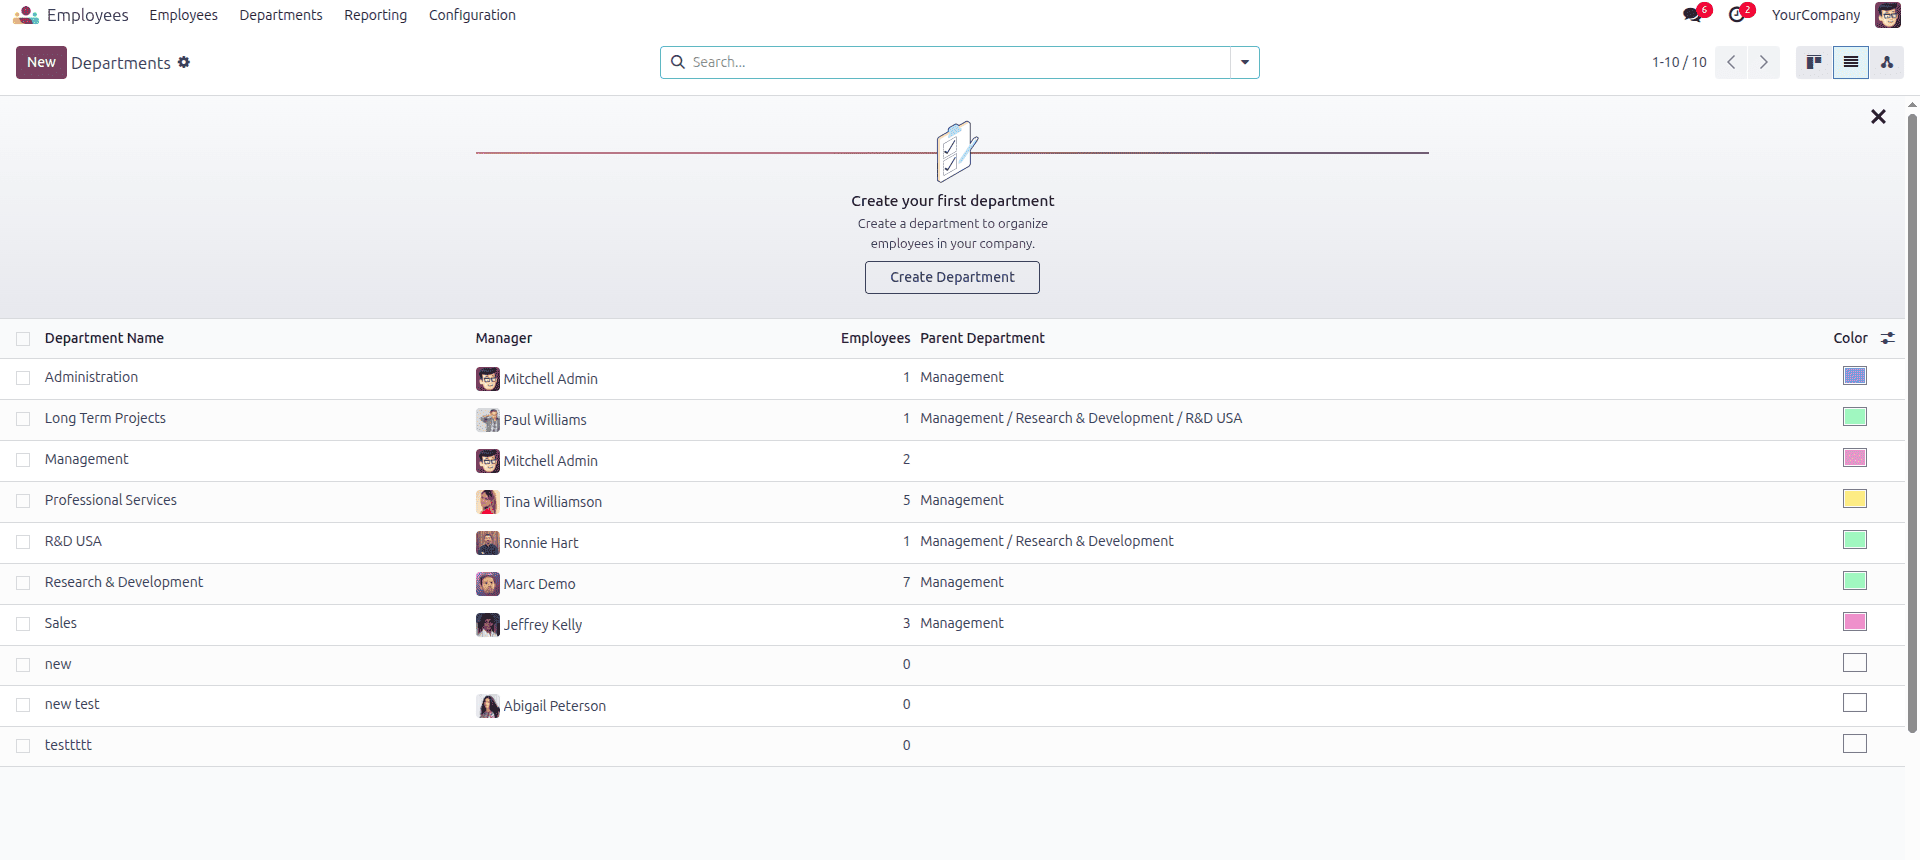
When the button is clicked, the action_open_department_step() method opens the Department form. The user can also close the onboarding panel. Once it is closed, the controller checks the onboarding state and prevents the panel from being displayed again for that onboarding progress.
Onboarding panels can help guide the user through the experience of using a new feature. Odoo 18 allows us to connect an onboarding configuration with a list view and is done by using the onboarding models, a controller route, a custom list controller, and an Owl template.
In the following example, a Department list has been enhanced with an onboarding panel that helps users create their first department. The onboarding panel takes advantage of using an Odoo standard onboarding template and relies on custom JavaScript triggering when to load and display the panel. The same logic can be applied to other list views where the user should go through a setup phase or learn about the functionality of the module.
To read more about How to Add an Onboarding Panel for List Views in Odoo 19, refer to our blog, How to Add an Onboarding Panel for List Views in Odoo 19.