Quality control plays a vital role in ensuring that manufacturing processes consistently deliver reliable and defect-free products. In Odoo 19 Manufacturing, quality checks are built directly into the production workflow, allowing businesses to monitor and control product quality at every stage. From raw material inspection to in-process validation and final product verification, Odoo provides flexible tools to define and automate quality control points. Users can create different types of checks, such as pass/fail tests, measurements, or visual inspections, tailored to specific operational needs. This integrated approach helps reduce errors, improve efficiency, and ensure compliance with industry standards. By using Odoo 19’s quality management features, manufacturers can proactively identify issues, take corrective actions, and maintain high levels of customer satisfaction while optimizing their overall production performance.
Firstly, open the Quality module from the Odoo 19 dashboard. Then, initiate the setup of your quality control processes.
Quality Control Points
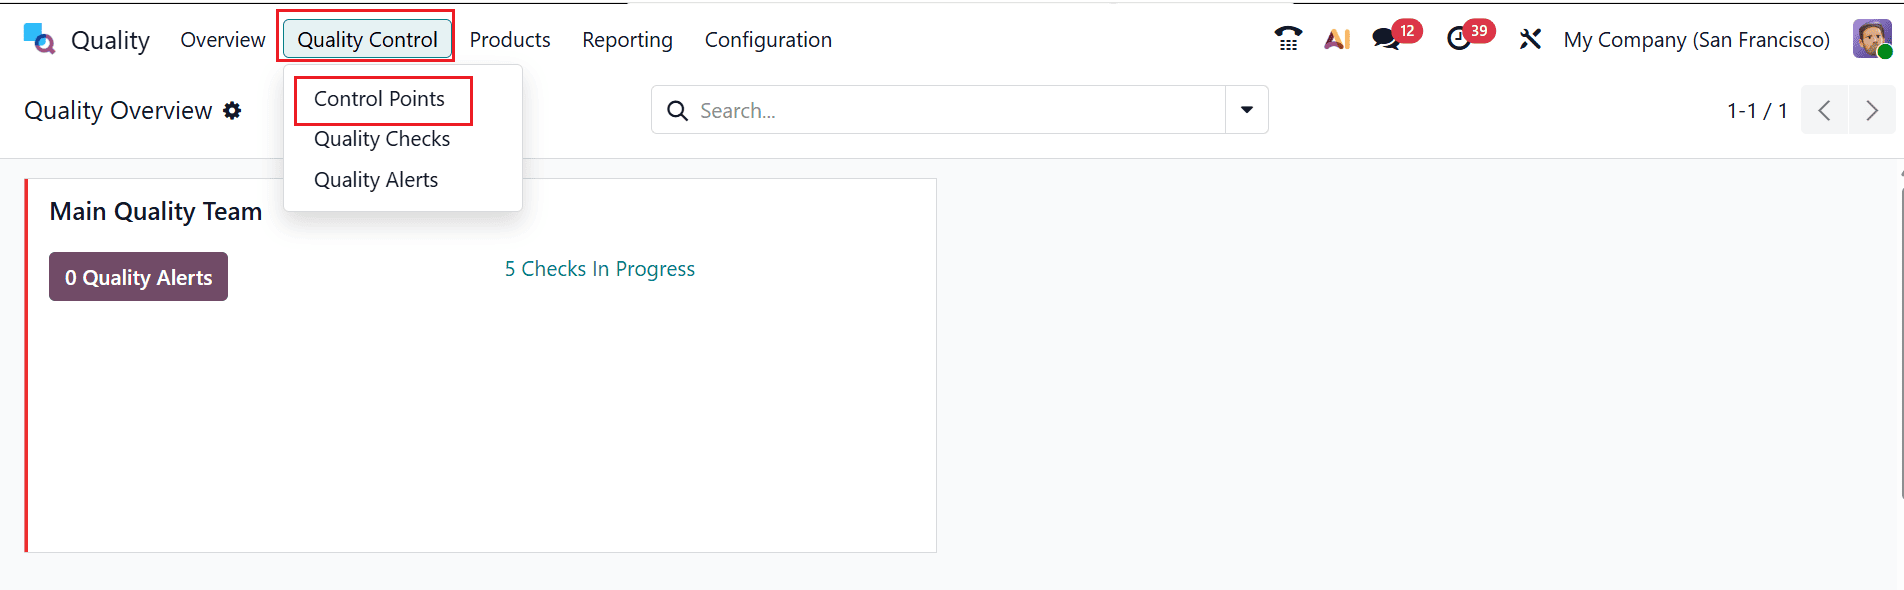
Quality control points are specific stages in a process where products are inspected to ensure they meet defined quality standards. They help detect defects early and maintain consistency throughout production or operations. To access the control points from the Quality module, navigate to Quality Control > Control Points as shown below:
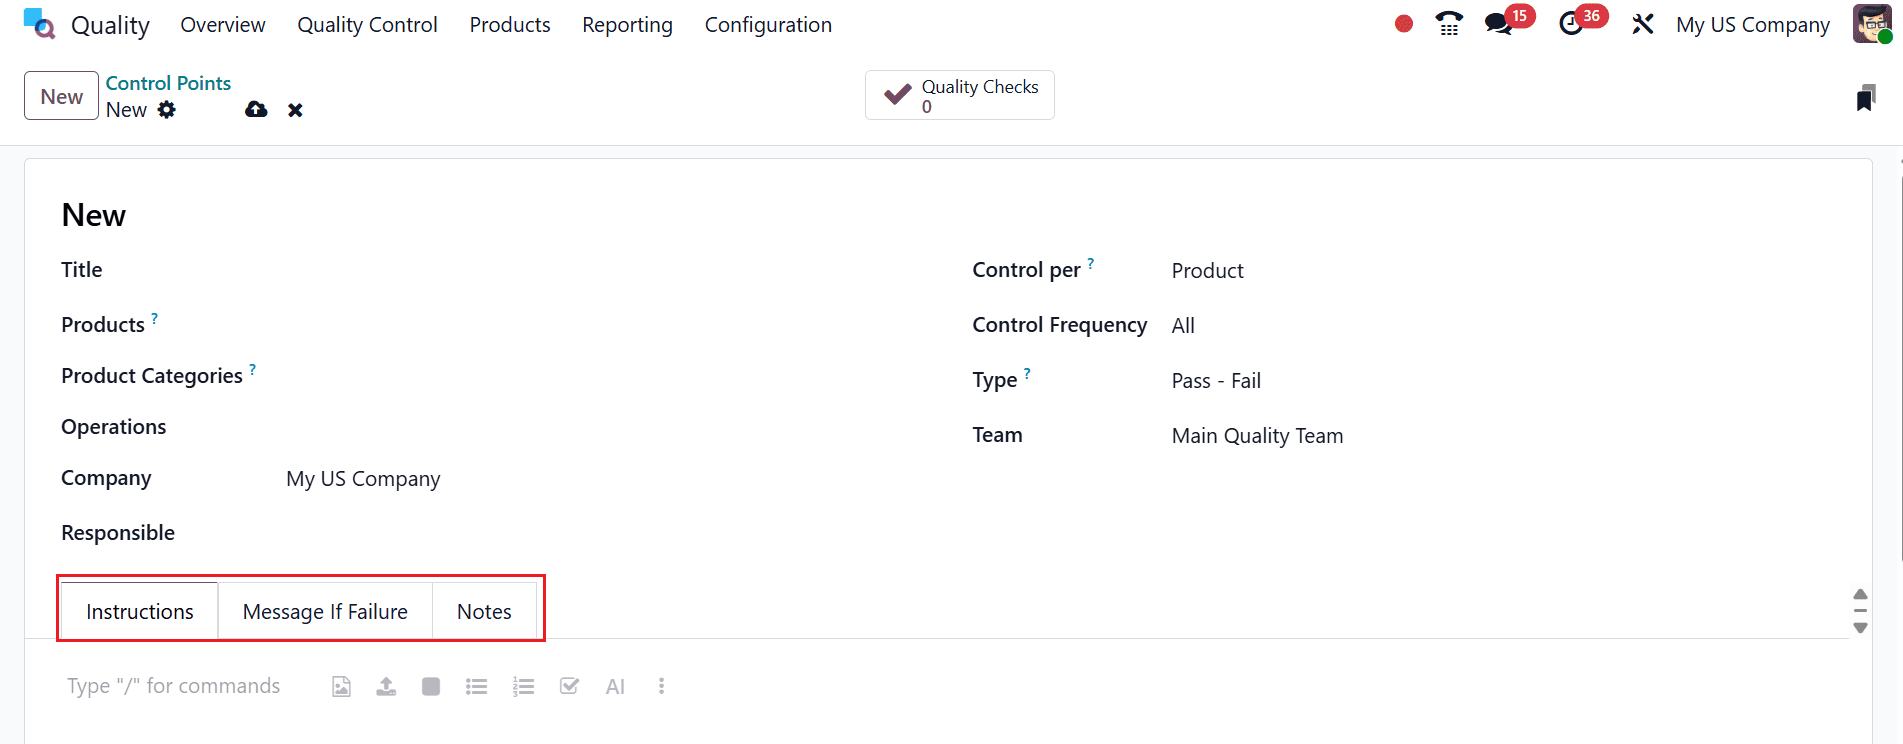
A new window will open as shown below. Add an appropriate title for the control point. You can set up checks at different levels—whether for individual products, entire product categories, or specific operations. You can also specify the company involved, assign the appropriate quality team, and designate a responsible person.
Here, you can see three tabs: Instructions, Message If Failure, and Notes. Under the Instructions tab, you can add guidelines to help users perform a quality check. Under the Message If Failure tab, you can add a warning or message displayed when a quality check fails. Under the Notes tab, add comments or details related to the quality check.
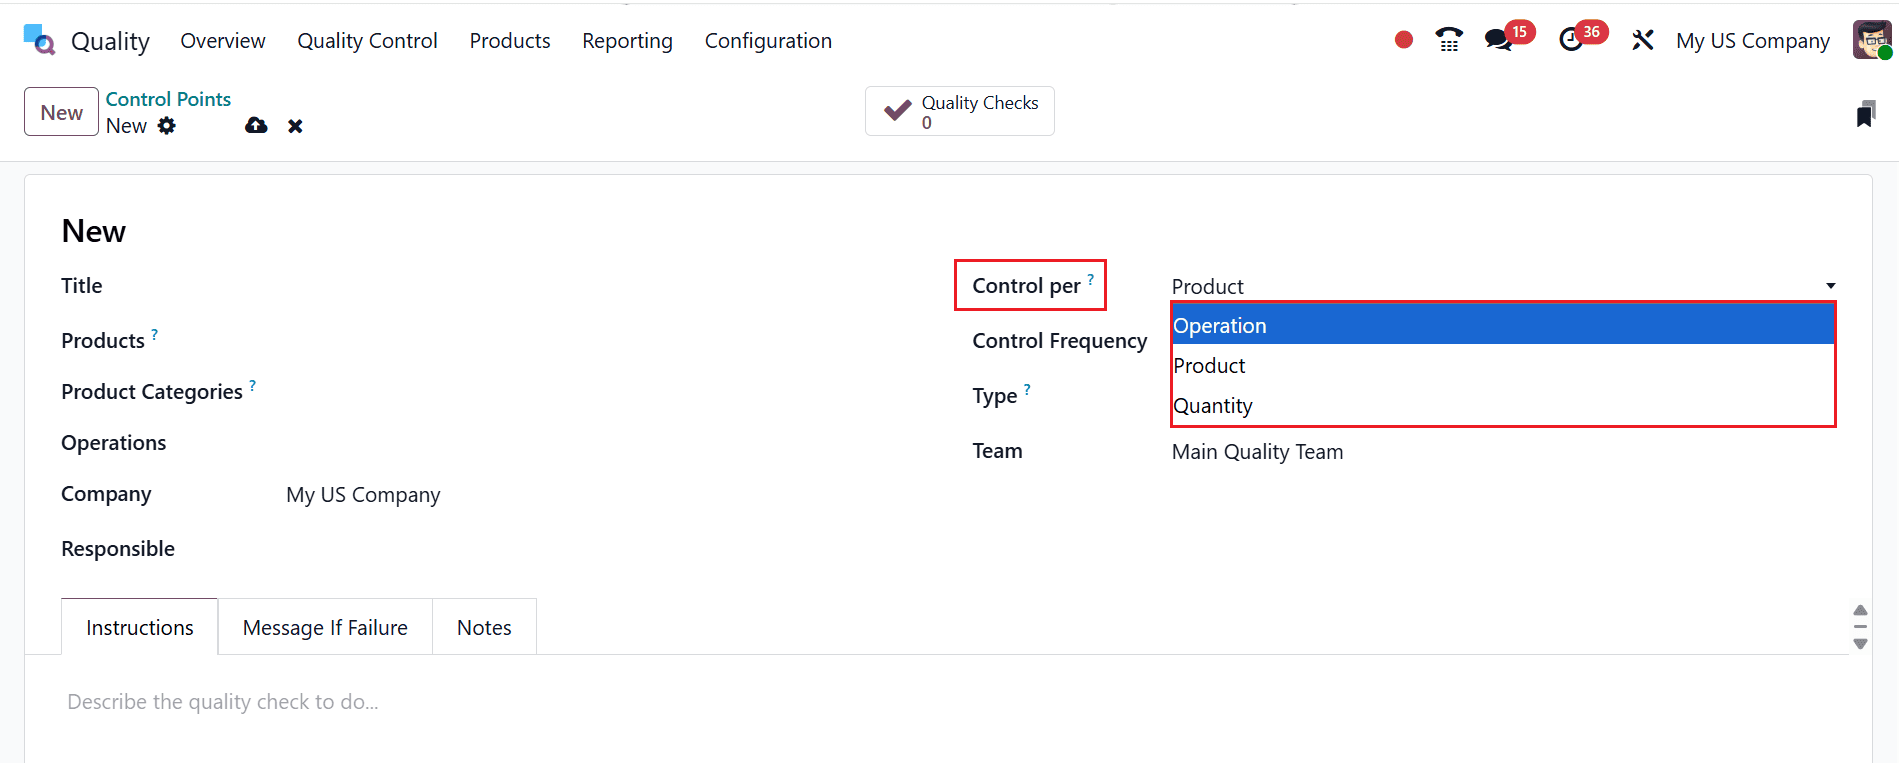
In the Control per field, you can configure the quality check based on Product, Operation, and Quantity. If the product is selected, the quality check applies to the specific item. When the operation is chosen, it determines at which stage the quality check is triggered. You can define how often a quality check is performed based on the number of units processed by selecting the quantity option.
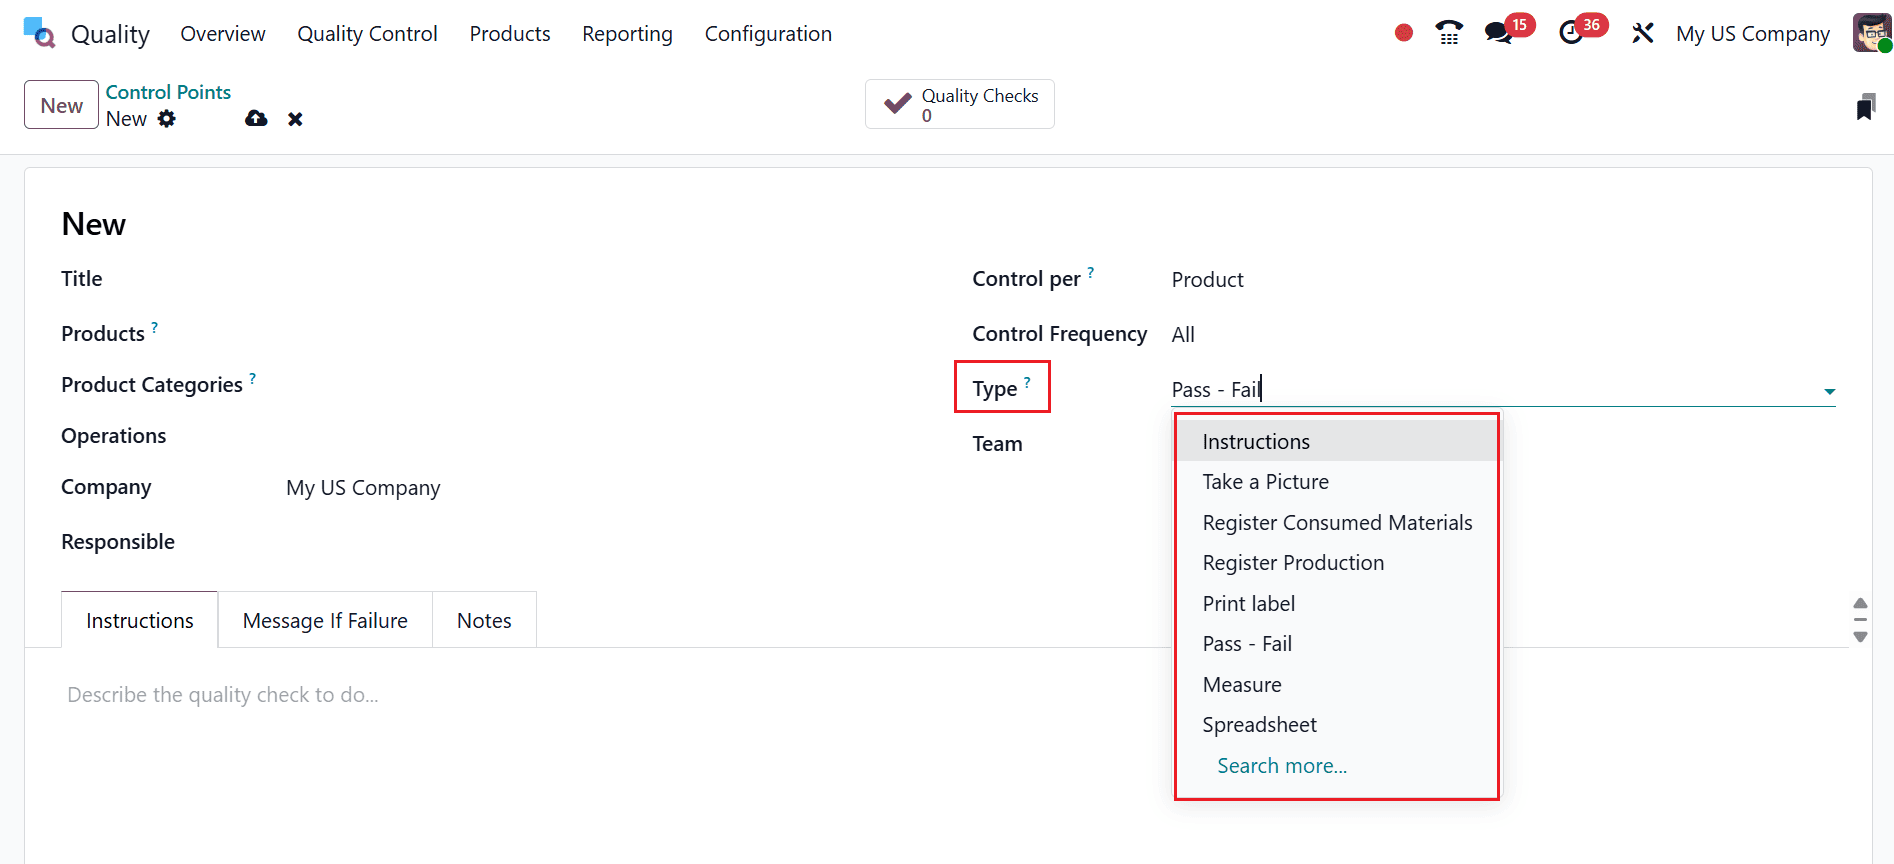
In the Type field, you can define the method of the quality check that can be applied.
Control Per Operation
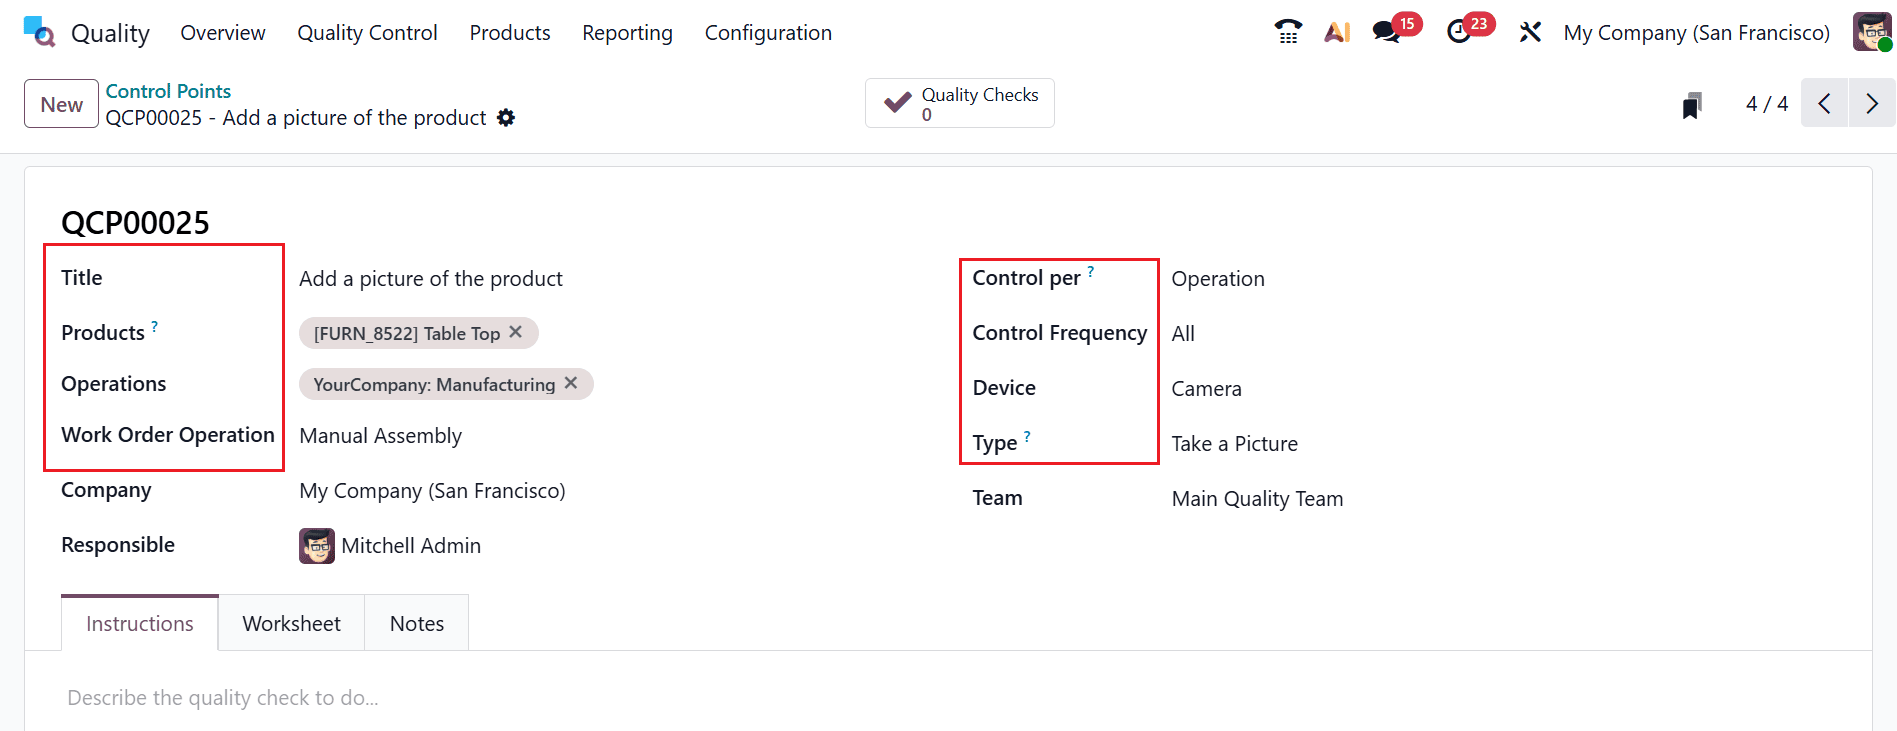
Here, the quality check is triggered for every individual operation or work order step in a process. This ensures that each stage of the workflow is inspected separately rather than applying one check to the entire process. In this example, add the details as shown below:
- Title: Add a picture of the product.
- Product: Table Top.
- Operations: Manufacturing
- Work Order Operation: Manual Assembly
- Company: My Company
- Responsible: Mitchell Admin
- Control per: Operation
- Control Frequency: All
- Device: Camera
- Type: Take a picture
- Team: Main Quality Team
After adding these details, save it.
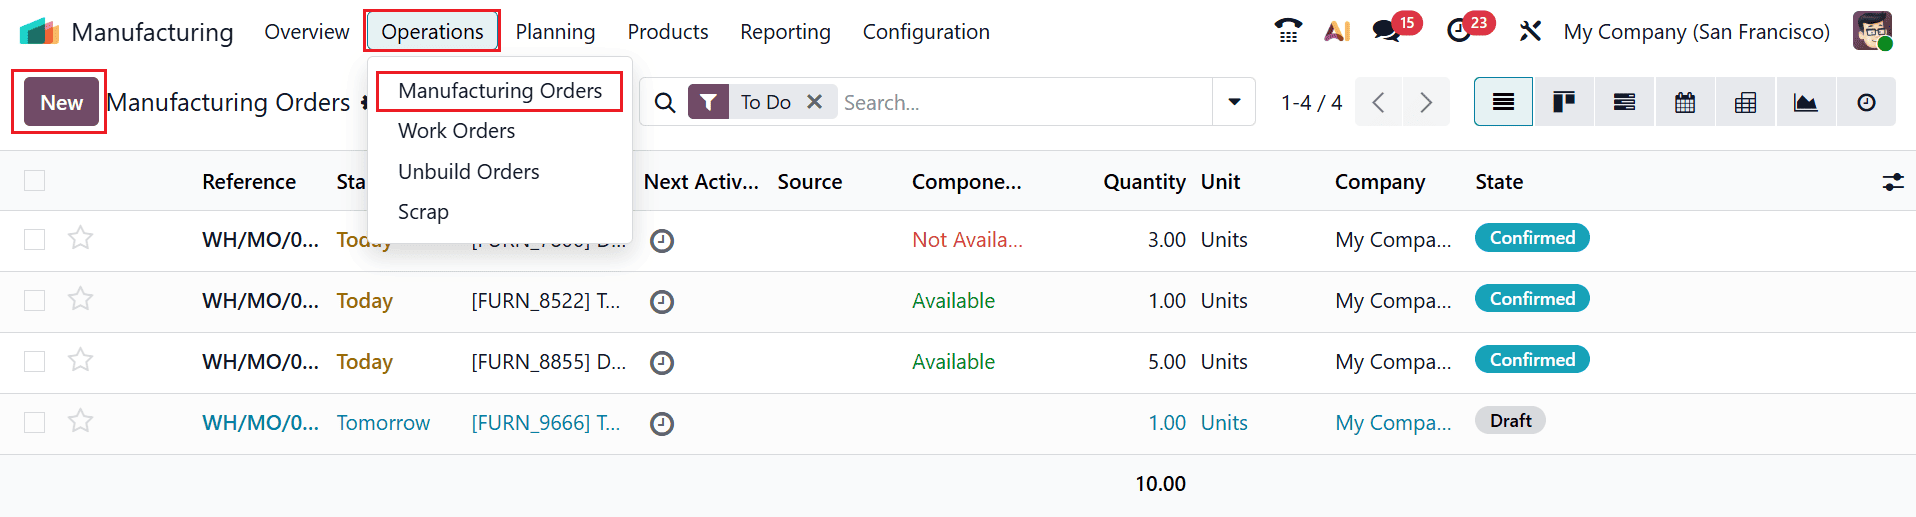
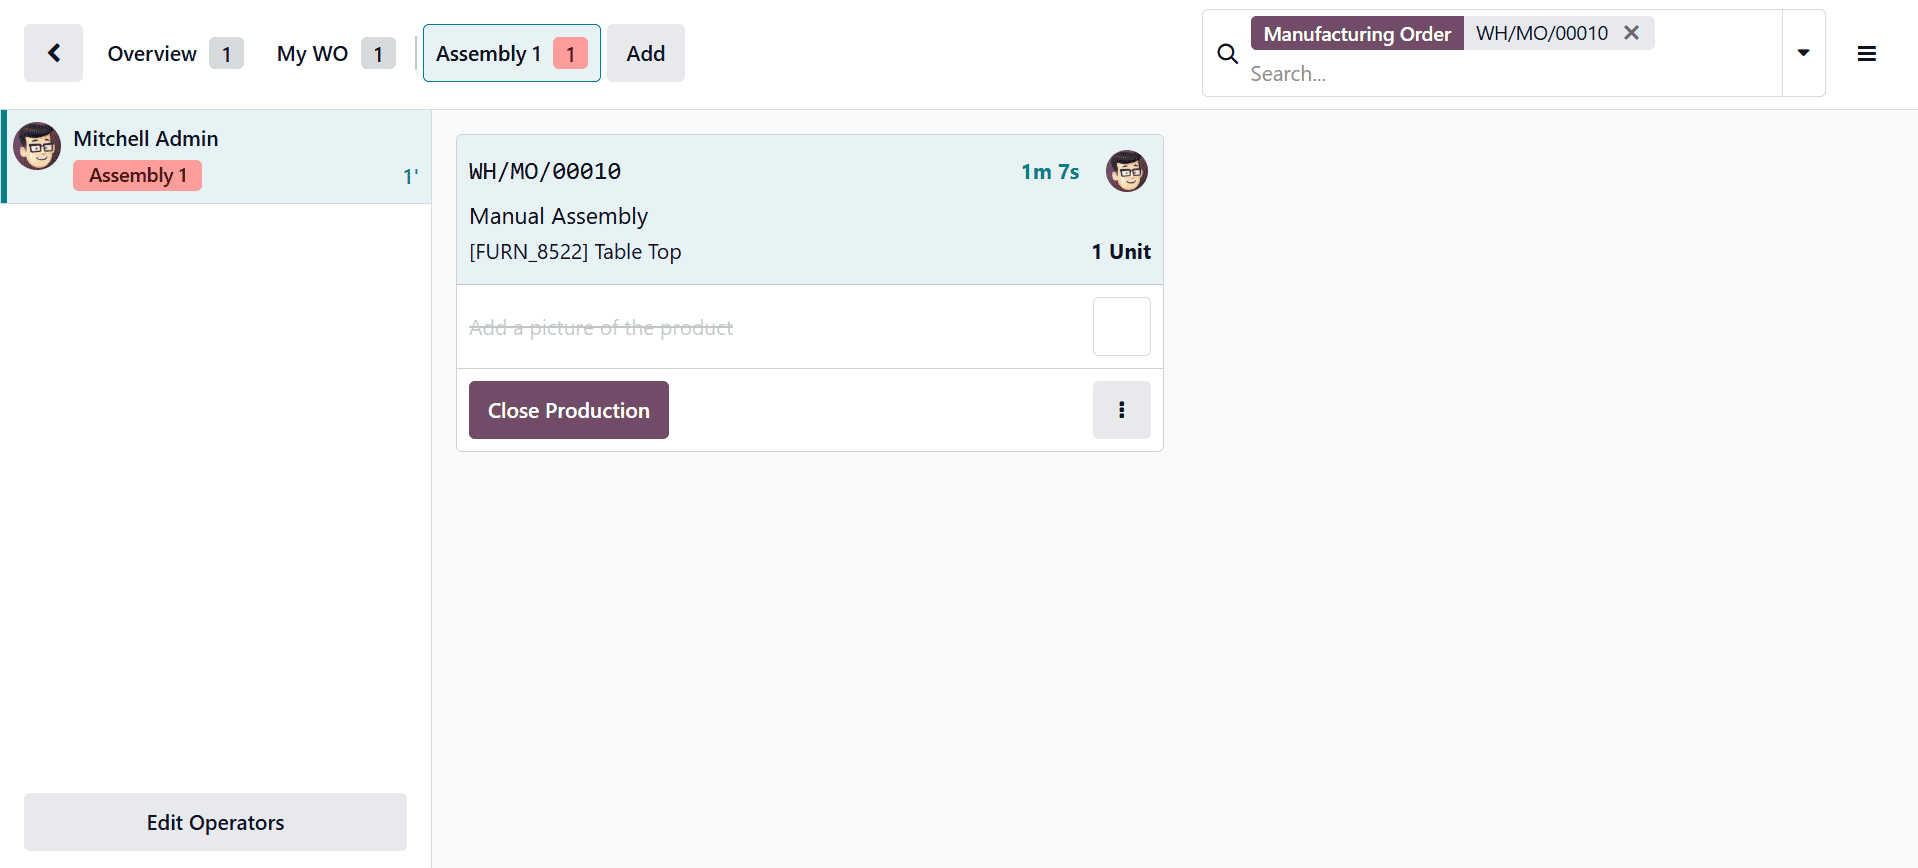
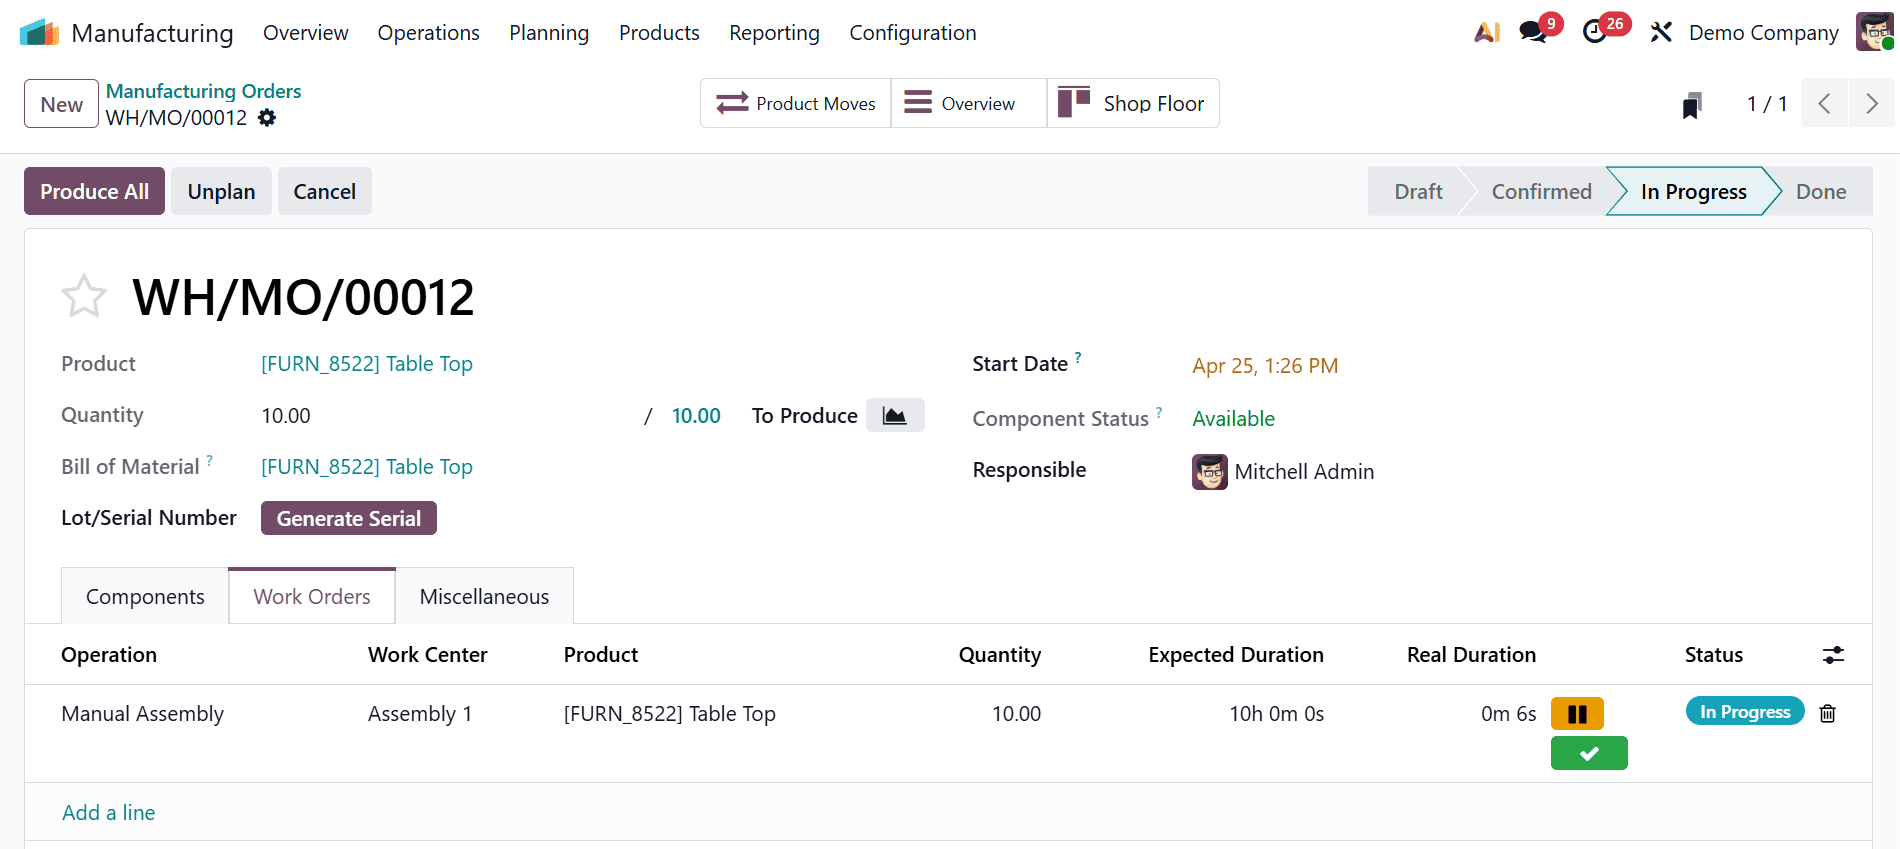
To understand how this works in the Manufacturing operation, move to the Manufacturing module. Then, navigate to the Operations > Manufacturing Orders and select the New button to set up a control point connected to the manufacturing process so that the quality check is triggered at the appropriate stage.
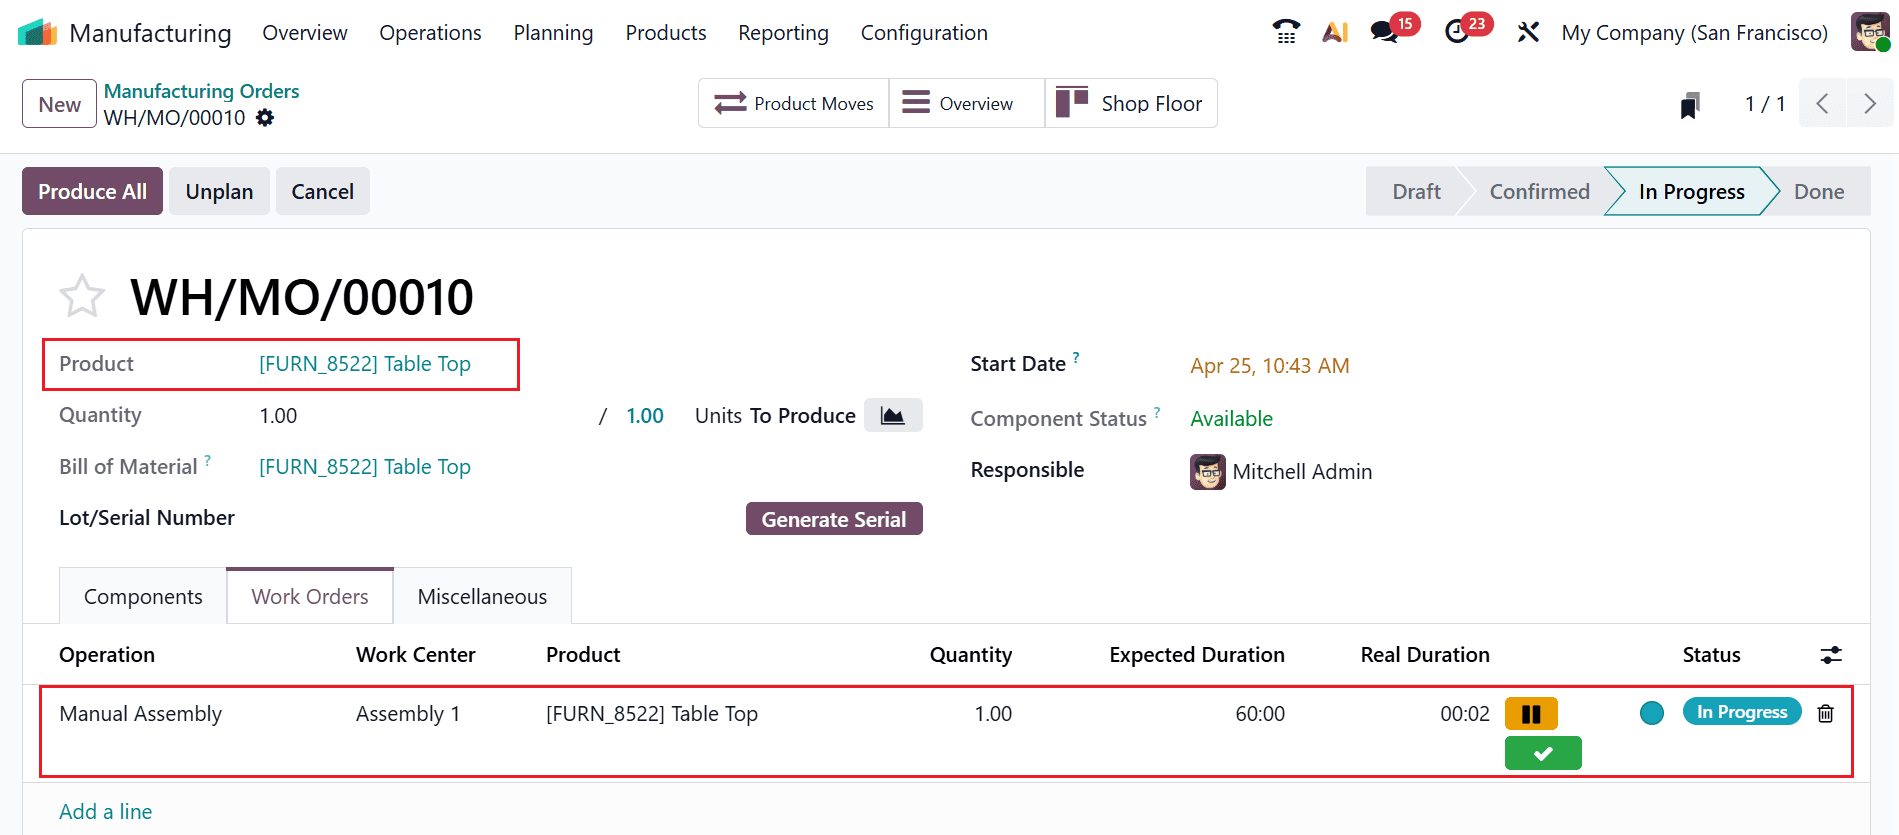
Here, add the product as Table Top, which is selected above. Under the Work Orders tab, you can see the details such as Operation, Work Center, Product, Quantity, Expected Duration, Real Duration, and Status. Let’s start the operation, and you can see the operation is in the In Progress stage.
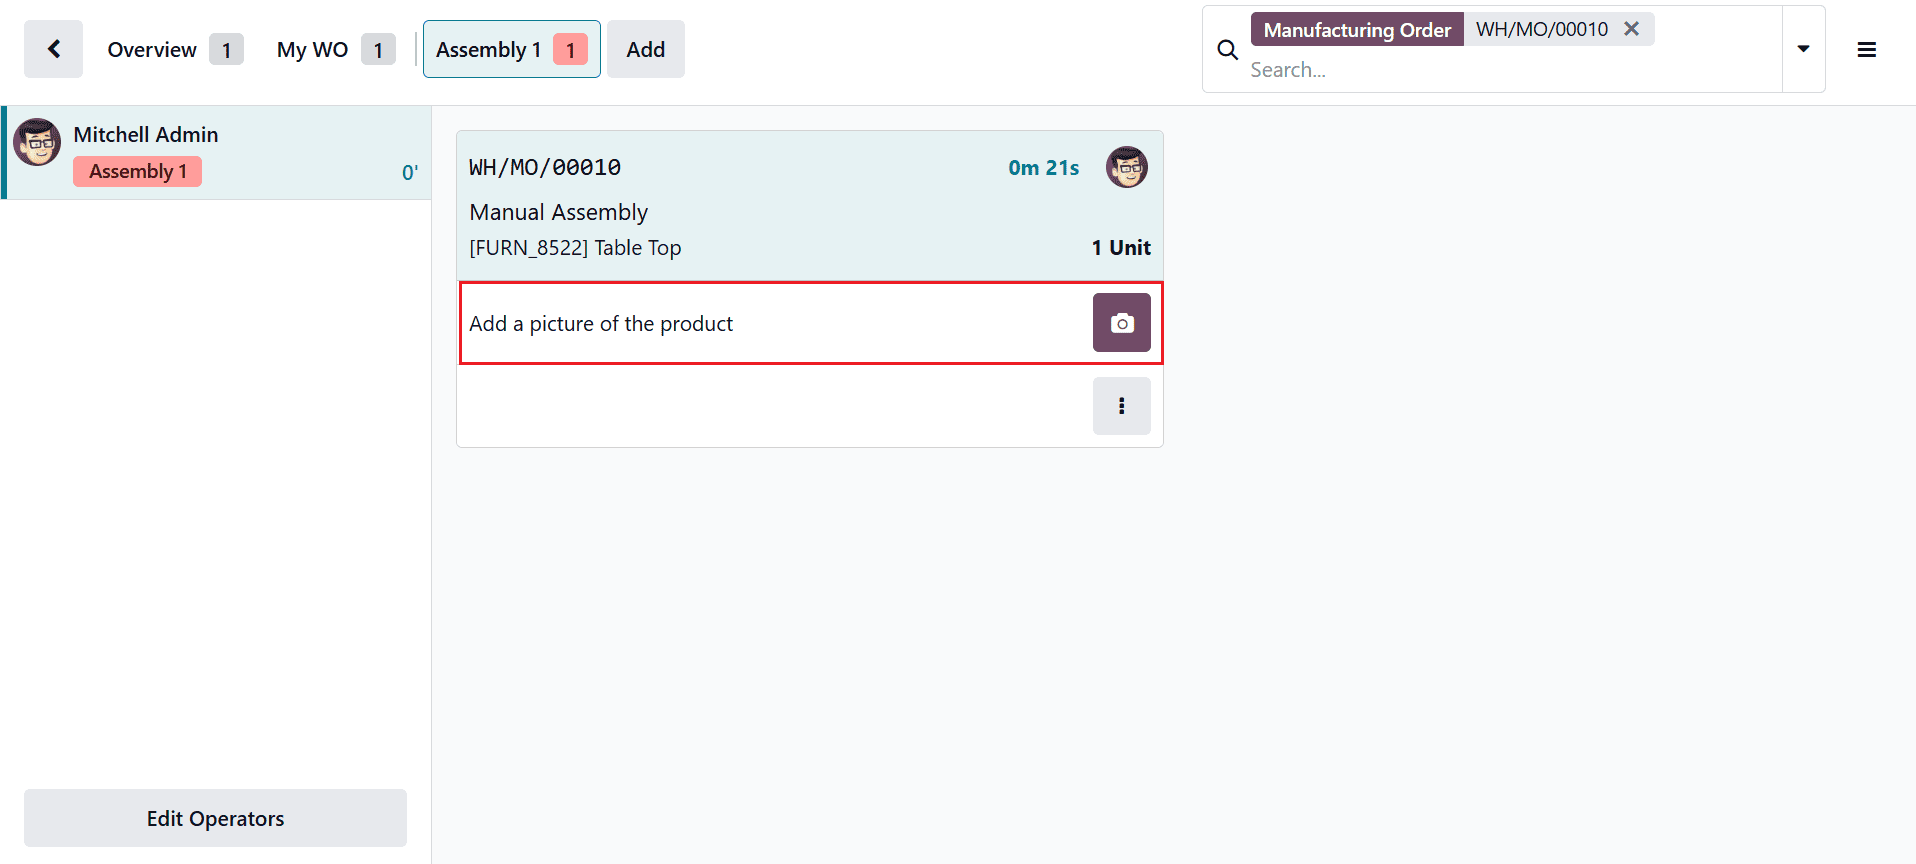
Click on the Shop Floor smart tab to validate the quality check. The shop floor window will open as shown below. As the check type is Add a Picture, the system will prompt the user to upload a product image, which should be attached in the specified section.
Now, you can see the quality check is completed.
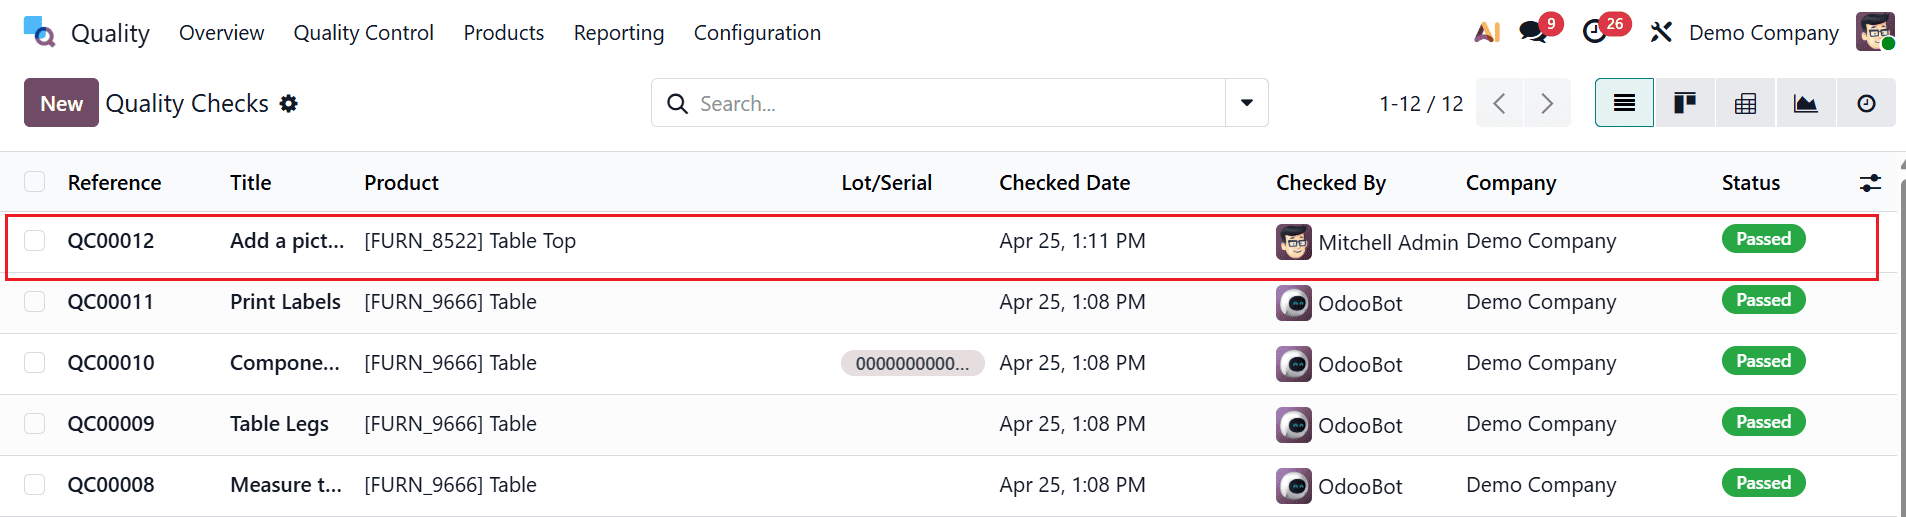
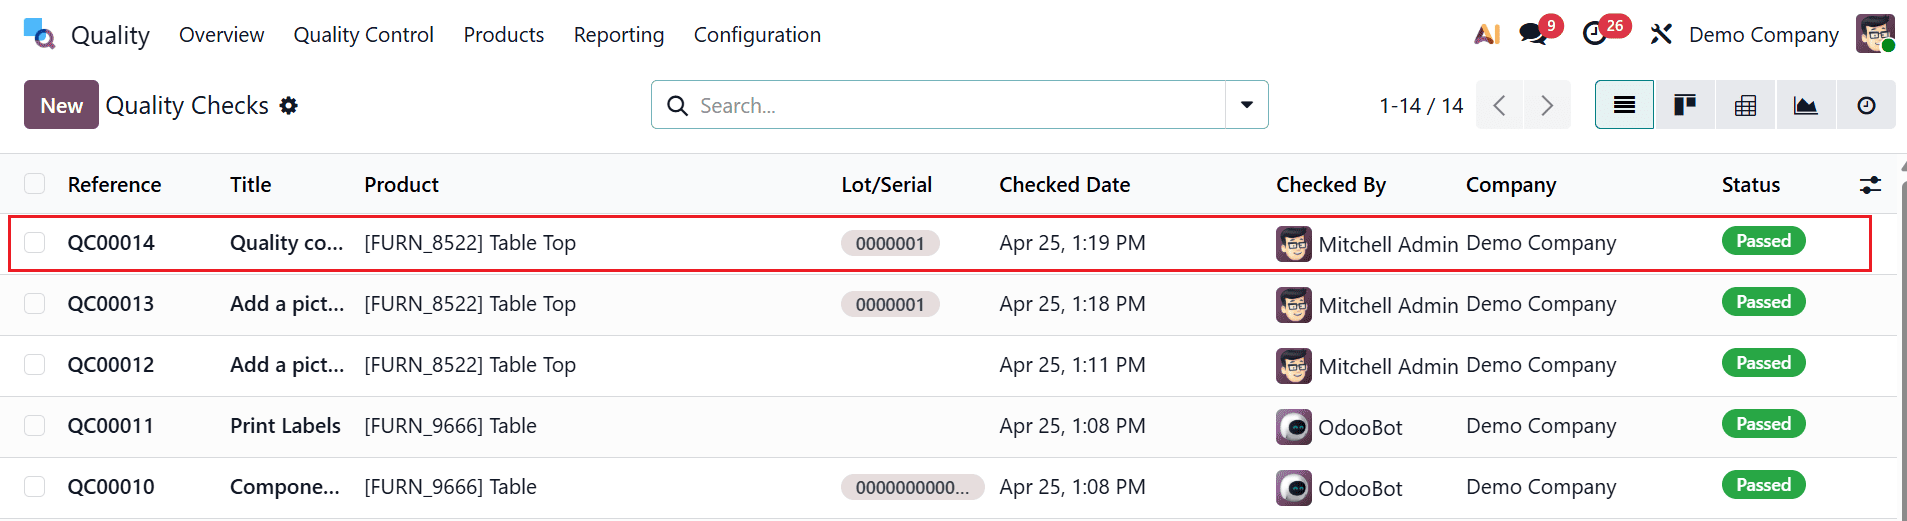
Then, navigate back to the Quality > Quality Control > Quality Checks. Here, you can see the quality check is in Passed status.
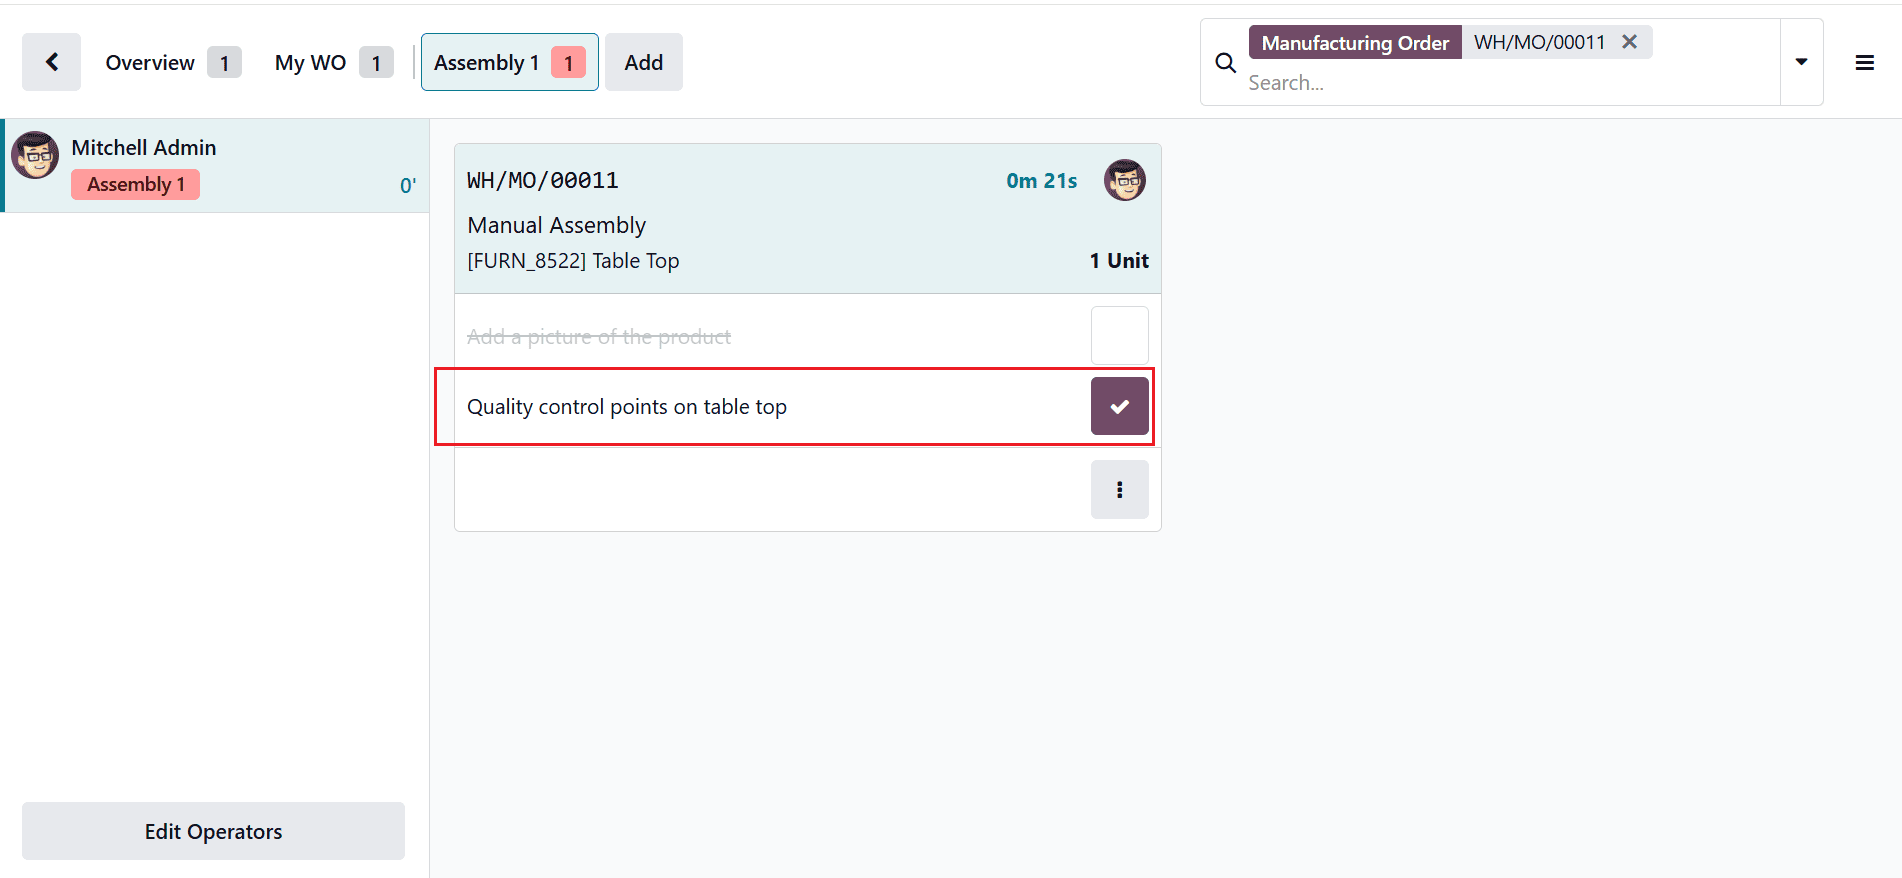
Control Per Product
Here, the quality check is triggered separately for each product in an operation. This ensures that every product is inspected individually rather than applying a single check to the entire batch. This operation will only proceed once the quality check for that product is completed. In this example, add the details as shown below:
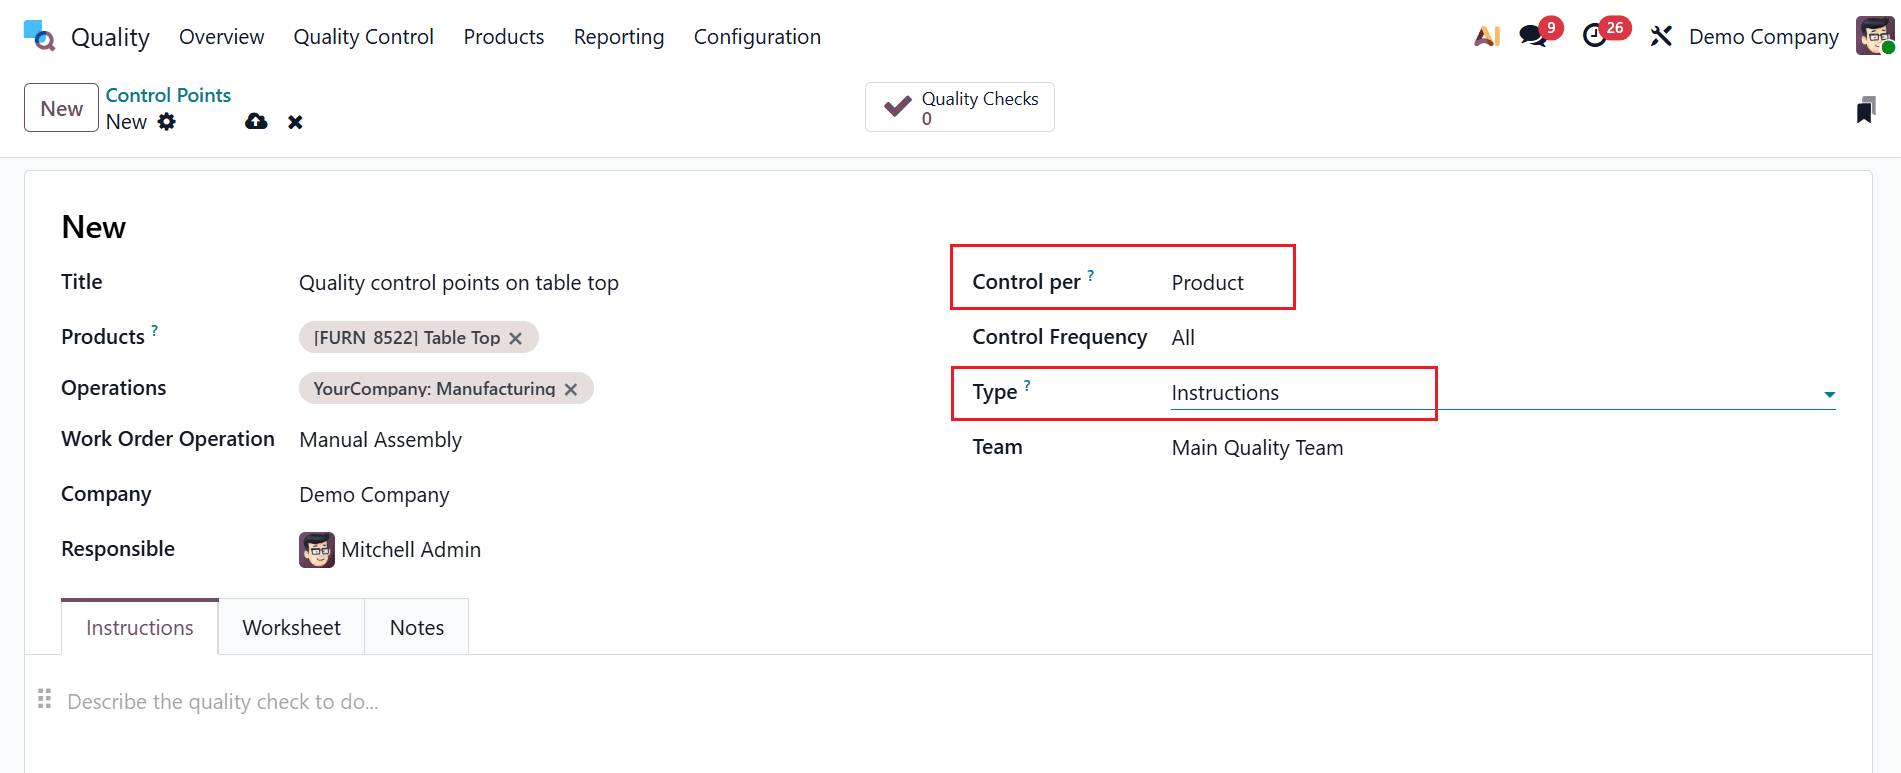
- Title: Quality control points on table top
- Product: Table Top.
- Operations: Manufacturing
- Work Order Operation: Manual Assembly
- Company: Demo Company
- Responsible: Mitchell Admin
- Control per: Product
- Control Frequency: All
- Type: Instructions
- Team: Main Quality Team
Then, save it.
Then, move back to the Manufacturing module and create a manufacturing order. Once the production is completed, click on the Shop Floor smart tab to verify the product quality.
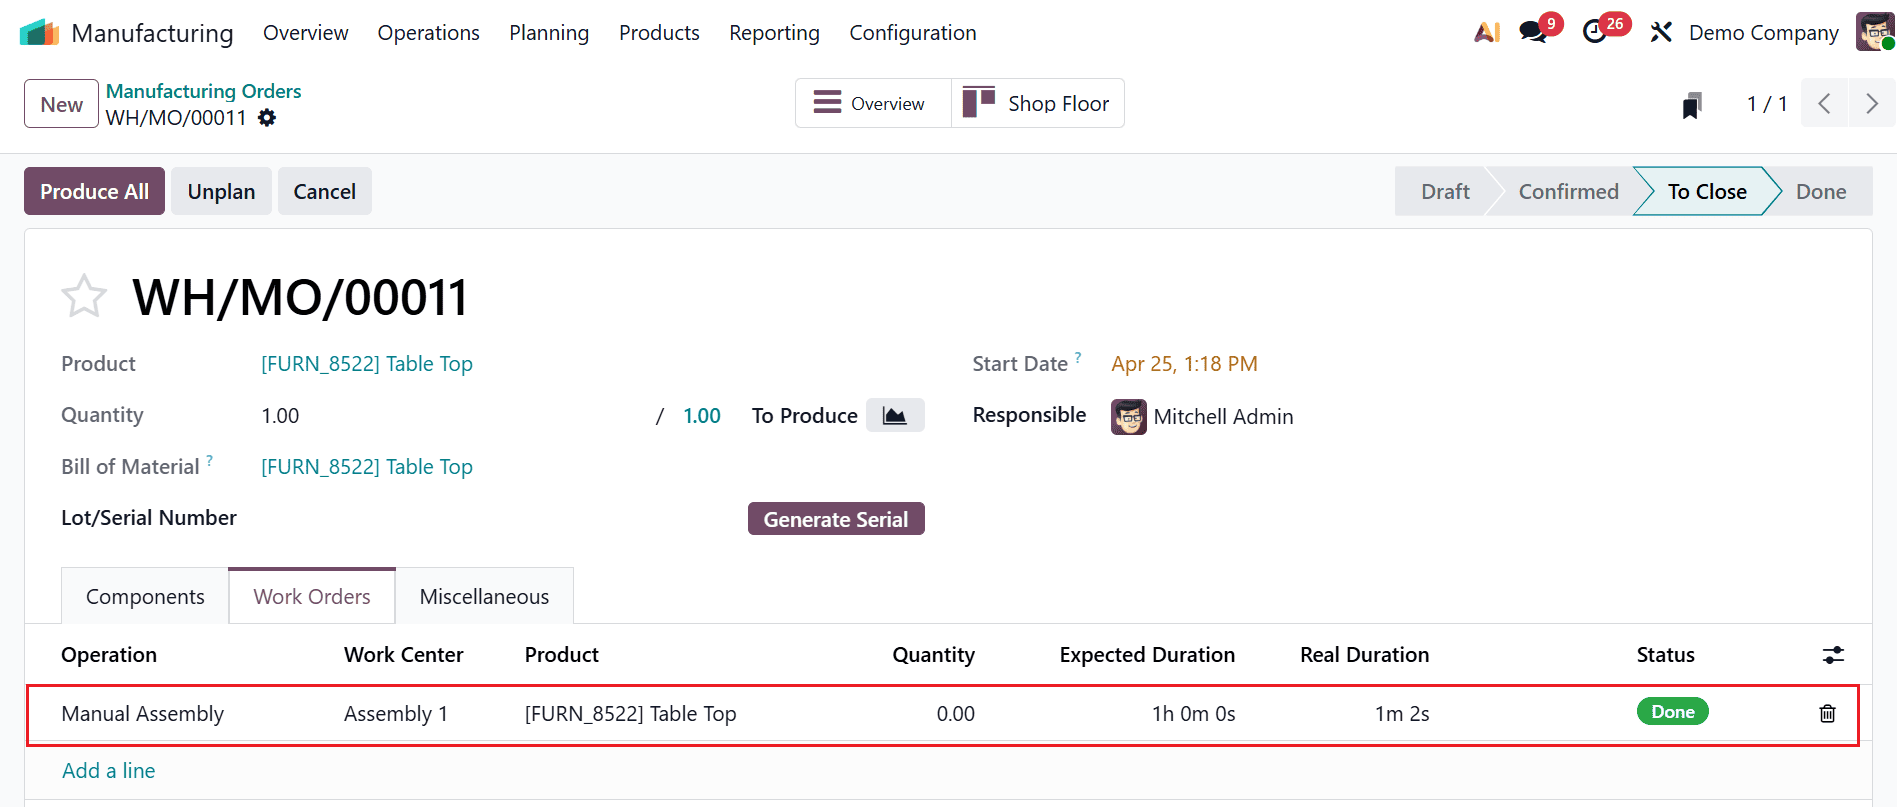
As the check type is Instruction, the system simply displays predefined instructions during the quality check. Here, you can read and follow the instructions, and then confirm the quality check.
Then, go back to the Quality > Quality Control > Quality Checks. Here, you can see the quality check is in Passed status.
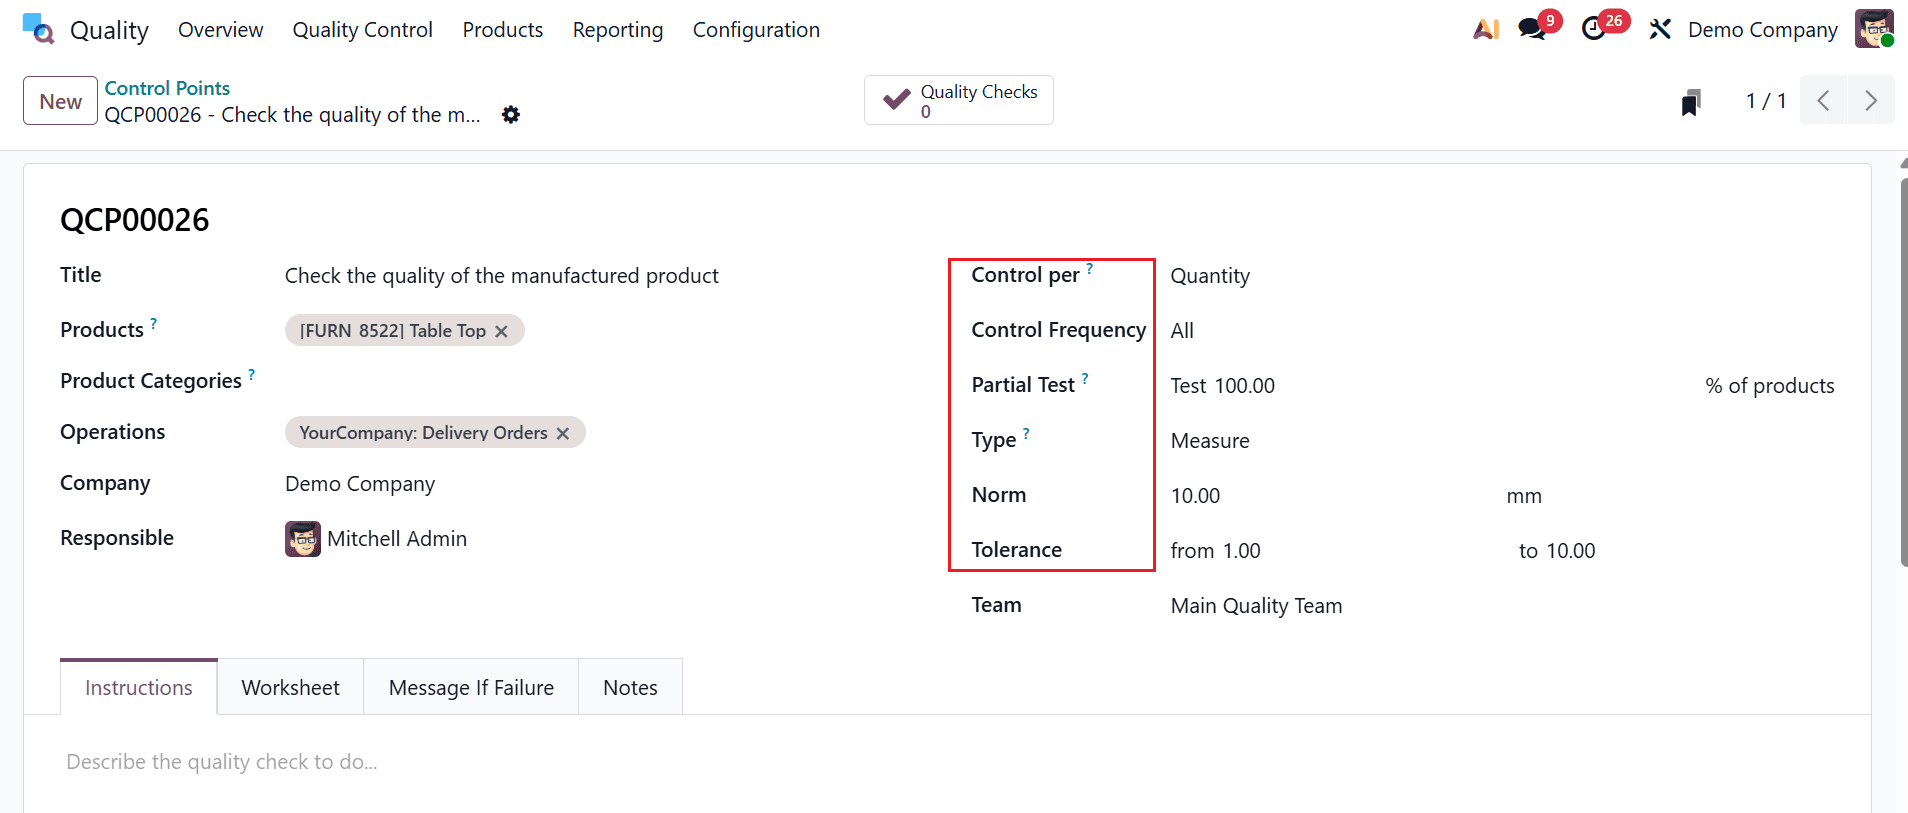
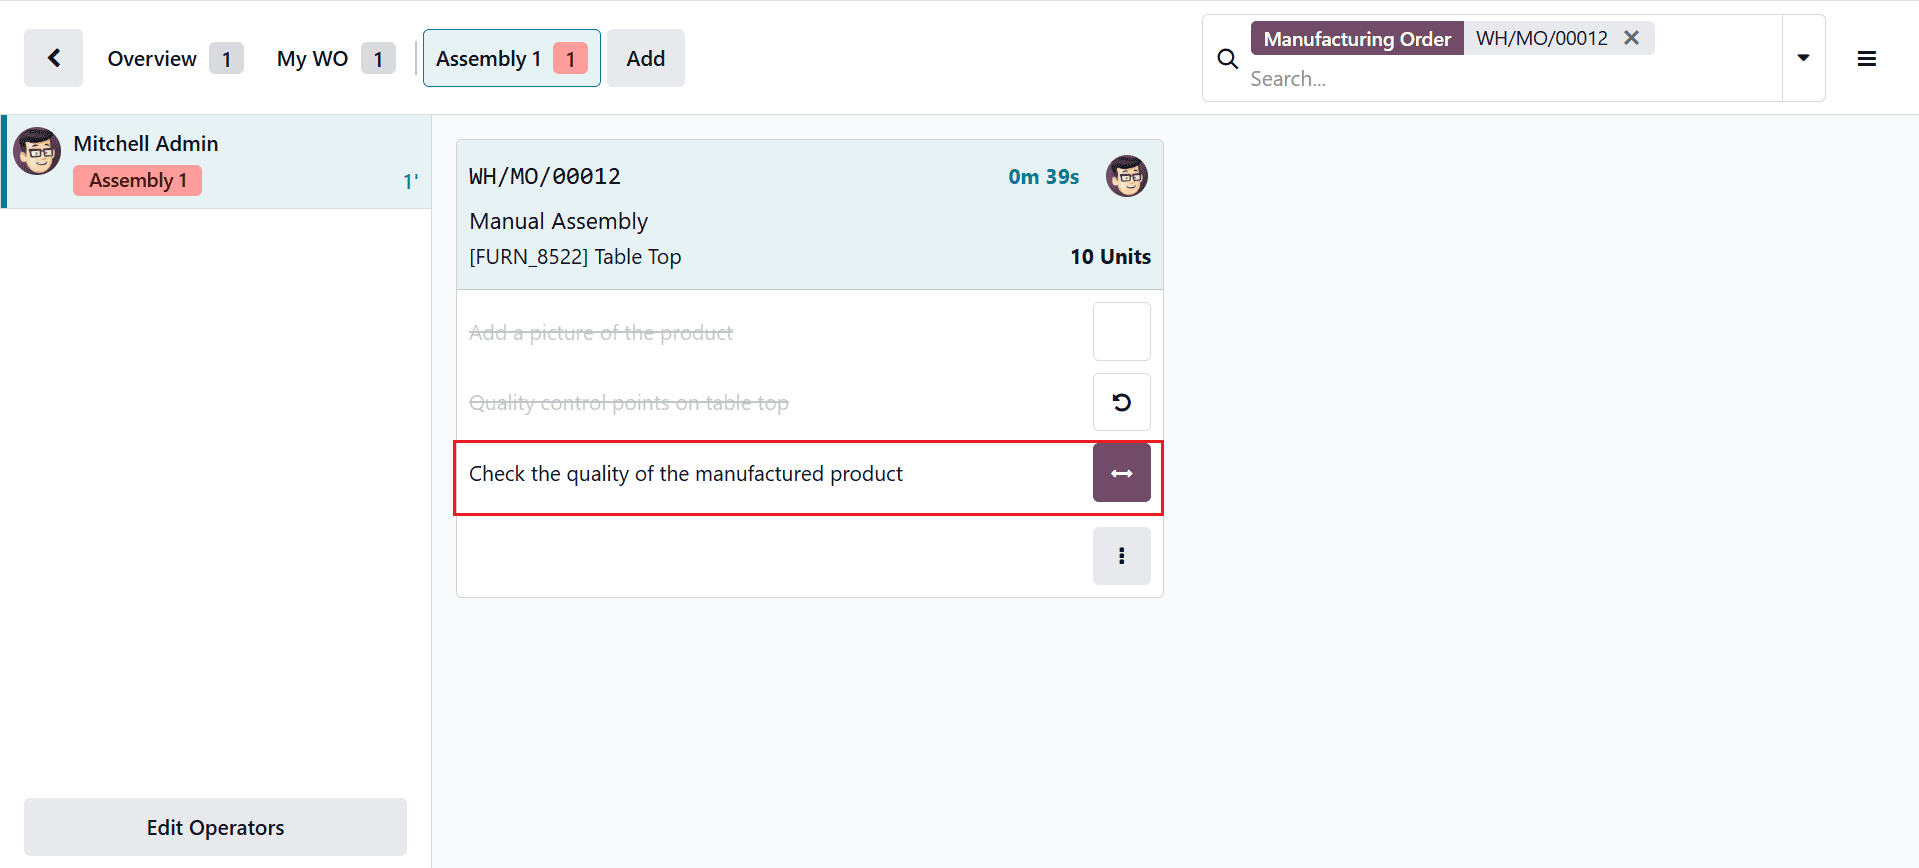
Control Per Quantity
Here, the quality check is triggered for a certain percentage of items within the specified operation. In the Partial Test field, you can add a numerical value in the percentage field that appears below. If the field keeps empty, one quality check is created for the full quantity. This ensures that checks are performed at intervals instead of checking each product. In this example, add the details as shown below:
- Title: Check the quality of the manufactured product
- Product: Table Top.
- Operations: Delivery Orders
- Work Order Operation: Manual Assembly
- Company: Demo Company
- Responsible: Mitchell Admin
- Control per: Quantity
- Control Frequency: All
- Partial Test: Test 100.00
- Type: Measure
- Norm: 10.00 mm
- Tolerance: from 1.00 to 10.00
- Team: Main Quality Team
Then, save it.
Next, return to the Manufacturing module and create a manufacturing order; once production is in progress, open the Shop Floor smart tab to verify the product quality.
As the check type is Measure, the system prompts you to enter a numerical value. The entered value is then compared against predefined tolerance limits to determine whether the quality check passes or fails. To add the value, click on the arrow button as shown below:
A new pop-up screen will appear where you can add the Measure and save it. 
Once the quality check is validated, the numerical value turns green as shown below: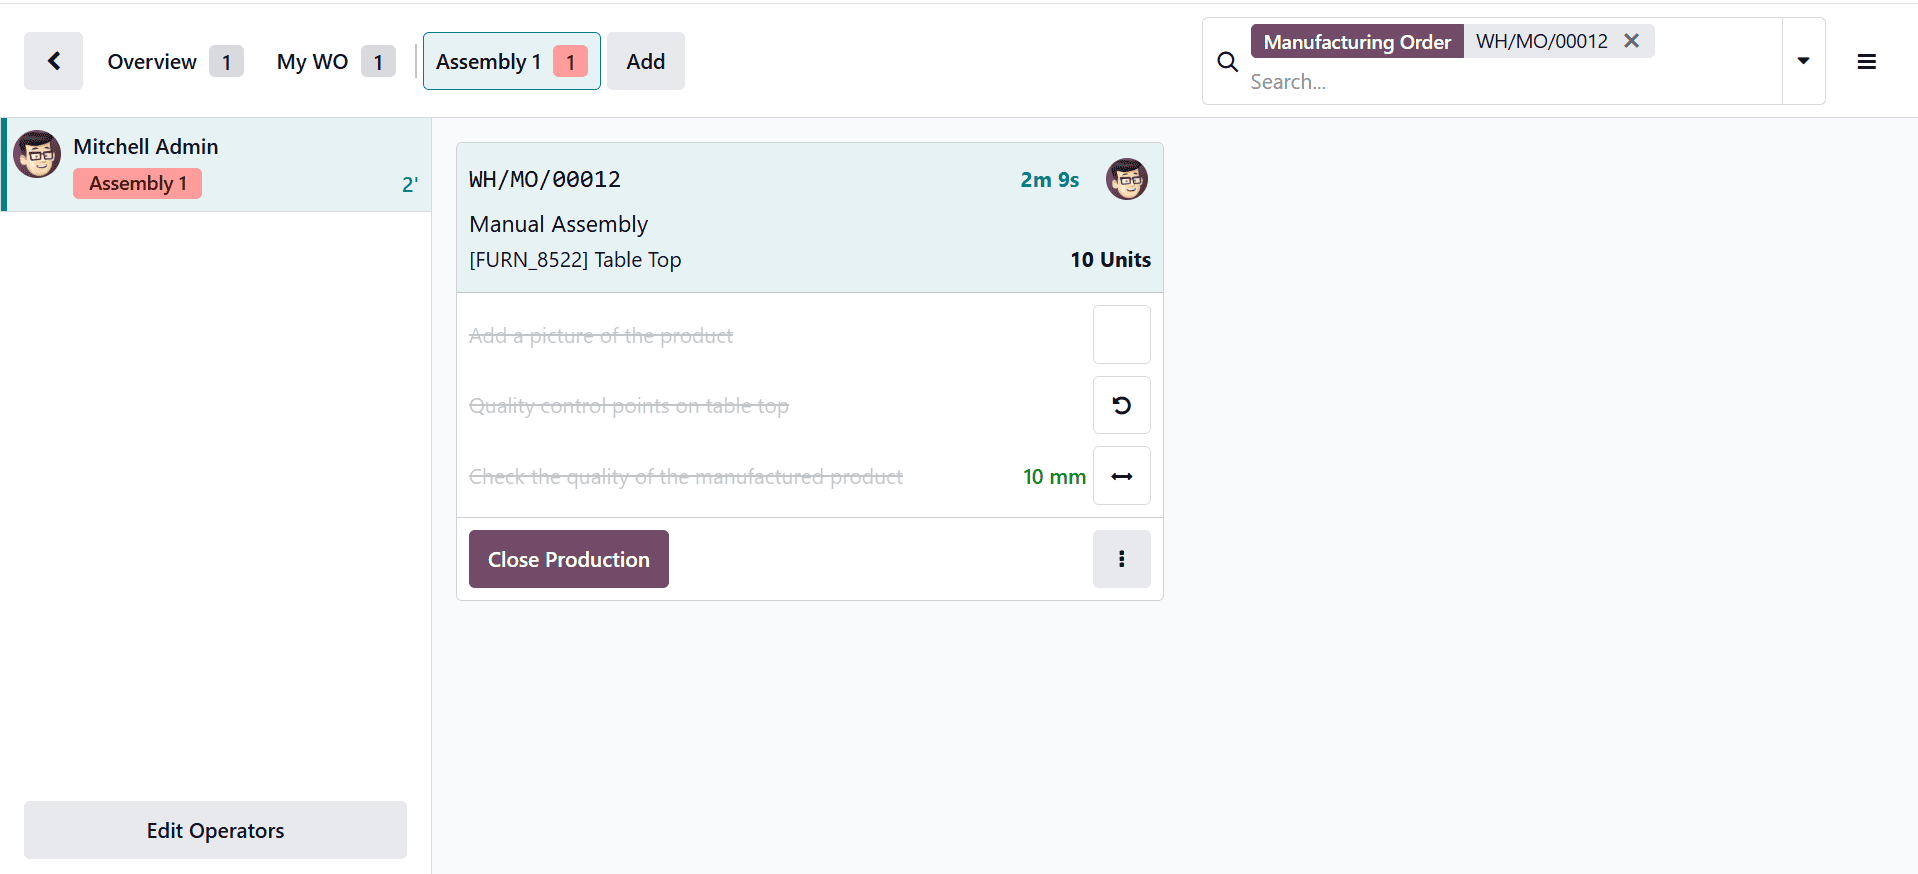
Then, go back to the Quality > Quality Control > Quality Checks. Here, you can see the quality check is in Passed status.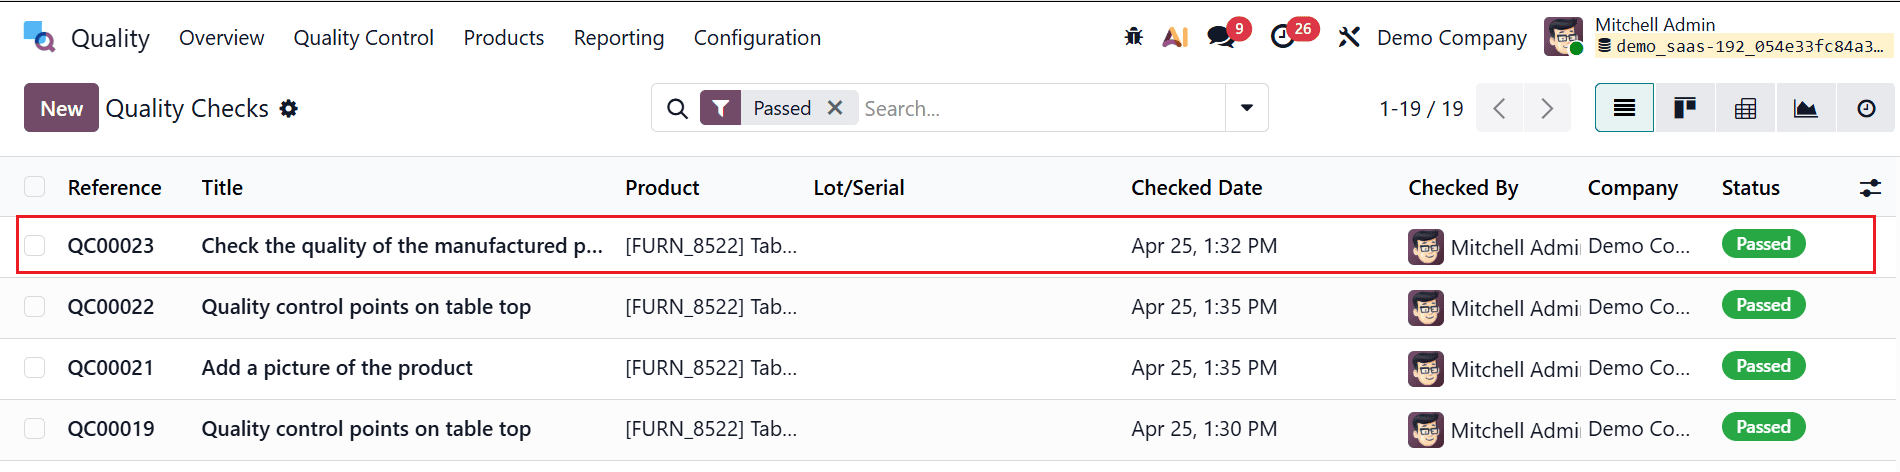
Implementing quality checks in Odoo 19 Manufacturing provides businesses with a structured and reliable approach to maintaining product excellence. By using quality control directly in production workflows, companies can detect issues early, minimize waste, and ensure compliance with standards. Odoo’s flexibility allows manufacturers to tailor quality control points and inspection types according to their unique operational needs. The integration of real-time reporting and automated notifications further enhances transparency and responsiveness across teams. As a result, organizations can continuously improve their processes and deliver consistent, high-quality products to customers. Adopting these quality management practices not only strengthens brand reputation but also contributes to long-term business growth. With the right setup and ongoing optimization, Odoo 19 becomes a powerful tool for achieving manufacturing precision and operational excellence.
To read more about Overview of Manufacturing Quality Check in Odoo 18, refer to our blog Overview of Manufacturing Quality Check in Odoo 18.