When users start working with a new application in Odoo, they need to complete a few basic steps before they can use all its features. An onboarding panel can be used to guide them through these initial steps. An onboarding panel appears inside the relevant Odoo view and can contain information, action buttons, and different onboarding steps. The buttons can also take users directly to the required configuration or form view.
Odoo provides the onboarding.onboarding and onboarding.onboarding.step models for managing this functionality. In Odoo 19, the onboarding panel can be added to a list view by extending the list controller and connecting it to the view using js_class.
In this blog, let's see how to add an onboarding panel to a list view in Odoo 19 with a simple Department example.
What is an Onboarding Panel in Odoo 19?
An onboarding panel is a small section displayed in a view to help users complete the initial steps related to a feature. For example, a Department list view can display a panel asking the user to create a sample department. The panel can have a Create button, which opens the Department form directly.
The onboarding functionality is handled using the onboarding.onboarding and onboarding.onboarding.step models. The frontend part is handled through Odoo's JavaScript view system.
Adding an Onboarding Panel to a List View
For this example, we will add an onboarding panel to the Department list view of the Employees application. The panel will contain a single step named Sample Department. It will have a Create button that opens the Department form view.
Step 1: Create the Module
First, create a custom module named banner_route.
banner_route/
+-- __init__.py
+-- __manifest__.py
+-- controllers/
¦   +-- __init__.py
¦   +-- onboarding.py
+-- models/
¦   +-- __init__.py
¦   +-- onboarding.py
+-- data/
¦   +-- onboarding_data.xml
+-- views/
¦   +-- hr_department_views.xml
+-- static/
    +-- src/
        +-- js/
        ¦   +-- department_onboarding_list.js
        +-- xml/
            +-- department_onboarding_list.xml
The models directory will contain the Python model extensions. The controller will provide the onboarding content to the frontend, while the JavaScript and XML files will add the panel to the list view.
Step 2: Define the Module Manifest
Create the __manifest__.py file and add the required dependencies and backend assets.
{
    "name": "Department Onboarding Panel",
    "version": "19.0.1.0.0",
    "category": "Human Resources",
    "summary": "Adds an onboarding panel to the Department list view",
    "depends": [
        "hr",
        "onboarding",
    ],
    "data": [
        "data/onboarding_data.xml",
        "views/hr_department_views.xml",
    ],
    "assets": {
        "web.assets_backend": [
            "banner_route/static/src/js/department_onboarding_list.js",
            "banner_route/static/src/xml/department_onboarding_list.xml",
        ],
    },
    "installable": True,
    "application": False,
    "license": "LGPL-3",
}
The HR module is required for the Department model, while the onboarding module provides the onboarding models. The JavaScript and Owl template are added to web.assets_backend so that they are loaded in the Odoo backend.
Step 3: Define the Onboarding Step
Now, create the onboarding step and the onboarding record.
Create data/onboarding_data.xml:
<?xml version="1.0" encoding="utf-8"?>
<odoo>
    <record id="banner_route_onboarding_sample_department_step"
            model="onboarding.onboarding.step">
        <field name="title">Sample Department</field>
        <field name="description">
            Create a sample department
        </field>
        <field name="button_text">Create</field>
        <field name="panel_step_open_action_name">
            action_open_department_onboarding_sample_department
        </field>
    </record>
    <record id="onboarding_onboarding_department"
            model="onboarding.onboarding">
        <field name="name">Department Onboarding</field>
        <field name="step_ids" eval="[
            Command.link(
                ref('banner_route.banner_route_onboarding_sample_department_step')
            )
        ]"/>
        <field name="route_name">department</field>
        <field name="panel_close_action_name">
            action_close_panel_department
        </field>
    </record>
</odoo>
The first record creates an onboarding.onboarding.step.
The title defines the heading displayed in the panel:
<field name="title">Sample Department</field>
The description gives the user some information about the required action:
<field name="description">
    Create a sample department
</field>
The text shown on the button is defined with button_text:
<field name="button_text">Create</field>
The panel_step_open_action_name connects the button to a Python method that will open the Department form.
The second record creates the onboarding process itself:
<record id="onboarding_onboarding_department"
        model="onboarding.onboarding">
The previously created step is linked through step_ids.
The route_name identifies this onboarding configuration:
<field name="route_name">department</field>
We will use the same route when creating the controller.
Step 4: Add the Python Methods
Next, extend the onboarding models.
Create models/onboarding.py:
from odoo import api, models

class Onboarding(models.Model):
    _inherit = "onboarding.onboarding"
    @api.model
    def action_close_panel_department(self):
        self.action_close_panel(
            "banner_route.onboarding_onboarding_department"
        )

class OnboardingStep(models.Model):
    _inherit = "onboarding.onboarding.step"
    @api.model
    def action_open_department_onboarding_sample_department(self):
        action = self.env["ir.actions.actions"]._for_xml_id(
            "hr.hr_department_tree_action"
        )
        action.update({
            "views": [[
                self.env.ref("hr.view_department_form").id,
                "form",
            ]],
            "view_mode": "form",
            "target": "current",
        })
        return action
The first method is used to close the onboarding panel:
def action_close_panel_department(self):
    self.action_close_panel(
        "banner_route.onboarding_onboarding_department"
    )
The second method is called when the Create button is clicked.
It gets the existing Department action:
action = self.env["ir.actions.actions"]._for_xml_id(
    "hr.hr_department_tree_action"
)
The action is then updated to open the Department form view:
action.update({
    "views": [[
        self.env.ref("hr.view_department_form").id,
        "form",
    ]],
    "view_mode": "form",
    "target": "main",
})
Finally, the updated action is returned.
Step 5: Create the Controller
The controller provides the onboarding panel HTML to the frontend.
Create controllers/onboarding.py:
from odoo import http
from odoo.http import request

class DepartmentOnboardingController(http.Controller):
    @http.route(
        "/onboarding/department",
        auth="user",
        type="json",
    )
    def department_onboarding(self):
        onboarding = request.env.ref(
            "banner_route.onboarding_onboarding_department",
            raise_if_not_found=False,
        )
        if not onboarding:
            return {}
        progress = onboarding._search_or_create_progress()
        if progress.is_onboarding_closed:
           return {}

        values = onboarding._prepare_rendering_values()
        html = request.env["ir.qweb"]._render(
            "onboarding.onboarding_panel",
            values,
        )
        return {"html": str(html)}
The route creates an endpoint at: /onboarding/department
The onboarding record is retrieved using its external ID:
onboarding = request.env.ref(
    "banner_route.onboarding_onboarding_department",
    raise_if_not_found=False,
)
The onboarding progress is then searched or created:
onboarding._search_or_create_progress()
The values required by the onboarding template are prepared using:
values = onboarding._prepare_rendering_values()
Odoo's existing onboarding template is then rendered:
html = request.env["ir.qweb"]._render(
    "onboarding.onboarding_panel",
    values,
)
The rendered HTML is returned to the JavaScript code.
Step 6: Create the JavaScript List Controller
Now, we need to connect the onboarding content with the Department list view.
static/src/js/department_onboarding_list.js
/** @odoo-module **/
import { registry } from "@web/core/registry";
import { ListController } from "@web/views/list/list_controller";
import { listView } from "@web/views/list/list_view";
import { onWillStart, markup, useState } from "@odoo/owl";
import { rpc } from "@web/core/network/rpc";
import { useActionLinks } from "@web/views/view_hook";
export class DepartmentOnboardingController extends ListController {
   static template = "banner_route.DepartmentOnboardingList";
   setup() {
       super.setup();
       // Use reactive state so OWL re-renders when the banner is closed
       this.state = useState({ onboardingHtml: null });
       this.handleActionLinks = useActionLinks({
           resModel: "hr.department",
           reload: () => this.model.load(),
       });
       onWillStart(async () => {
           try {
               const response = await rpc("/onboarding/department");
               if (response && response.html) {
                   this.state.onboardingHtml = markup(response.html);
               }
           } catch (error) {
               console.error("Error fetching onboarding banner:", error);
           }
       });
   }
   onCloseBanner(ev) {
       this.handleActionLinks(ev);
       const target = ev.target.closest("[data-o-hide-banner]");
       if (target && target.dataset.oHideBanner) {
           this.state.onboardingHtml = null;
       }
   }
}
export const departmentOnboardingListView = {
   ...listView,
   Controller: DepartmentOnboardingController,
};
registry.category("views").add("department_onboarding_list", departmentOnboardingListView);
Here, the custom controller extends Odoo's standard ListController:
export class DepartmentOnboardingController extends ListController
This lets us keep the normal list view functionality and add the onboarding panel to it. The controller calls the Python route using Odoo's rpc function:
const response = await rpc("/onboarding/department");The HTML returned by the controller is converted to Owl markup:
this.onboardingHtml = markup(response.html);
useActionLinks() connects the action links inside the onboarding panel with Odoo's action handling:
useActionLinks({
    resModel: "hr.department",
    reload: () => this.model.load(),
});
Finally, the custom list view is registered in Odoo's view registry:
registry.category("views").add(
    "department_onboarding_list",
    departmentOnboardingListView
);
The name department_onboarding_list will be used in the list view through js_class.
Step 7: Create the Owl Template
Now, create the template used by the custom list controller.
static/src/xml/department_onboarding_list.xml
<?xml version="1.0" encoding="UTF-8"?>
<templates xml:space="preserve">
   <t t-name="banner_route.DepartmentOnboardingList"
      t-inherit="web.ListView" t-inherit-mode="primary">
       <xpath expr="//Layout" position="before">
           <t t-if="state.onboardingHtml">
               <div class="o_onboarding_banner"
                    t-out="state.onboardingHtml"
                    t-on-click="onCloseBanner"/>
           </t>
       </xpath>
   </t>
</templates>
The template inherits the standard Odoo list view:
<t t-name="banner_route.DepartmentOnboardingList"
   t-inherit="web.ListView" t-inherit-mode="primary">
The onboarding content is inserted before the list view layout:
<xpath expr="//Layout" position="before">
The onboardingHtml returned by the controller is then displayed:
<t t-if="state.onboardingHtml">
    <div class="o_onboarding_banner"
         t-out="state.onboardingHtml"/>
          t-on-click="onCloseBanner"/>
</t>
The template name must match the template specified in the JavaScript controller:
static template = "banner_route.DepartmentOnboardingList";
Step 8: Add the Custom List View to the Department View
The final step is to tell the Department list view to use our custom JavaScript view.
Create views/hr_department_views.xml:
<?xml version="1.0" encoding="utf-8"?>
<odoo>
    <record id="hr_department_view_list_inherit_banner_route"
            model="ir.ui.view">
        <field name="name">
            hr.department.view.list.inherit.banner.route
        </field>
        <field name="model">hr.department</field>
        <field name="inherit_id" ref="hr.view_department_tree"/>
        <field name="arch" type="xml">
            <list position="attributes">
                <attribute name="js_class">
                    department_onboarding_list
                </attribute>
            </list>
        </field>
    </record>
</odoo>
The important part is the js_class attribute:
<attribute name="js_class">
    department_onboarding_list
</attribute>
The value must match the key used when registering the JavaScript view:
registry.category("views").add(
    "department_onboarding_list",
    departmentOnboardingListView
);
This connects the Department list view with the custom list controller.
Onboarding Panel in the Department List View
Once the implementation is complete, the Department list view will display the onboarding panel above the list of departments. The panel contains the Sample Department step and the Create button configured in the onboarding record.
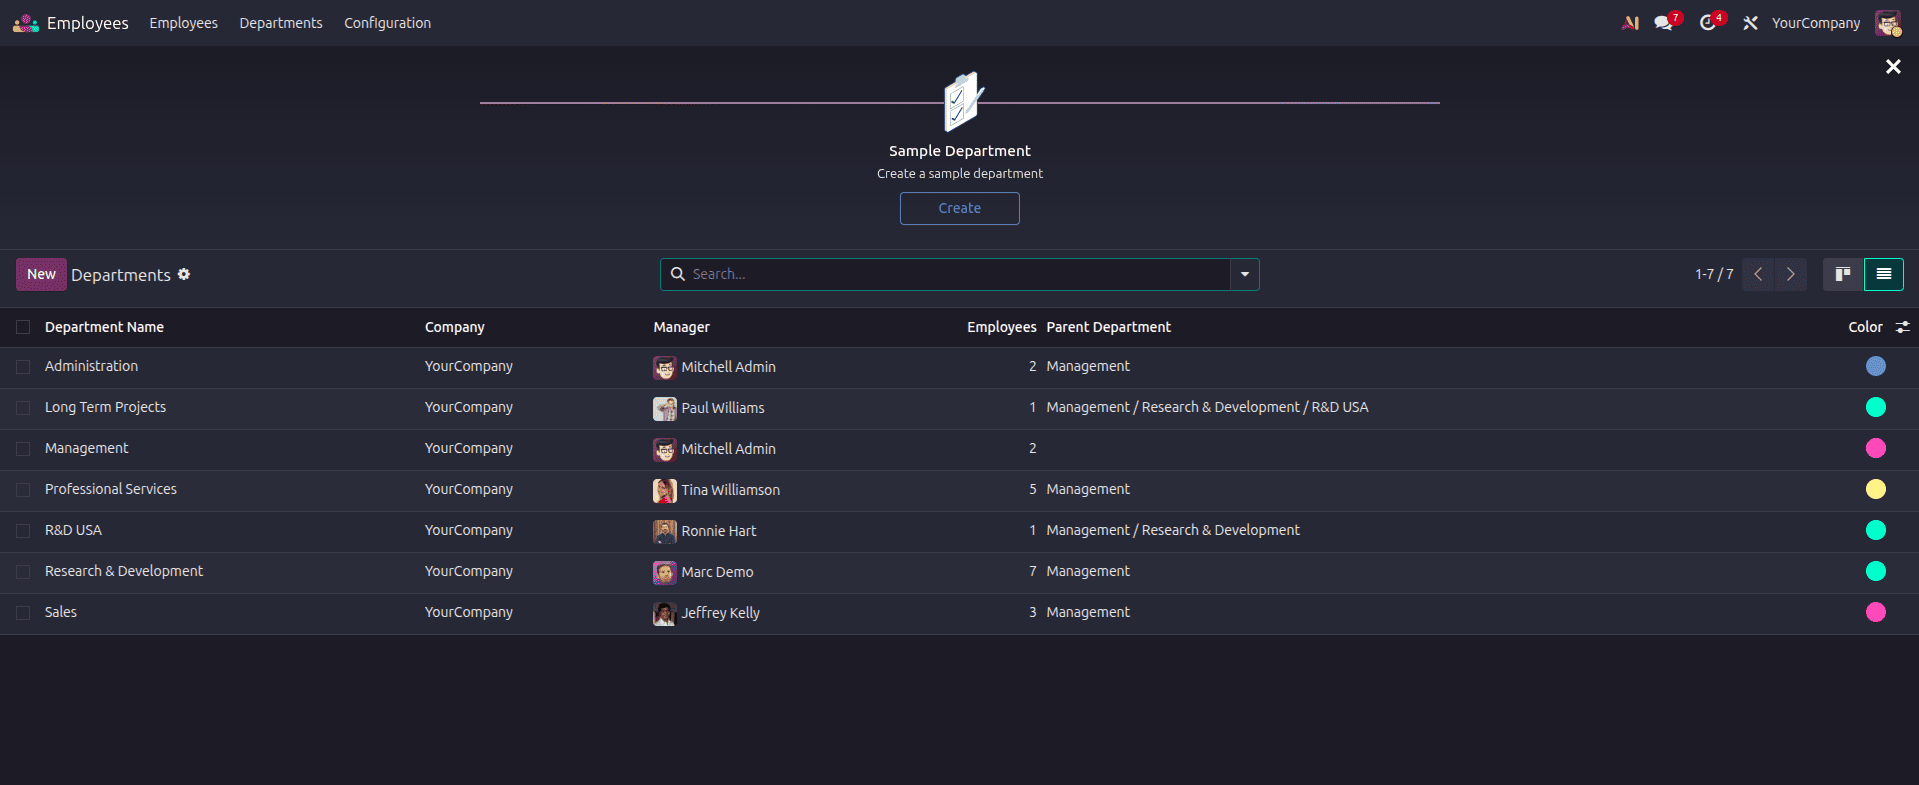
Clicking Create opens the Department form through the action defined in action_open_department_onboarding_sample_department.
When starting to use a new feature, onboarding panels help users by providing some guidance. Odoo 19 provides the onboarding models to specify the steps, while the web framework can be enhanced to show the panel in a list view. In this case, the Department list view extends the base list controller. The controller gets the onboarding content from the Python route, while the Owl template displays it on top of the list. The field js_class links the Department list view to the custom JavaScript view, making it possible to show the onboarding panel without altering the standard functionality of the list view.
To read more about Overview of List View Attributes in Odoo 19, refer to our blog, Overview of List View Attributes in Odoo 19.