Odoo 19 offers an effective system that allows developers to develop captivating and interactive user interfaces. Custom visual effects will enable users to notice critical activities, and at the same time, they will get visual confirmation.
In this blog post, we will describe the process of developing a custom firework animation in Odoo 19 by using the OWL framework, JavaScript, and SCSS. This animation can be activated after performing some particular activities, like completing record saving, completing a task, reaching a milestone, etc.
Step 1: Setting up your Module
First of all, you have to make a custom module for Odoo 19 and put your files inside that module folder in the following way:
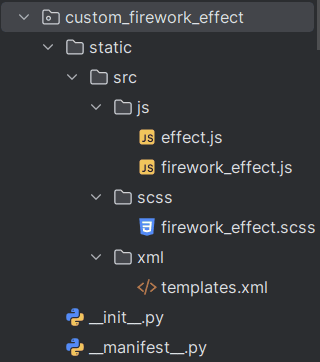
Update __manifest__.py to include dependencies and assets:
{
    'name': "Custom Firework Effect",
    'depends': ['web'],
    'assets': {
        'web.assets_backend': [
            'custom_firework_effect/static/src/js/effect.js',
            'custom_firework_effect/static/src/js/firework_effect.js',
            'custom_firework_effect/static/src/scss/firework_effect.scss',
            'custom_firework_effect/static/src/xml/templates.xml',
        ],
    },
}
Step 2: Registration of the Custom Effect
Now that we have the custom firework effect ready, the next step is to register it in Odoo 19 so that it can be invoked. The registration is done through the effect.js file.
/** @odoo-module **/
import { registry } from "@web/core/registry";
import { FireworkEffect } from "./firework_effect";
import { user } from "@web/core/user";
const effectRegistry = registry.category("effects");
function fireworkEffect(env, params = {}) {
 const message = params.message || "Congratulations!";
 const duration = params.duration || 3000;
if (user.showEffect) {
    return {
        Component: FireworkEffect,
        props: { message, duration },
    };
}
env.services.notification.add(message, { type: "success", title: "Success" });
}
effectRegistry.add("firework_effect", fireworkEffect);
This code registers the firework_effect as a custom effect in Odoo 19, making it available for use throughout the application. It also provides a fallback option: if a user has disabled visual effects in their preferences, a standard success notification will be displayed instead of the firework animation.
Step 3: Create the Firework Component
The core logic of the firework effect implementation is encapsulated in the firework_effect.js script. It is an OWL component that will handle creation and management of the firework particles on the screen.
/** @odoo-module **/
import { Component, useState, useEffect } from "@odoo/owl";
import { browser } from "@web/core/browser/browser";
export class FireworkEffect extends Component {
    setup() {
        this.state = useState({
            particles: [],
            isAnimating: true,
        });
        this.particleCount = 30;
        this.duration = this.props.duration || 3000;
        useEffect(() => {
            // Generate particles
            const particles = Array.from({ length: this.particleCount }, () => ({
                x: Math.random() * 100,
                y: Math.random() * 100,
                angle: Math.random() * 360,
                speed: Math.random() * 5 + 2,
                color: `hsl(${Math.random() * 360}, 70%, 50%)`,
            }));
            this.state.particles = particles;
            // Animate particles
            const animationInterval = browser.setInterval(() => {
                this.state.particles = this.state.particles.map(particle => ({
                    ...particle,
                    x: particle.x + Math.cos(particle.angle * Math.PI / 180) * particle.speed,
                    y: particle.y + Math.sin(particle.angle * Math.PI / 180) * particle.speed,
                    speed: particle.speed * 0.98, // Slow down particles
                }));
            }, 30);
            // Close effect after duration
            const closeTimeout = browser.setTimeout(() => {
                this.state.isAnimating = false;
                browser.clearInterval(animationInterval);
                this.props.close();
            }, this.duration);
            return () => {
                browser.clearInterval(animationInterval);
                browser.clearTimeout(closeTimeout);
            };
        }, () => []);
    }
}
FireworkEffect.template = "custom_firework_effect.FireworkEffect";
FireworkEffect.props = {
    close: Function,
    message: String,
    duration: { type: Number, optional: true },
};
In this section, we have 30 particles, which are created and assigned random positions and colors at the start. We use setInterval to constantly update their positions, thus making sure that they are exploding outwards with increasing speed and slowing down, just like fireworks.
Step 4: Create the XML Template
The XML template defines the structure of the custom effect. In the templates.xml file, we will specify how the firework message and animated particles are displayed on the screen.
<?xml version="1.0" encoding="UTF-8"?>
<templates xml:space="preserve">
    <t t-name="custom_firework_effect.FireworkEffect">
        <div class="o_firework_effect" t-att-class="{ 'o_animating': state.isAnimating }">
            <div class="o_firework_container">
                <div class="o_firework_message"><t t-esc="props.message"/></div>
                <t t-foreach="state.particles" t-as="particle" t-key="particle_index">
                    <div class="o_firework_particle"
                         t-att-style="'transform: translate(' + particle.x + 'vw, ' + particle.y + 'vh); background-color: ' + particle.color + ';'"/>
                </t>
            </div>
        </div>
    </t>
</templates>
This template creates the main container for the firework effect, displays the message, and iterates through the particles generated by the JavaScript component to render each particle on the screen.
Step 5: Add Styling with SCSS
To enhance the appearance of the firework animation, add the required styles in the firework_effect.scss file. These styles define the visual presentation and animation of the firework effect.
.o_firework_effect {
    position: fixed;
    top: 0;
    left: 0;
    width: 100vw;
    height: 100vh;
    z-index: 1200;
    display: flex;
    justify-content: center;
    align-items: center;
    background: rgba(0, 0, 0, 0.5);
    opacity: 0;
    transition: opacity 0.5s ease;
    &.o_animating {
        opacity: 1;
    }
}
.o_firework_container {
    position: relative;
    width: 100%;
    height: 100%;
    overflow: hidden;
}
.o_firework_message {
    position: absolute;
    top: 50%;
    left: 50%;
    transform: translate(-50%, -50%);
    font-size: 24px;
    font-weight: bold;
    color: #fff;
    text-shadow: 0 0 10px rgba(0, 0, 0, 0.5);
    z-index: 1;
}
.o_firework_particle {
    position: absolute;
    width: 8px;
    height: 8px;
    border-radius: 50%;
    opacity: 0.8;
    transition: transform 0.1s linear, opacity 0.5s ease;
}
The above code makes sure that the animation covers the entire screen using a dark and translucent background. It is used to center the message while making the particles appear as colored dots for a fireworks effect.
Step 6: Activating the Custom Firework Effect
The custom firework effect can be activated from any part of your Odoo 19 application.
In JS:
this.env.services.effect.add({
    message: "Task Completed Successfully!",
    type: "firework_effect",
    duration: 3000,
});
In Python:
return {
            'effect': {
                'type': 'firework_effect',
                'message': _("Task Completed Successfully!"),
                'duration': 3000,
            }
        }
This snippet activates the firework animation with a message passed to it and renders the animation on the screen for 3 seconds.
Development of a customized firework animation effect in Odoo 19 includes registration of a new effect, creation of an OWL component that will handle animated particles, creation of a proper XML template, and styling with SCSS. Thus, this animation will add an interesting visual element to users’ actions.
This approach can be extended to create various custom visual effects, including confetti, sparkles, and progress bars, allowing developers to enhance the overall user experience in Odoo 19.
To read more about Step-by-Step Guide to Creating Custom Effects in Odoo 18, refer to our blog Step-by-Step Guide to Creating Custom Effects in Odoo 18.