Website forms in Odoo 20 are customizable and flexible, but in practical use cases, simple text fields are not sufficient. In many cases, website forms need to allow users to select multiple related records, such as interests, tags, services, or categories, directly within the form.
In this blog post, we will see the entire process of implementation of the Many2Many field for the Odoo 20 website form. We will create a custom module, define a model on the backend side, extend a website form, process submitted values, and then install and test our module.
Why Use Many2Many Fields in Website Forms?
A Many2Many field allows a single record to be linked to multiple records from another model, and vice versa. In case this connection becomes visible in a website form, many options become available, like
- Select multiple interests at the time of registration.
- Assign multiple tags to website submissions.
- Select multiple services or categories in the contact form.
- Prevent duplication of fields for structured data collection.
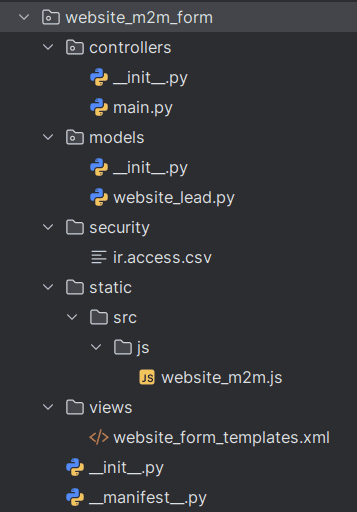
Step 1: Make a Custom Module
The first step is to make a custom module inside the Odoo addons directory.
This will contain logic for the backend and also customizing forms for the frontend.
This approach satisfies Odoo 20 development standards and maintains separation of frontend, backend, and security issues.
Step 2: Describe the Manifest File of the Module
Make the __manifest__.py file to register the module.
# -*- coding: utf-8 -*-
{
  "name": "Website Many2Many Form",
  "version": "20.0.1.0.0",
  "category": "Website",
  "summary": "Add Many2Many fields to Odoo 20 website forms",
  "description": """
      This module demonstrates how to add and handle Many2Many fields
      in Odoo 20 website forms with backend processing.
  """,
  "depends": ["website", "crm"],
  "data": [
      "security/ir.access.csv",
      "views/website_form_templates.xml",
  ],
   "assets": {
       "web.assets_frontend": [
           "website_m2m_form/static/src/js/website_m2m.js",
       ],
   },
  "installable": True,
  "application": False,
  "license": "LGPL-3",
}
Step 3: Make the Model
Here, make a model containing a many2many field.
# -*- coding: utf-8 -*-
from odoo import models, fields
class WebsiteLead(models.Model):
  _name = "website.lead.custom"
  _description = "Website Lead with Tags"
  name = fields.Char(string="Name")
  tag_ids = fields.Many2many(
      'crm.tag',      # Related model
      'lead_tag_rel', # Relation table
      'lead_id', 'tag_id',
      string="Tags"
  )
In this case, users will be able to choose several tags from the website.
Step 4: Give Rights to Access
Since the website users are public users, you should give the right to create records in the system. To do so, create a security/ir.access.csv file:
id,name,model_id,group_id/id,operation,domain
access_website_lead_custom,website.lead.custom,website_lead_custom,,crud,
Step 5: Extend the Form for the Website (XML)
Here, you will inherit a default Contact Us form and make a multi-selection drop-down list.
<?xml version="1.0"?>
<odoo>
   <template id="website_m2m_form_template" inherit_id="website.contactus">
       <xpath expr="//form" position="attributes">
           <attribute name="action">/contactus/m2m</attribute>
       </xpath>

       <xpath expr="//input[@name='subject']" position="after">

           <!-- Load jQuery and Select2 via CDN to bypass Odoo 20 missing asset issues -->
           <script src="https://code.jquery.com/jquery-3.7.1.min.js"></script>
           <link href="https://cdn.jsdelivr.net/npm/select2@4.1.0-rc.0/dist/css/select2.min.css" rel="stylesheet" />
           <script src="https://cdn.jsdelivr.net/npm/select2@4.1.0-rc.0/dist/js/select2.min.js"></script>
           <!-- Tags Dropdown (Select2 Native Pills) -->
           <div class="mb-3 s_website_form_field s_website_form_custom" data-type="many2many" data-name="Tag">
               <label class="s_website_form_label" for="contact_tag">
                   <span class="s_website_form_label_content">Tags</span>
               </label>
               <select id="contact_tag" class="form-control s_website_form_input" name="tag_ids" multiple="multiple">
                   <t t-foreach="request.env['crm.tag'].sudo().search([])" t-as="tag">
                       <option t-att-value="tag.id" t-out="tag.name"></option>
                   </t>
               </select>
           </div>
           <!-- Initialize Select2 -->
           <script type="text/javascript">
               $(document).ready(function() {
                   $('#contact_tag').select2({
                       placeholder: "Select tags...",
                       width: '100%'
                   });
               });
           </script>
       </xpath>
   </template>
</odoo>
The multiple="multiple" attribute ensures the possibility to select multiple options at once.
Step 6: Improve the User Interface Using JavaScript (Optional)
To make the UI more user-friendly, you may improve it using JavaScript. In Odoo 20, @odoo-module JavaScript is used as a standard compared to odoo.define (the old way).
/** @odoo-module **/
import publicWidget from "@web/legacy/js/public/public_widget";
publicWidget.registry.M2MSelectWidget = publicWidget.Widget.extend({
   selector: '#tag_ids',
   start: function () {
       if (this.$target.length) {
           this.$target.select2({
               placeholder: "Select multiple tags",
               width: '100%'
           });
       }
       return this._super.apply(this, arguments);
   },
});
It makes the field searchable and much more convenient to use when working with large amounts of data.
Step 7: Handling the Form Submission Using the Controller
Now, we should get the Many2Many values selected on the form and save them using a Python controller.
from odoo import http
from odoo.http import request
class WebsiteFormController(http.Controller):
  @http.route('/contactus/m2m', type='http', auth='public', website=True, methods=['POST'], csrf=True)
  def website_m2m_form(self, **post):
      # Safely extract list of multiple values from the form data
      tag_ids = request.httprequest.form.getlist('tag_ids')
      tag_ids = list(map(int, tag_ids)) if tag_ids else []
      request.env['website.lead.custom'].sudo().create({
          'name': post.get('name'),
          'tag_ids': [(6, 0, tag_ids)],
      })
      return request.redirect('/contactus-thank-you')

from odoo import http
from odoo.http import request
class WebsiteFormController(http.Controller):
  @http.route('/contactus/m2m', type='http', auth='public', website=True, methods=['POST'], csrf=True)
  def website_m2m_form(self, **post):
      # Safely extract list of multiple values from the form data
      tag_ids = request.httprequest.form.getlist('tag_ids')
      tag_ids = list(map(int, tag_ids)) if tag_ids else []
      request.env['website.lead.custom'].sudo().create({
          'name': post.get('name'),
          'tag_ids': [(6, 0, tag_ids)],
      })
      return request.redirect('/contactus-thank-you')
The command (6, 0, tag_ids) is a specific instruction used in Odoo ORM. It replaces the whole many2many relation with new values.
Step 8: Module Installation
- Restart the Odoo server.
- Activate Developer Mode.
- Go to Apps > Update Apps List.
- Find ‘Website Many2Many Form’ in the Apps
- Install the module.
After that, your Contact Us form will be able to make dynamic selections in the Many2Many field.
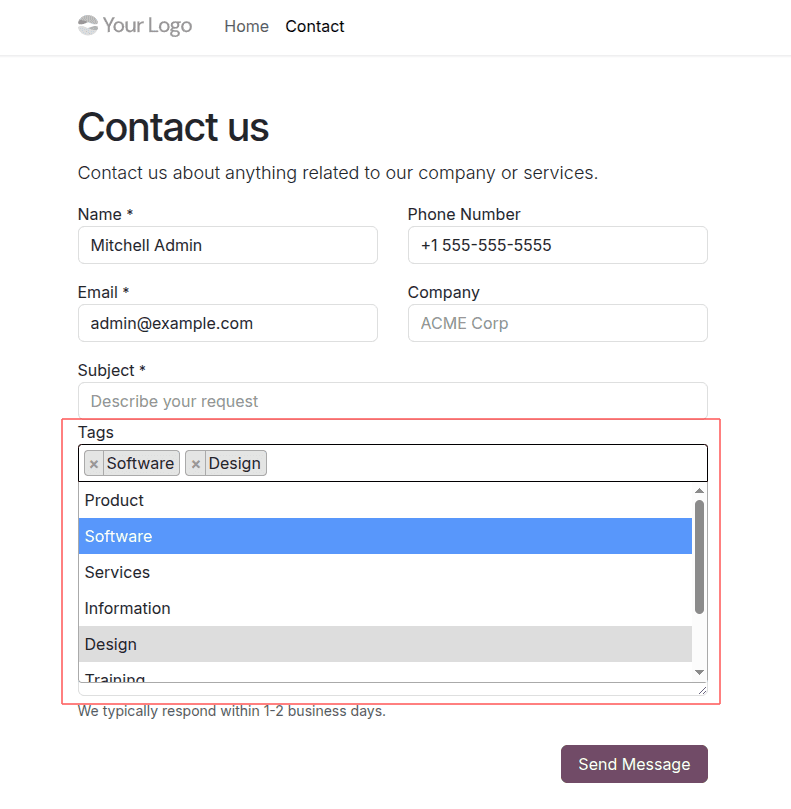
Creating a custom module, adding the Many2Many field, extending the website form, and implementing the form submission in the controller allows adding multi-selection features to the Odoo 20 website forms.
To read more about How to Add Many2Many fields in Odoo19 Website Form, refer to our blog, How to Add Many2Many fields in Odoo19 Website Form.