Accepting online payments is one of the most important parts of running an eCommerce business. Customers expect a smooth, secure, and familiar payment experience, and the backend needs to be just as reliable for the business managing those payments. Odoo 19 makes this straightforward by offering a complete payment management system built directly into the Website and eCommerce module. From choosing a payment provider to tracking every transaction, everything is available in one place without needing a separate payment platform.
This blog walks through the full payment configuration and management flow in Odoo 19, covering payment providers, payment methods, how payments work on the storefront, and how transactions and tokens are tracked in the backend.
Where Payment Configuration Lives
All payment-related settings in Odoo 19 are accessible from the Website module under the Configuration menu. Clicking on Configuration reveals a dedicated eCommerce section with five payment-related options: Payment Providers, Payment Methods, Payment Tokens, Payment Transactions, Delivery Methods, and Zip Prefix for shipping configuration.
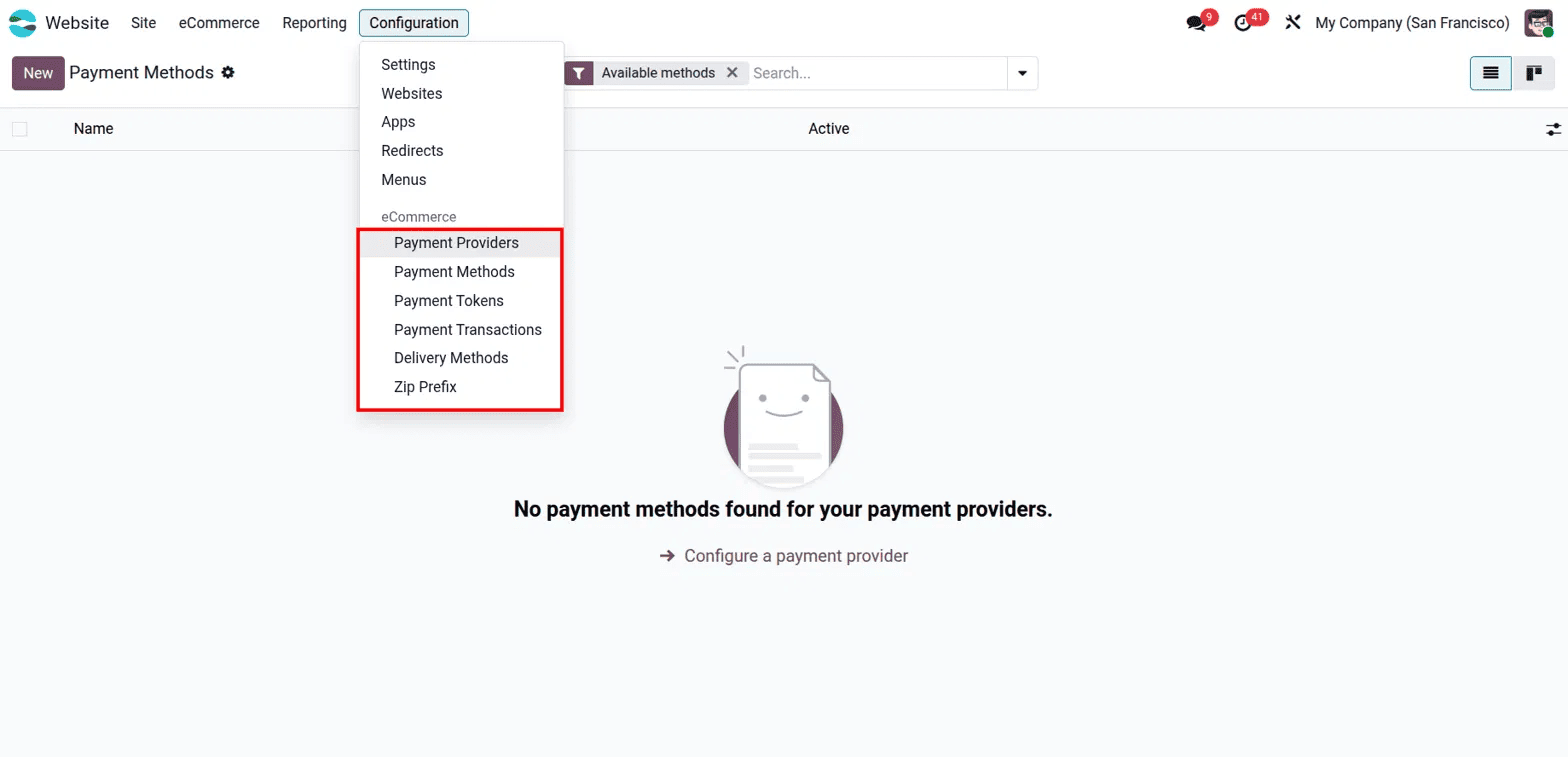
This centralised setup means there is no need to jump between multiple modules to manage how payments are received and tracked. Everything from provider setup to transaction history is accessible from this single menu.
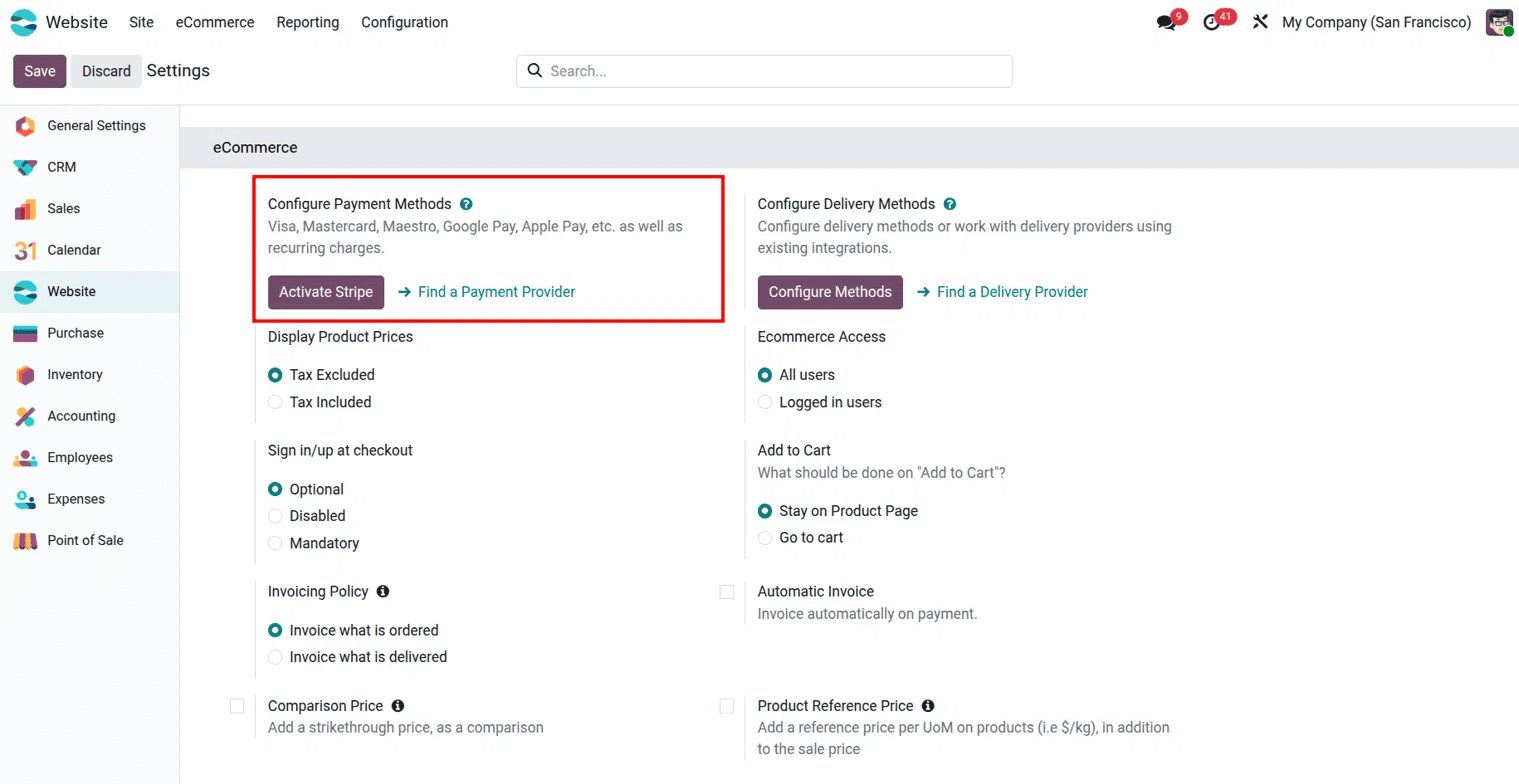
There is also a quick access point from the eCommerce Settings page. Under Website > Configuration > Settings, the Configure Payment Methods section is visible at the top of the eCommerce settings. From here, Stripe can be activated with one click, or another payment provider can be found via the Find a Payment Provider link.
Payment Providers
The Payment Providers page is accessed via Configuration > Payment Providers. It displays all available payment integrations in a Kanban view, showing 22 providers in total.
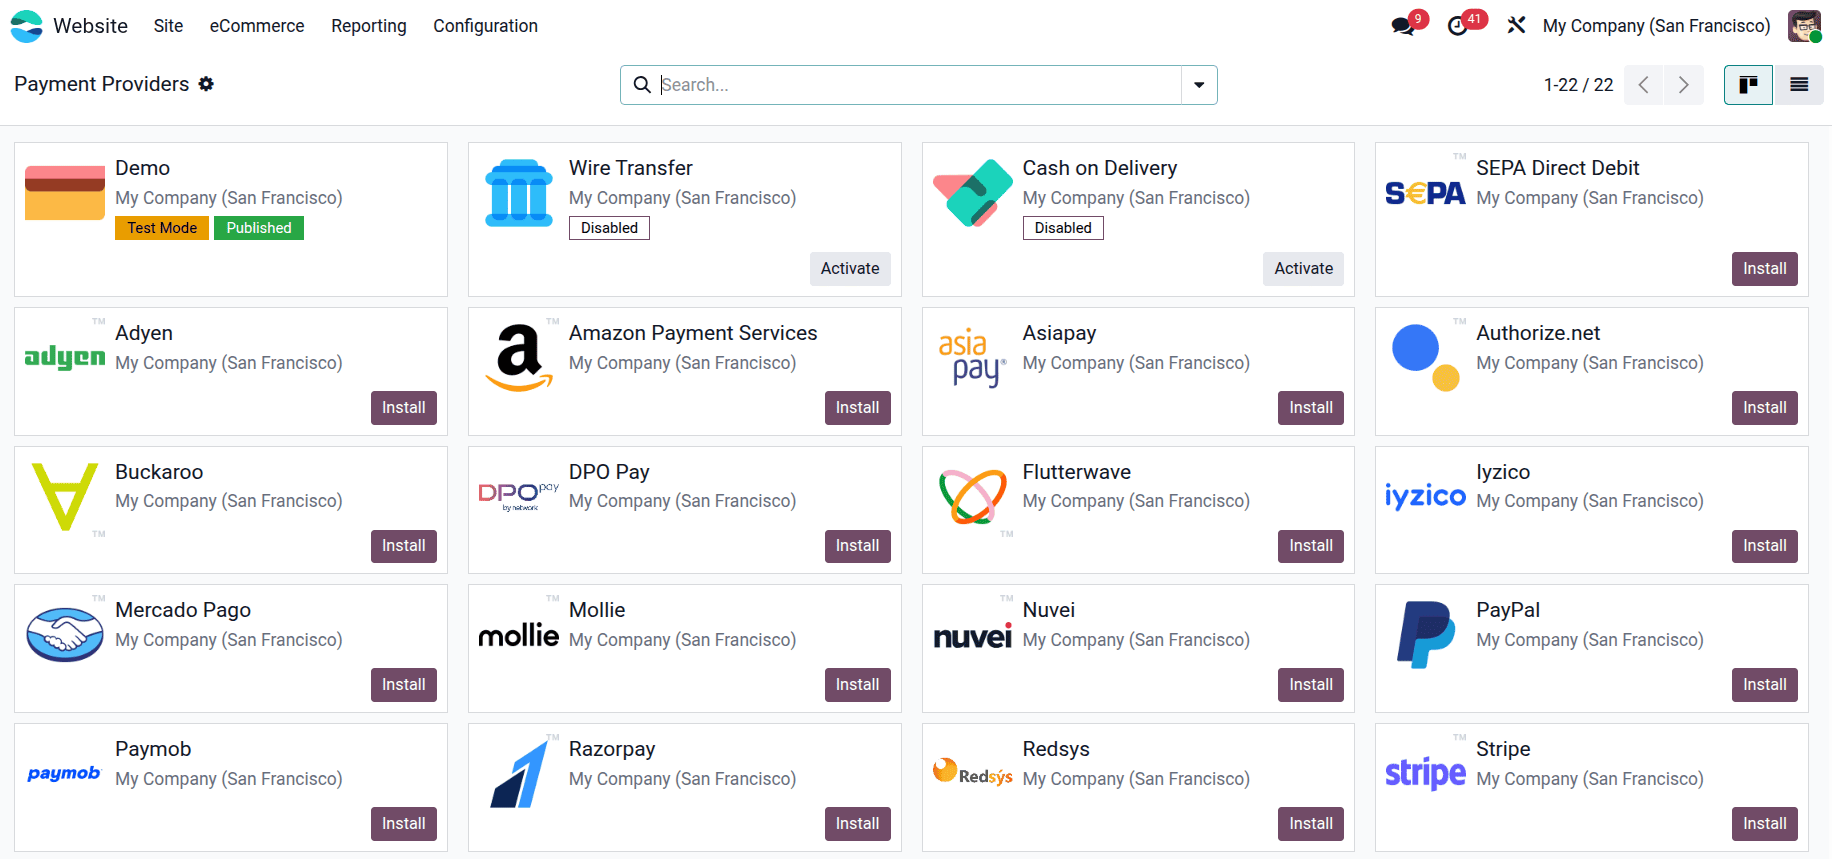
Some providers are built into Odoo and just need to be activated. Wire Transfer and Cash on Delivery fall into this category and show a Disabled status with an Activate button. These do not require any external account and are useful for businesses that handle payments manually or on delivery.
The remaining providers need to be installed and configured using credentials from their respective payment platforms. These include widely used options like Stripe, PayPal, Adyen, Amazon Payment Services, Razorpay, Mollie, Flutterwave, Authorize.net, SEPA Direct Debit, Asiapay, Buckaroo, DPO Pay, Iyzico, Mercado Pago, Nuvei, Paymob, and Redsys, among others. Each of these supports different regions and payment methods; for example, Stripe and PayPal support Visa, Mastercard, Maestro, Google Pay, and Apple Pay, making them suitable for businesses with an international customer base. Once a provider is installed and its API credentials are entered, it becomes available on the checkout page for customers to use.
This wide selection means businesses operating in different countries or serving different types of customers can pick the provider that best suits their needs, or even activate multiple providers at once to give customers a choice.
Payment Methods
Payment Methods are accessed via Configuration > Payment Methods. A payment method represents a specific way customers can pay, such as Visa, Mastercard, Maestro, Google Pay, or Apple Pay, and each method is linked to one or more payment providers.
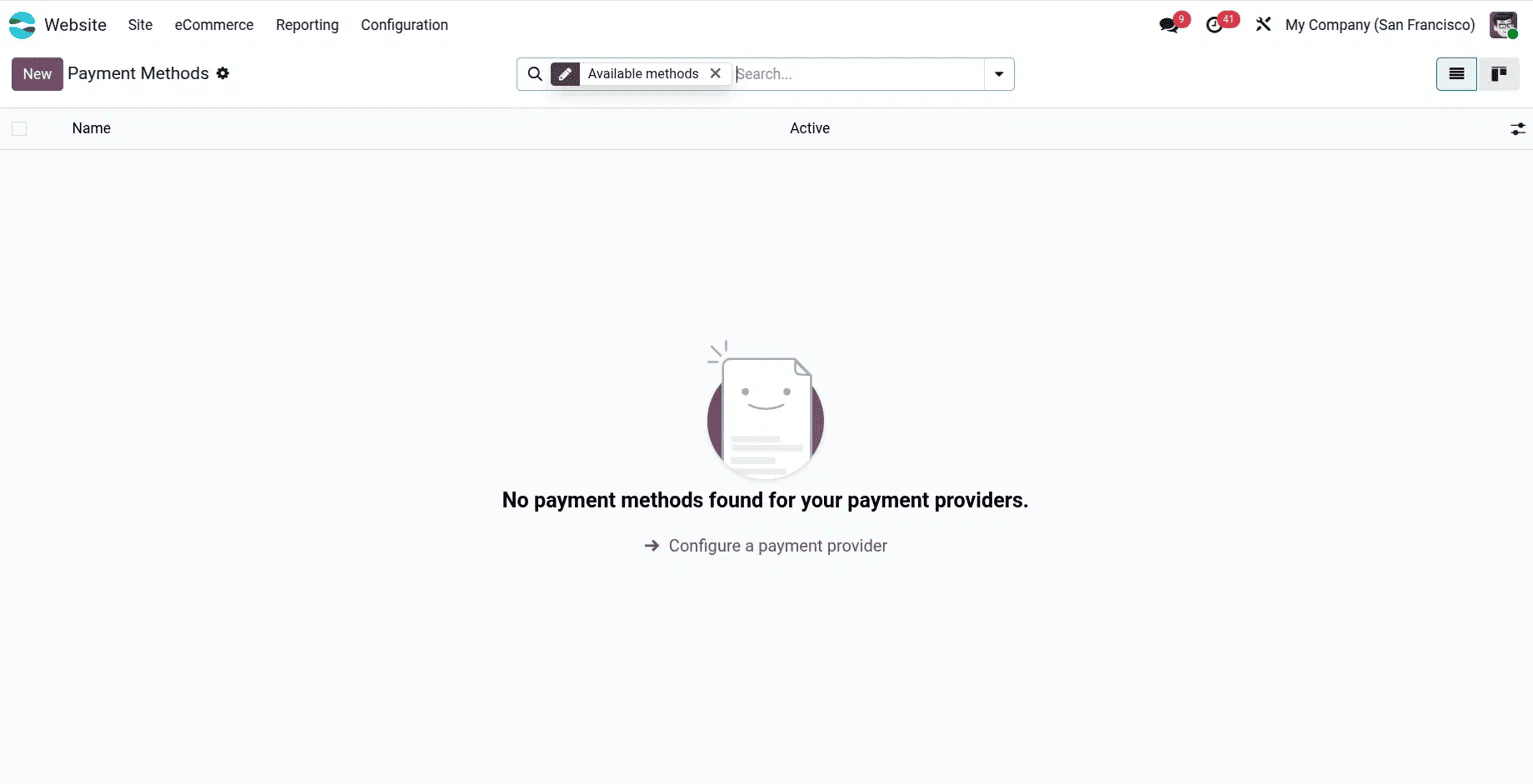
In this demo setup, no payment methods appear yet because no provider has been fully configured and activated. The page shows a message that says "No payment methods found for your payment providers" with a link to Configure a payment provider. Once a provider like Stripe is activated and configured, its supported payment methods, such as card payments and digital wallets, will automatically appear here and become available at checkout.
A new payment method can also be created manually using the New button. The payment method form has fields for the Name, Code, Active status, supported Countries, and supported Currencies. Three tabs at the bottom, Providers, Brands, and Configuration, allow the method to be linked to specific providers, associated with card brand logos, and further configured as needed.
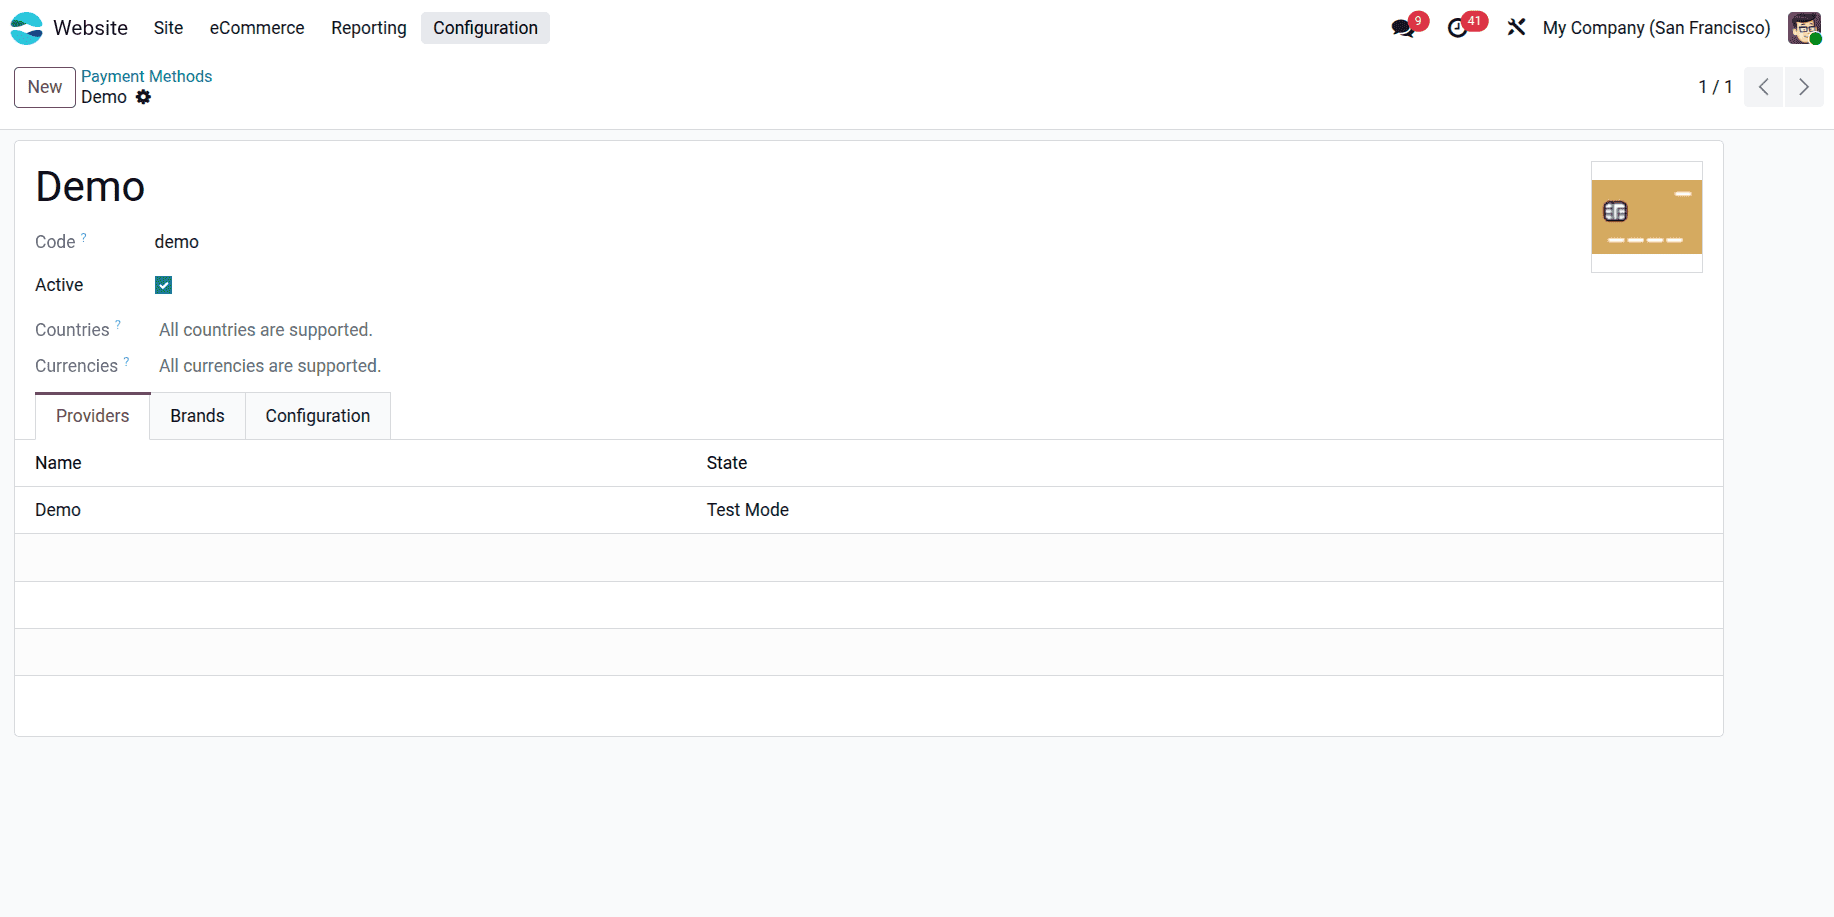
This level of control means businesses can fine-tune exactly which payment options appear at checkout and ensure only the most relevant methods are shown to customers based on their location and currency.
How Payments Work on the Storefront
Once payment providers and methods are configured, customers experience a clean and straightforward payment flow on the website.
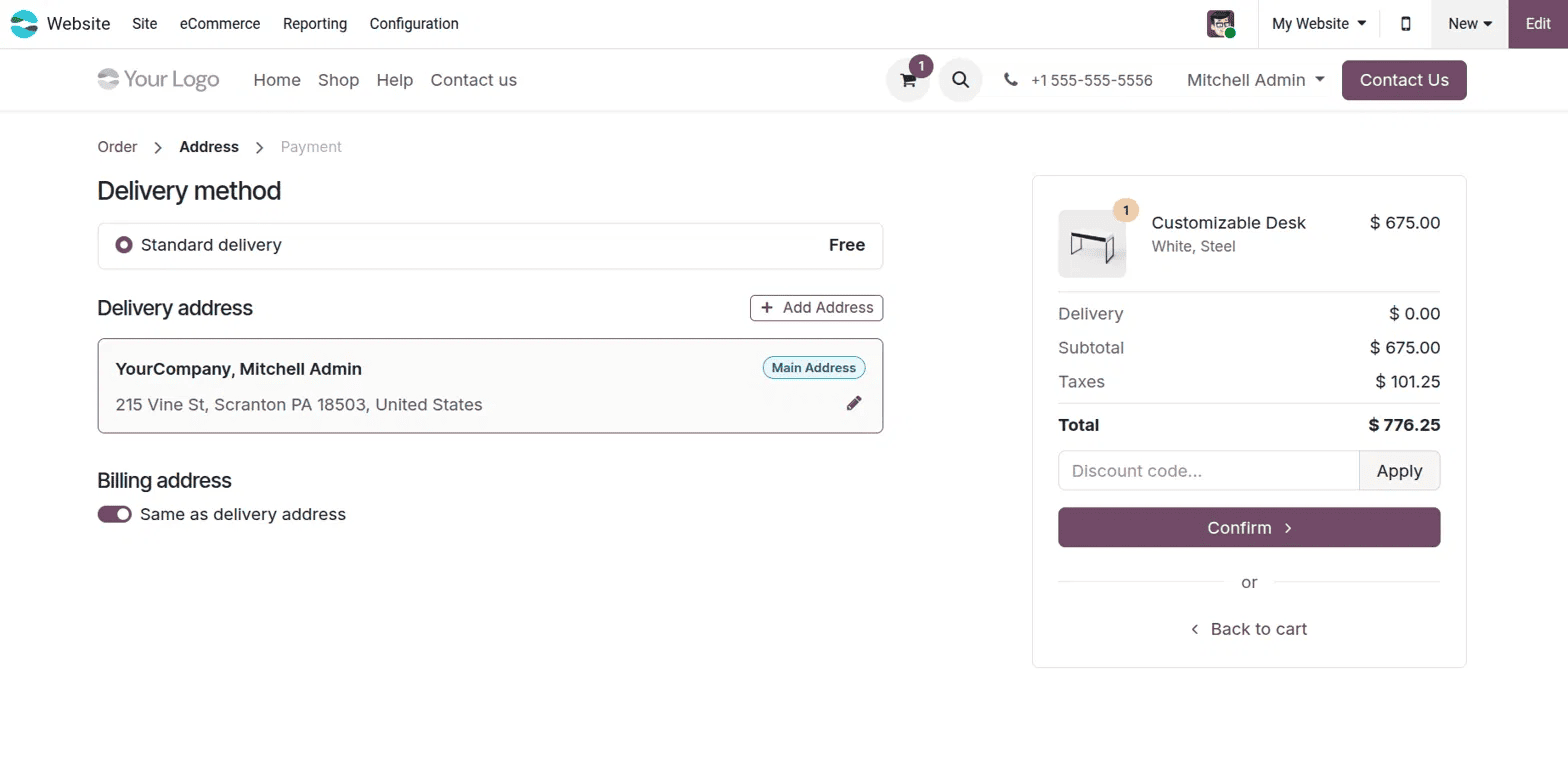
After adding a product to the cart and proceeding to checkout, the customer first lands on the Address step. Here, the delivery method, delivery address, and billing address are confirmed. In this example, Standard delivery is set to Free, and the billing address is set to the same as the delivery address using a toggle.
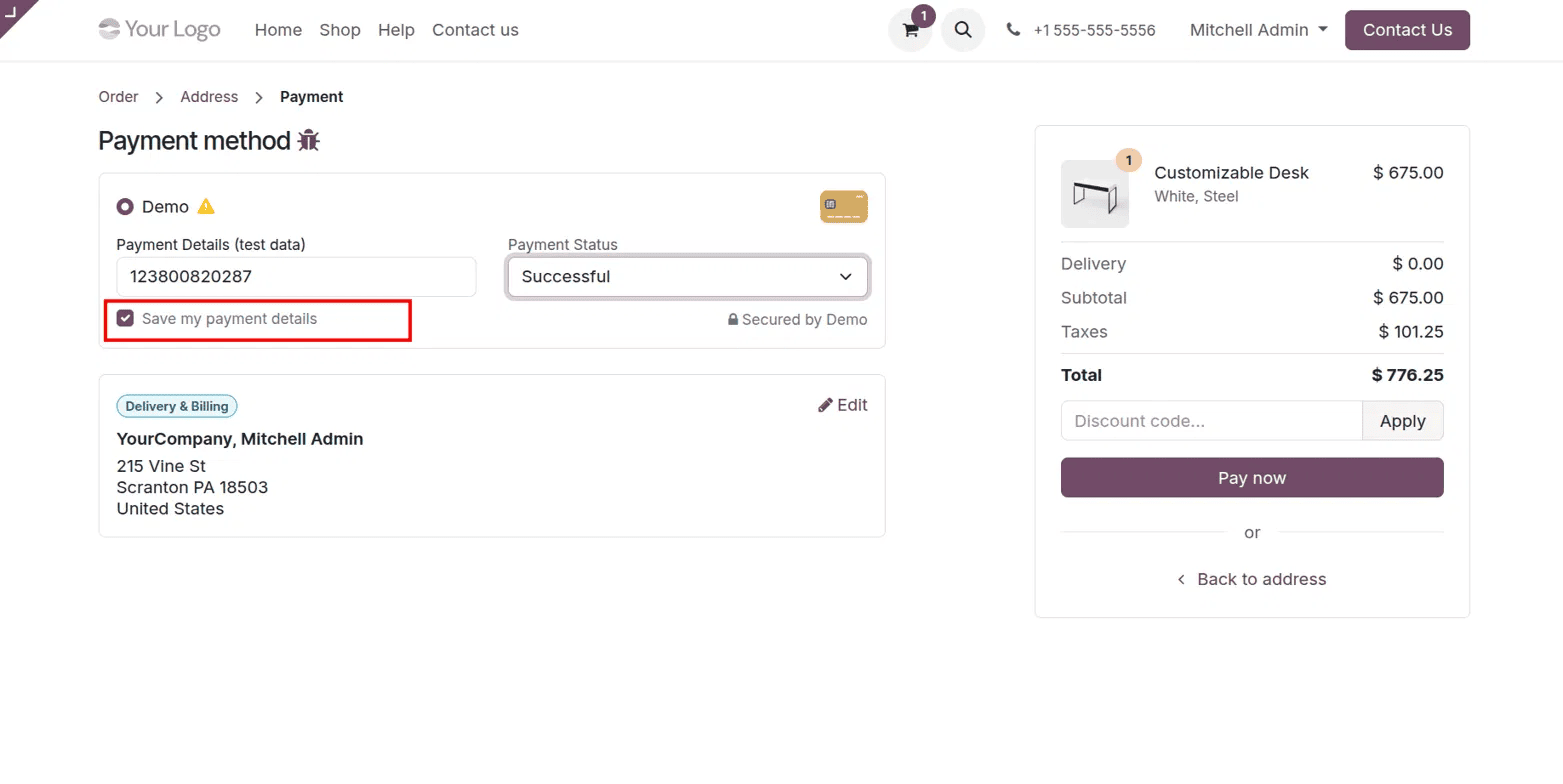
After confirming the address, the customer moves to the Payment step. Here, the available payment methods are displayed. In this demo, the Demo provider is shown with a test payment details field and a Payment Status dropdown set to Successful. A "Save my payment details" checkbox is also visible; when ticked, it saves the customer's payment information as a token for faster checkout on future orders.
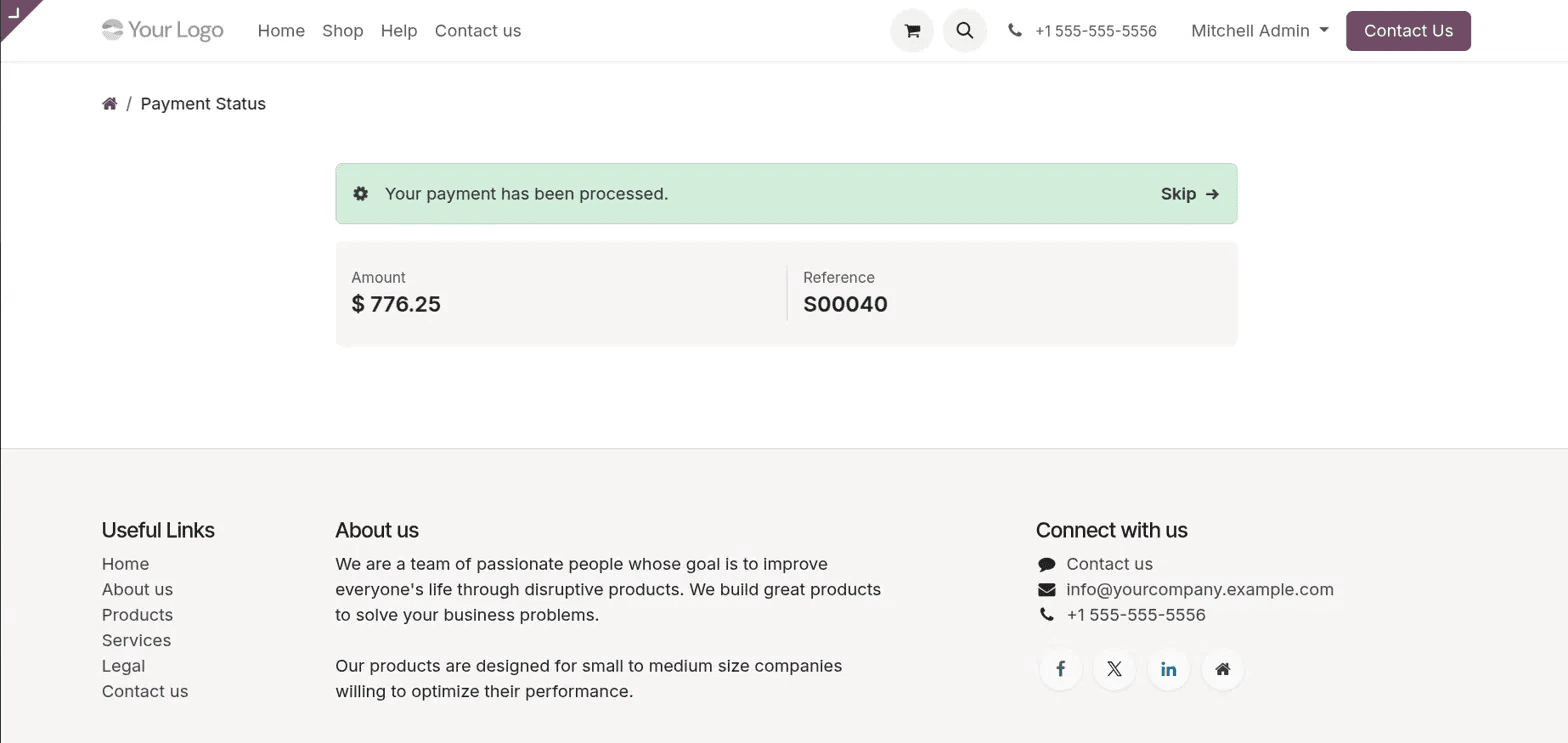
Once the customer clicks Pay now, Odoo processes the payment and redirects to the Payment Status page. This page confirms that the payment has been processed successfully, showing the total Amount paid and the Reference number of the order, in this case $776.25 for order S00040.
Payment Tokens
When a customer ticks the "Save my payment details" option during checkout, Odoo saves those details as a Payment Token. Tokens are accessed via Configuration > Payment Tokens.
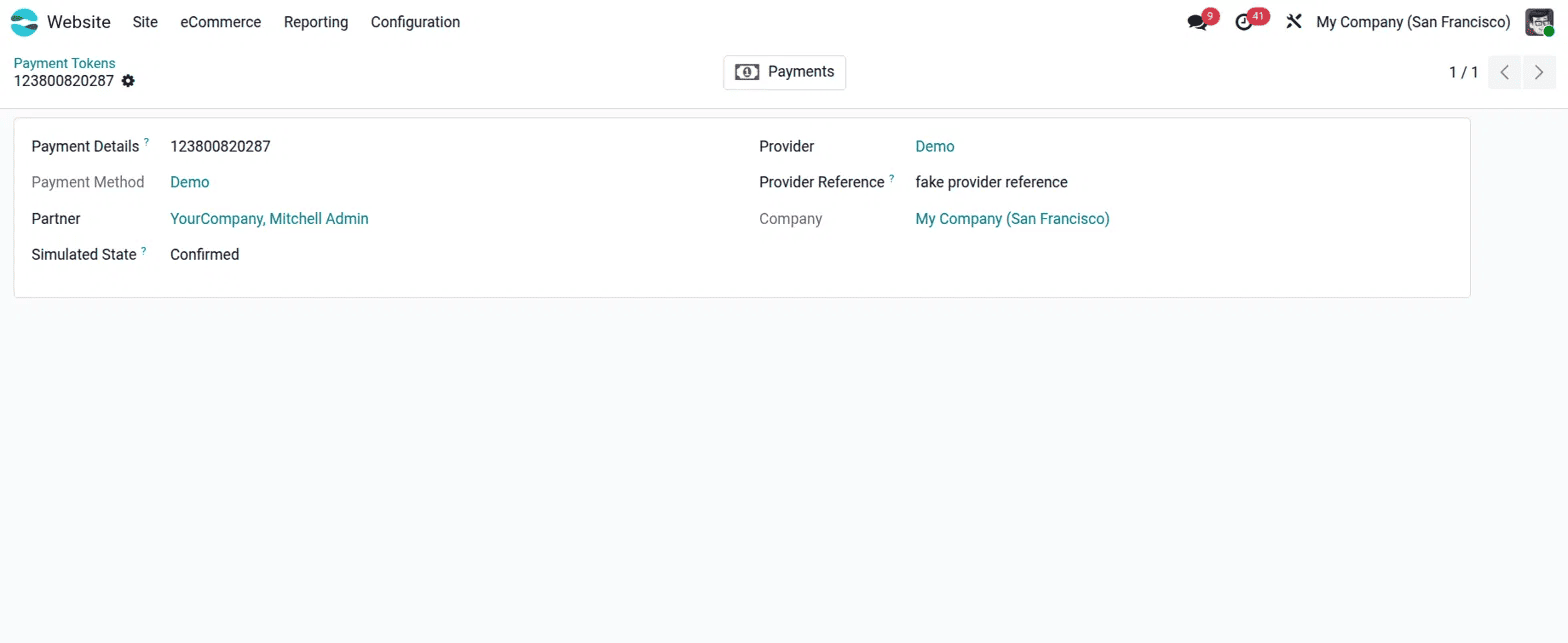
The token record stores the Payment Details reference number, the Payment Method used, the Partner name, and the Simulated State, which shows Confirmed in this case. On the right side, it shows the Provider, Provider Reference, and Company. A Payments smart button at the top links directly to all payment transactions associated with this token.
Payment Tokens are particularly useful for businesses with returning customers or subscription-based services, where automatically charging a saved card without requiring the customer to re-enter their details each time is an important part of the workflow.
Payment Transactions
Every payment made through the store is recorded as a Payment Transaction. These are accessed via Configuration > Payment Transactions and give a complete, traceable record of every payment event.
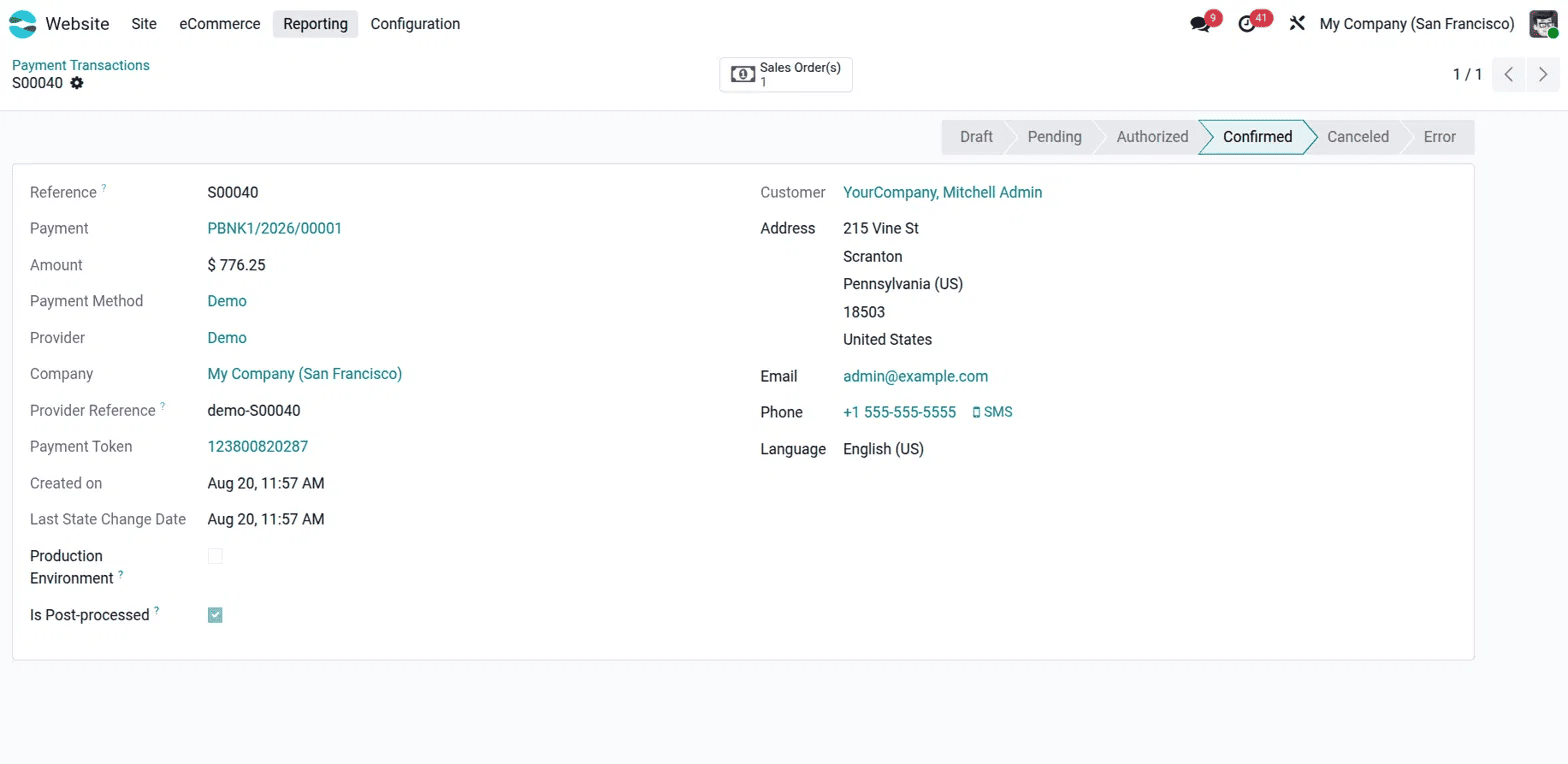
The transaction record contains a full set of details about the payment, the Reference number (S00040), the linked Payment journal entry (PBNK1/2026/00001), the Amount ($776.25), the Payment Method and Provider used (Demo), the Company, the Provider Reference (demo-S00040), the Payment Token reference, the date and time the transaction was created, and the Last State Change Date. On the right side, you can see the customer's full details including name, address, email, phone, and language.
Two additional fields worth noting are Production Environment, which, when unchecked, indicates this is a test transaction rather than a live one, and Is Post-processed, which, when ticked, confirms the transaction has been fully processed and recorded in the accounting system.
The status bar at the top of the transaction record moves through six stages: Draft, Pending, Authorized, Confirmed, Cancelled, and Error, giving a clear and traceable picture of where each payment stands at any point in time. In this example, the transaction is at the Confirmed stage, meaning the payment is complete and recorded. A Sales Order smart button at the top links directly to the corresponding sales order, connecting the payment record to the rest of the business flow.
Odoo 19 gives businesses a complete and well-organised payment management system that covers every step of the process, from choosing and configuring the right payment provider to tracking every transaction in detail. With support for 22 payment providers, including globally recognised names like Stripe, PayPal, Adyen, and Razorpay, and payment methods covering Visa, Mastercard, Maestro, Google Pay, and Apple Pay, businesses of any size and in any region can find a setup that works for their customers. The payment token system makes repeat purchasing easier, and the detailed transaction records with a full status trail ensure that every payment is accounted for and traceable from the moment it is made.
To read more about How to set up the Payment Providers in Odoo 19, refer to our blog How to set up the Payment Providers in Odoo 19.