Odoo version 20 has made new alterations to its ERP platform, which makes the management and access of business operations easier. The developers of Odoo are well aware of their obligations and aim to enhance the functionality and technical aspects of the product after each update. To experience the upgrades that Odoo 20 offers, your first step would be to install it on the required server. Ubuntu 24.04 LTS is one of the most suitable platforms to set up Odoo, and the installation process can be done by using the Community Edition source code.
In this blog, we are going to describe how to install Odoo 20 on the Ubuntu 24.04 LTS server in detail. The specifics of the process will involve installing different packages, setting up PostgreSQL, installing Python packages, as well as configuring the Odoo service. By the end of this blog, you will successfully install Odoo 20 and make it usable.
Step 1. Log in to the Ubuntu server
Before the installation starts, you have to be sure that you have access to the Ubuntu 24.04 LTS server. If you’re working on a remote computer, you can access the server through an SSH connection.
ssh username@server_ip
Replace username with your server username and server_ip with the IP address of the server.
If SSH is configured to use a different port, include the port number:
ssh -p port_number username@server_ip
If the server requires a PEM key, use:
ssh -i /path/to/your/key.pem username@server_ip
Once you are logged in, you can check the Ubuntu version with:
lsb_release -a
Step 2: Update the Server
Before installing Odoo 20, update the package list and upgrade the packages already installed on the server.
Execute the following command to update the package index:
sudo apt-get update
Then, upgrade the installed packages:
sudo apt-get upgrade -y
This makes sure the server has the latest available package updates before the Odoo installation begins.
Step 3: Secure the Server
If you are installing Odoo on a remote server, it is important to make sure that SSH access is available and the server is protected against common login attacks. The OpenSSH Server package allows the server to accept SSH connections. Install it using:
sudo apt-get install -y openssh-server
You can also install Fail2Ban to help protect the server against repeated failed login attempts.
sudo apt-get install -y fail2ban
Start the Fail2Ban service:
sudo systemctl start fail2ban
Enable it to start automatically when the server boots:
sudo systemctl enable fail2ban
To check whether the service is running, use:
sudo systemctl status fail2ban
These steps provide a basic level of protection before continuing with the Odoo installation.
Step 4: Install Packages and Libraries
Odoo requires Python, development libraries, and other packages to run properly. Ubuntu 24.04 provides Python 3.12, which is suitable for the Odoo 20 source installation.
Install Python, Git, and the required development packages with:
sudo apt-get install -y python3-pip python3-venv python3-dev \
    git build-essential libxml2-dev libxslt1-dev zlib1g-dev \
    libsasl2-dev libldap2-dev libssl-dev libffi-dev \
    libjpeg-dev libpq-dev liblcms2-dev libblas-dev \
    libatlas-base-dev npm node-less
Odoo also uses Node.js tools for some frontend-related tasks. Install the required Node.js package:
sudo apt-get install -y nodejs
If the node command is not available after installation, check the installed version:
nodejs --version
On systems where Node.js is installed under the nodejs command, a symbolic link can be created if required:
sudo ln -s /usr/bin/nodejs /usr/bin/node
Odoo uses Less for processing CSS files. Install the required Less packages with:
sudo npm install -g less less-plugin-clean-css
The required packages are now installed, and the server is ready for the database setup.
Step 5: Set Up the Database Server
Odoo uses PostgreSQL to store and manage its data. For Odoo 20, PostgreSQL 16 or later is required.
Install PostgreSQL with:
sudo apt-get install -y postgresql postgresql-client
After installation, switch to the PostgreSQL system user:
sudo su - postgres
Now, create a dedicated PostgreSQL user for Odoo:
createuser --createdb --username postgres --no-createrole --superuser --pwprompt odoo20
The command creates a database user named odoo20 and asks you to enter a password. The createdb option allows the user to create databases, while pwprompt prompts you to set a password. After creating the user, return to your normal system user:
exit
Step 6: Create a System User for Odoo
It is better to run Odoo using a separate system user instead of using the root account. This keeps the application files and services isolated from other server processes.
Create a new system user with a home directory:
sudo adduser --system --home=/opt/odoo20 --group odoo20
The Odoo source code will reside in /opt/odoo20.
Step 7: Download Odoo 20 Community Edition from GitHub
The Odoo Community Edition source code can be downloaded from GitHub. In this step, we will download the Odoo 20 branch.
First, Git has to be installed:
sudo apt-get install -y git
Switch to the Odoo system user:
sudo su - odoo20 -s /bin/bash
Go to the Odoo home directory:
cd /opt/odoo20
Go to the Odoo home directory:
cd /opt/odoo20
Now, clone the Odoo 20 Community Edition repository
git clone https://github.com/odoo/odoo.git --depth 1 --branch 20.0 --single-branch .
The --branch 20.0 option downloads the Odoo 20 branch, while the --depth 1 option downloads only the latest commit instead of downloading the complete history of Git. After cloning the repository, verify the files using the following command:
ls
You should see files like odoo-bin, requirements.txt, and the addons folder. Exit back to your normal system user:
exit
Step 8: Install Required Python Packages
Odoo runs on Python packages and utilizes them for different operations. We use a Python virtual environment to isolate project packages from the system Python.
Install the virtual environment package:
sudo apt install -y python3-venv
Create the virtual environment inside the Odoo directory:
sudo python3 -m venv /opt/odoo20/venv
Now, switch to the Odoo directory and activate the virtual environment:
sudo -s
cd /opt/odoo20
source venv/bin/activate
Once the virtual environment is active, install the Python dependencies listed in Odoo's requirements.txt file:
pip install --upgrade pip
pip install -r requirements.txt
The installation may take some time, depending on the server and the number of packages that need to be installed. After installing all required dependencies, exit the virtual environment.
deactivate
Then, exit the root shell:
exit
Step 9: Install wkhtmltopdf
Odoo uses wkhtmltopdf to generate PDF reports. The package should be installed separately because it is not included with the Python dependencies. Download the wkhtmltopdf package:
sudo wget https://github.com/wkhtmltopdf/wkhtmltopdf/releases/download/0.12.6.1/wkhtmltox_0.12.6.1-2.jammy_amd64.deb
Install the downloaded package:
sudo dpkg -i wkhtmltox_0.12.6.1-2.jammy_amd64.deb
If the installation reports missing dependencies, run:
sudo apt install -f
You can check whether wkhtmltopdf is installed with:
wkhtmltopdf --version
Note: The wkhtmltopdf package needs to be verified for the current Odoo 20 requirement before its use in production. If the package is incompatible with your server, it is recommended to use an appropriate build rather than insisting upon its installation.
Step 10: Configuration File Configuration
The Odoo configuration file contains all the parameters necessary for setting up the connection to PostgreSQL, determining the location of the directory with addons, and saving logs. In this regard, let us demonstrate the creation of an Odoo configuration file based on the example of the Odoo source directory.
sudo cp /opt/odoo20/debian/odoo.conf /etc/odoo20.conf
Let’s open this configuration file with the following command.
sudo nano /etc/odoo20.conf
Now, let’s edit the file as follows:
[options]
admin_passwd = your_admin_password
db_host = localhost
db_port = 5432
db_user = odoo20
db_password = your_database_password
addons_path = /opt/odoo20/addons
logfile = /var/log/odoo/odoo20.log
When using the Odoo database manager, do not forget to provide a strong password for database management instead of your_admin_password, and insert the password specified for that specific PostgreSQL user instead of your_database_password.
The parameter addons_path stands for the default Odoo directory with addons, but in case you want to add custom addons later, you will do that at this point in time. Save and exit.
Now, it is time to set the necessary ownership and permissions.
sudo chown odoo20: /etc/odoo20.conf
sudo chmod 640 /etc/odoo20.conf
Create a directory for the Odoo logs:
sudo mkdir -p /var/log/odoo
sudo chown odoo20:root /var/log/odoo
The configuration file is now ready.
Step 11: Create a Systemd Service
A systemd service allows Odoo to run in the background and start automatically when the server boots.
Create a new service file:
sudo nano /etc/systemd/system/odoo20.service
Add the following configuration:
[Unit]
Description=Odoo 20
Documentation=https://www.odoo.com
[Service]
Type=simple
User=odoo20
Group=odoo20
ExecStart=/opt/odoo20/venv/bin/python3 /opt/odoo20/odoo-bin -c /etc/odoo20.conf
[Install]
WantedBy=multi-user.target
The ExecStart line tells systemd to start Odoo using the Python interpreter from the virtual environment. The User and Group settings ensure that Odoo runs using its dedicated account. Save the file and exit.
Step 12: Start the Odoo Service
Reload systemd so that it recognizes the new service:
sudo systemctl daemon-reload
Start the Odoo service:
sudo systemctl start odoo20
Enable the service to start automatically after a server reboot:
sudo systemctl enable odoo20
Check the service status:
sudo systemctl status odoo20
If the service is running correctly, you should see an active status.
Step 13: Access Odoo in the Browser
Odoo uses port 8069 by default. Open your web browser and go to the following address:
http://your_server_ip:8069
Replace your_server_ip with the actual IP address of your Ubuntu server.
You should now see the Odoo database manager page. Enter the required database details and create the database.
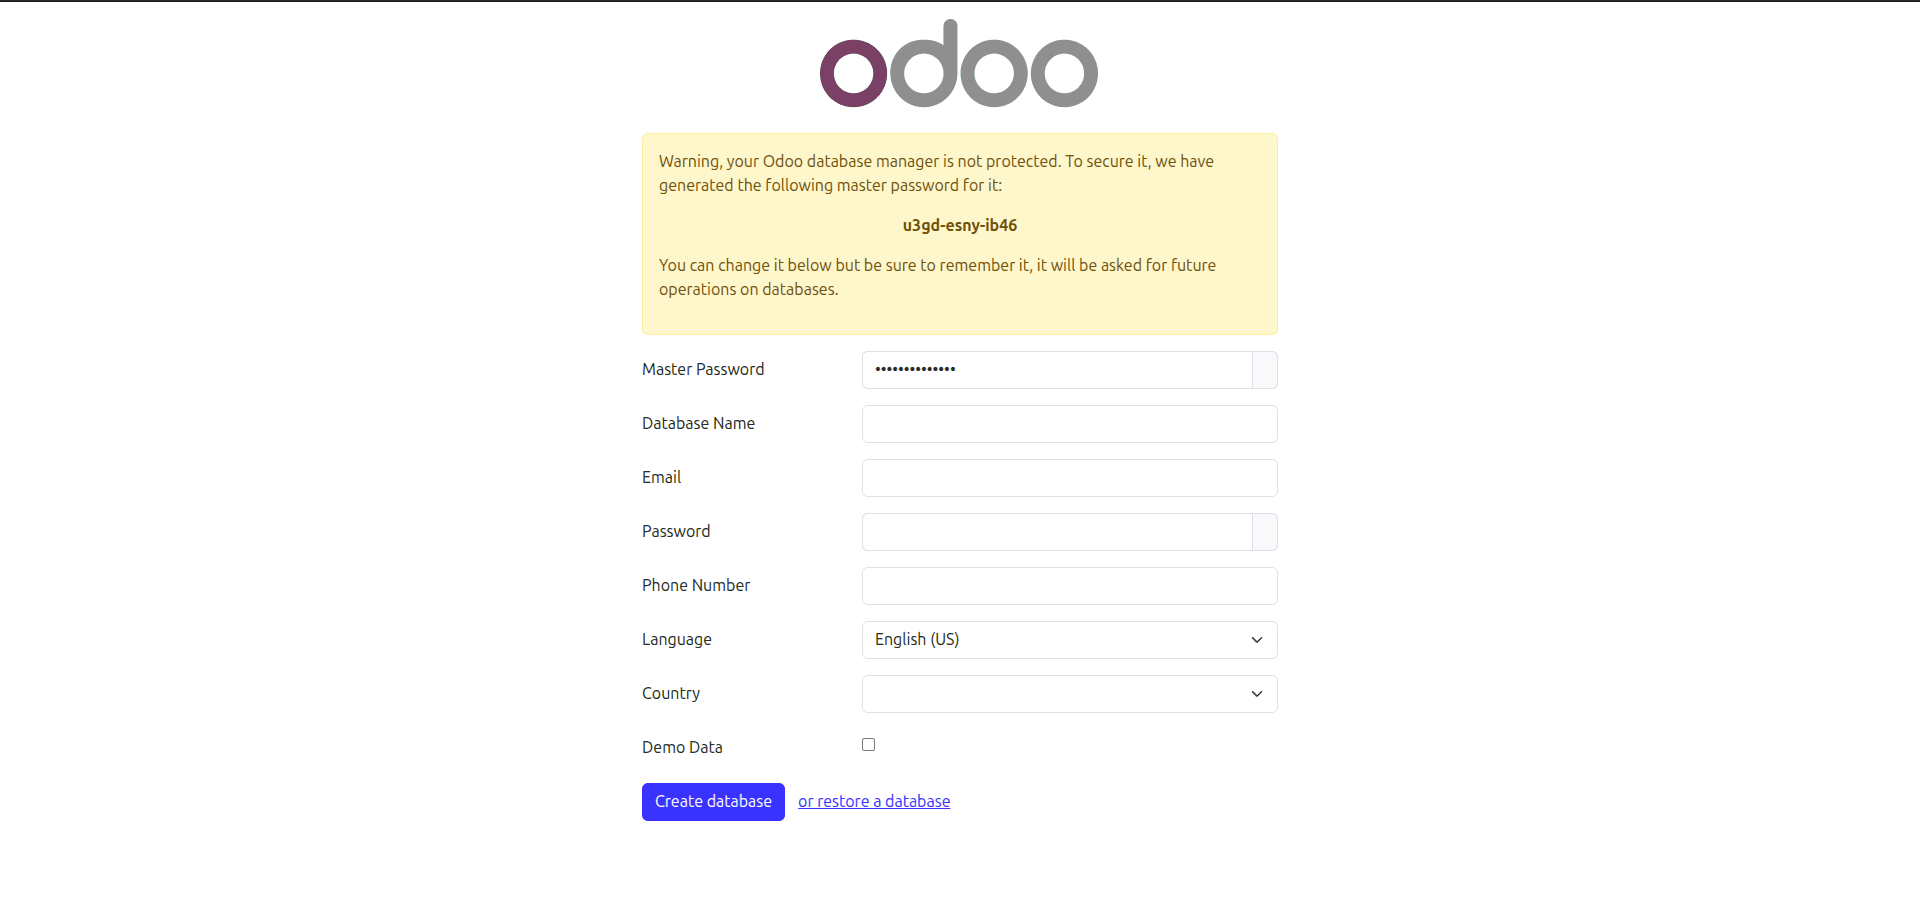
Once the database is created, you can log in and start configuring Odoo.
Step 14: Check the Odoo Logs
If Odoo does not start or the browser does not load the page, check the log file.
sudo tail -f /var/log/odoo/odoo20.log
The log will show errors related to the database connection, missing Python packages, configuration problems, or other startup issues.
You can also check the systemd service logs:
sudo journalctl -u odoo20 -f
This is useful when the service stops immediately after starting.
Installation of Odoo 21 on Ubuntu 24.04 LTS includes a number of processes that require different server configurations, as well as the installation of PostgreSQL and several Python libraries that are essential for Odoo operation. Once Odoo is fully operational, the server will become accessible via port 8069. Further options can be performed and customized depending on the particular requirements of your business while using Odoo running on the server.
To read more about How to Install Odoo 19 on Ubuntu 24 LTS Server, refer to our blog How to Install Odoo 19 on Ubuntu 24 LTS Server.