Managing employee expenses has always been one of the more time-consuming parts of running a business. Employees pay out of pocket, collect receipts, fill out expense reports, wait for approvals, and then wait again for reimbursement. This back-and-forth takes time for everyone involved: the employee, the manager, and the finance team. Odoo 19 offers a much cleaner solution through its Expense Card feature, which allows businesses to issue prepaid cards directly to employees so they can make work-related purchases without using their own money in the first place.
This blog covers what the Expense Card feature is, how to enable it, how to create both virtual and physical cards, and how the spending policy works to keep things under control.
What is the Expense Card feature?
The Expense Card feature in Odoo 19 allows businesses to create prepaid virtual and physical cards for employees, which can be used for both one-time and recurring expenses. These cards are integrated into Odoo through Stripe Issuing, which means the card management, transaction tracking, and spending controls all happen within the Odoo platform itself. Instead of reimbursing employees after the fact, the business loads the card with funds, and the employee uses it directly for approved expenses.
This approach saves time, reduces the chance of out-of-pocket spending disputes, and gives the company better visibility into how money is being spent before it goes out rather than after.
How to enable the Expense Card feature
The Expense Card option is not turned on by default, so the first step is to enable it from the settings. Go to the Expenses app, then click on Configuration and select Settings. In the Settings page, under the Expenses section, you will see the Expense Card option on the right side. Enable it by checking the box. The description reads "Create prepaid virtual and physical cards for both one-time and recurring expenses, integrated into Odoo through Stripe Issuing".
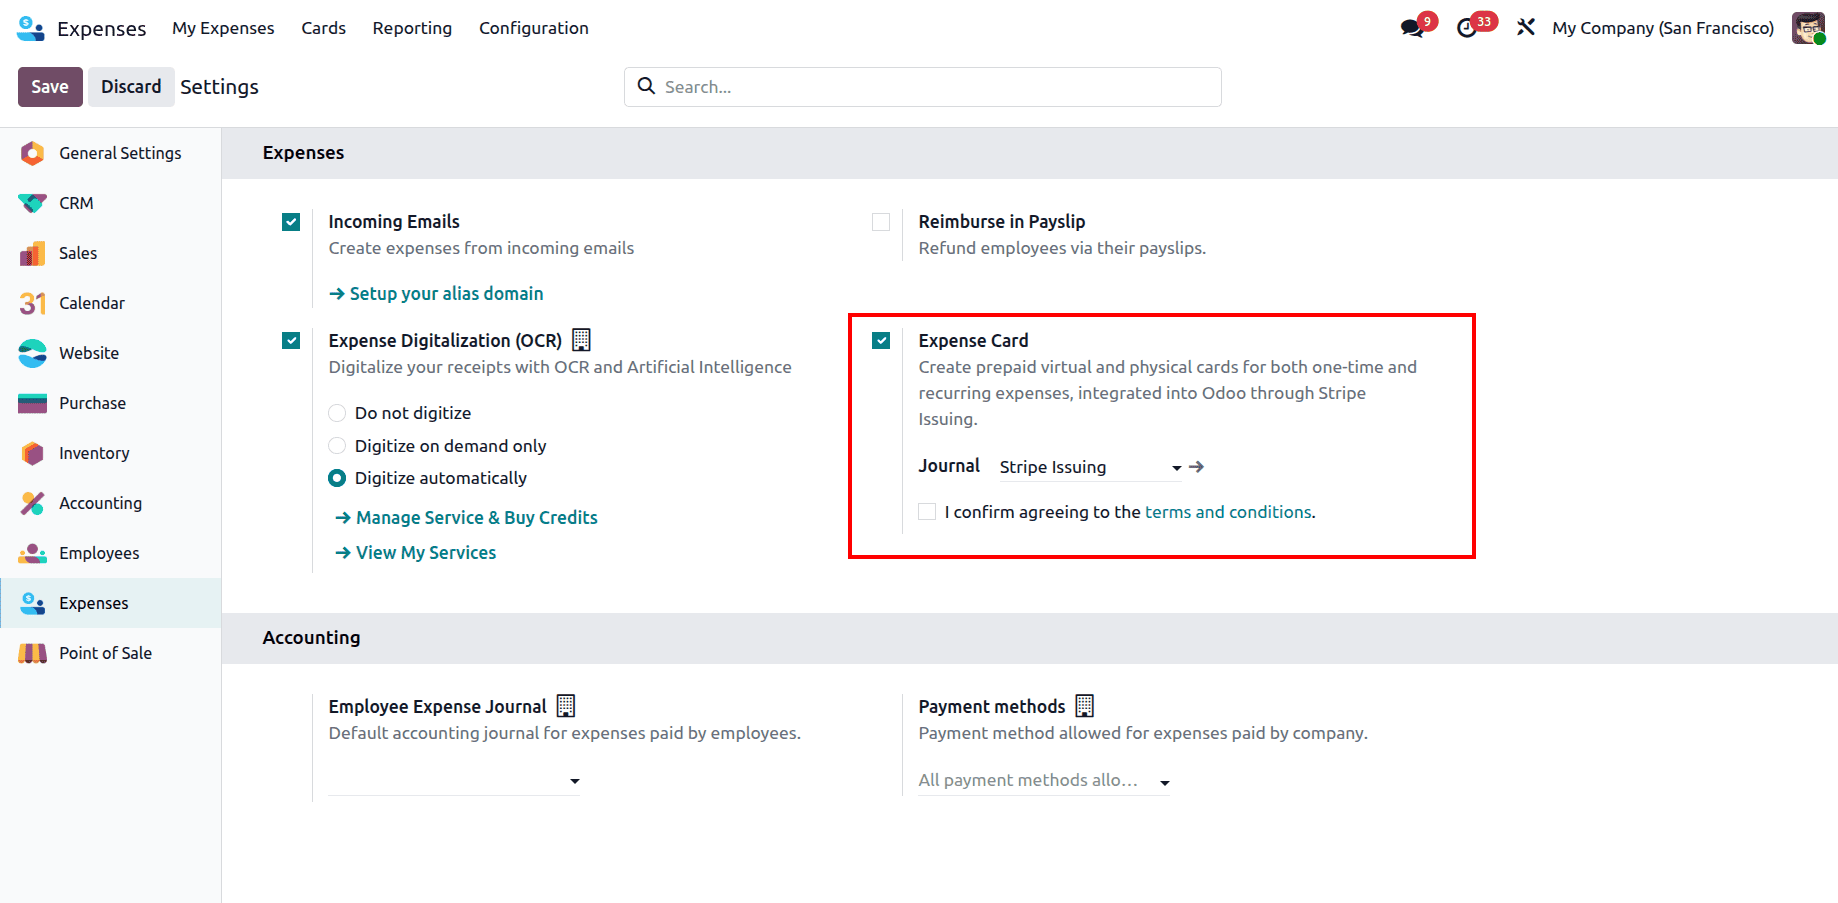
Once you enable it, a message appears saying "Save this page and come back here to set up the feature". Click Save first, then return to the settings to complete the Stripe Issuing setup. After the feature is fully set up, a new Cards menu will appear in the top navigation bar of the Expenses module.
The Cards page
Once the Expense Card feature is enabled and set up, you can access all your company's expense cards by clicking on Cards in the top navigation bar of the Expenses module.
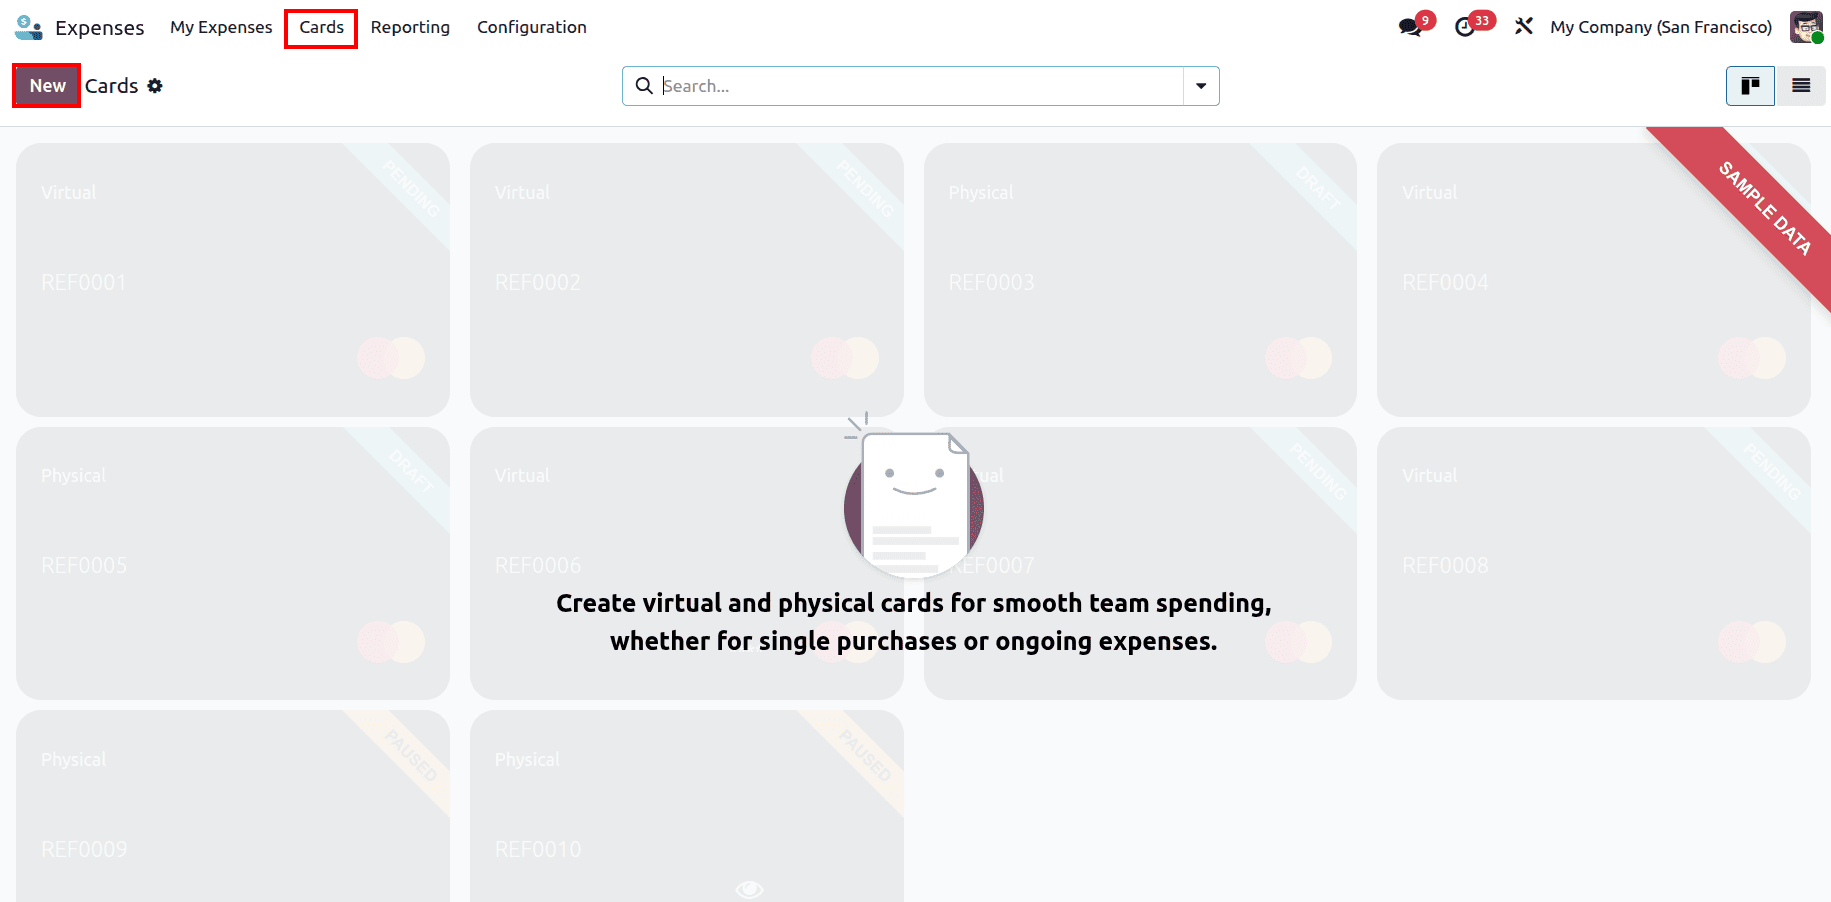
The Cards page opens in a Kanban view showing all existing cards, both physical and virtual, each displayed as a card tile with its reference number and type clearly labelled.
From this page you can view existing cards, check their status, and create new ones using the New button at the top left.
Creating a new expense card
To create a new expense card, click the New button on the Cards page. A card creation form will open. The first thing you will notice is the card name field at the top; this is where you give the card a meaningful name such as "Marketing Card" or "Travel Card," so it is easy to identify later.
Below the name, you will see the Stripe Card ID field, which is automatically filled in by Stripe once the card is created and activated. The Cardholder field is where you select the employee who will be using this card. There is also an Employee smart button at the top right of the form that links directly to the employee's record, making it easy to check the employee's details without leaving the card form.
On the right side of the form, the Type field lets you choose between two options, Virtual or Physical. This is a key choice, and it changes a few things on the form depending on what you select.
The Company field shows which company the card belongs to, and the Stripe Journal field shows the journal linked to Stripe Issuing, which handles the financial transactions behind the card.
The status bar at the top of the form shows three stages, Draft, Inactive, and Active, giving you a clear picture of where the card currently stands.
Virtual cards
When you select Virtual as the card type, the form shows fields relevant to a digital card. A virtual card exists only online and is typically used for online purchases or subscriptions. Since there is no physical card to deliver, the form does not require a delivery address.
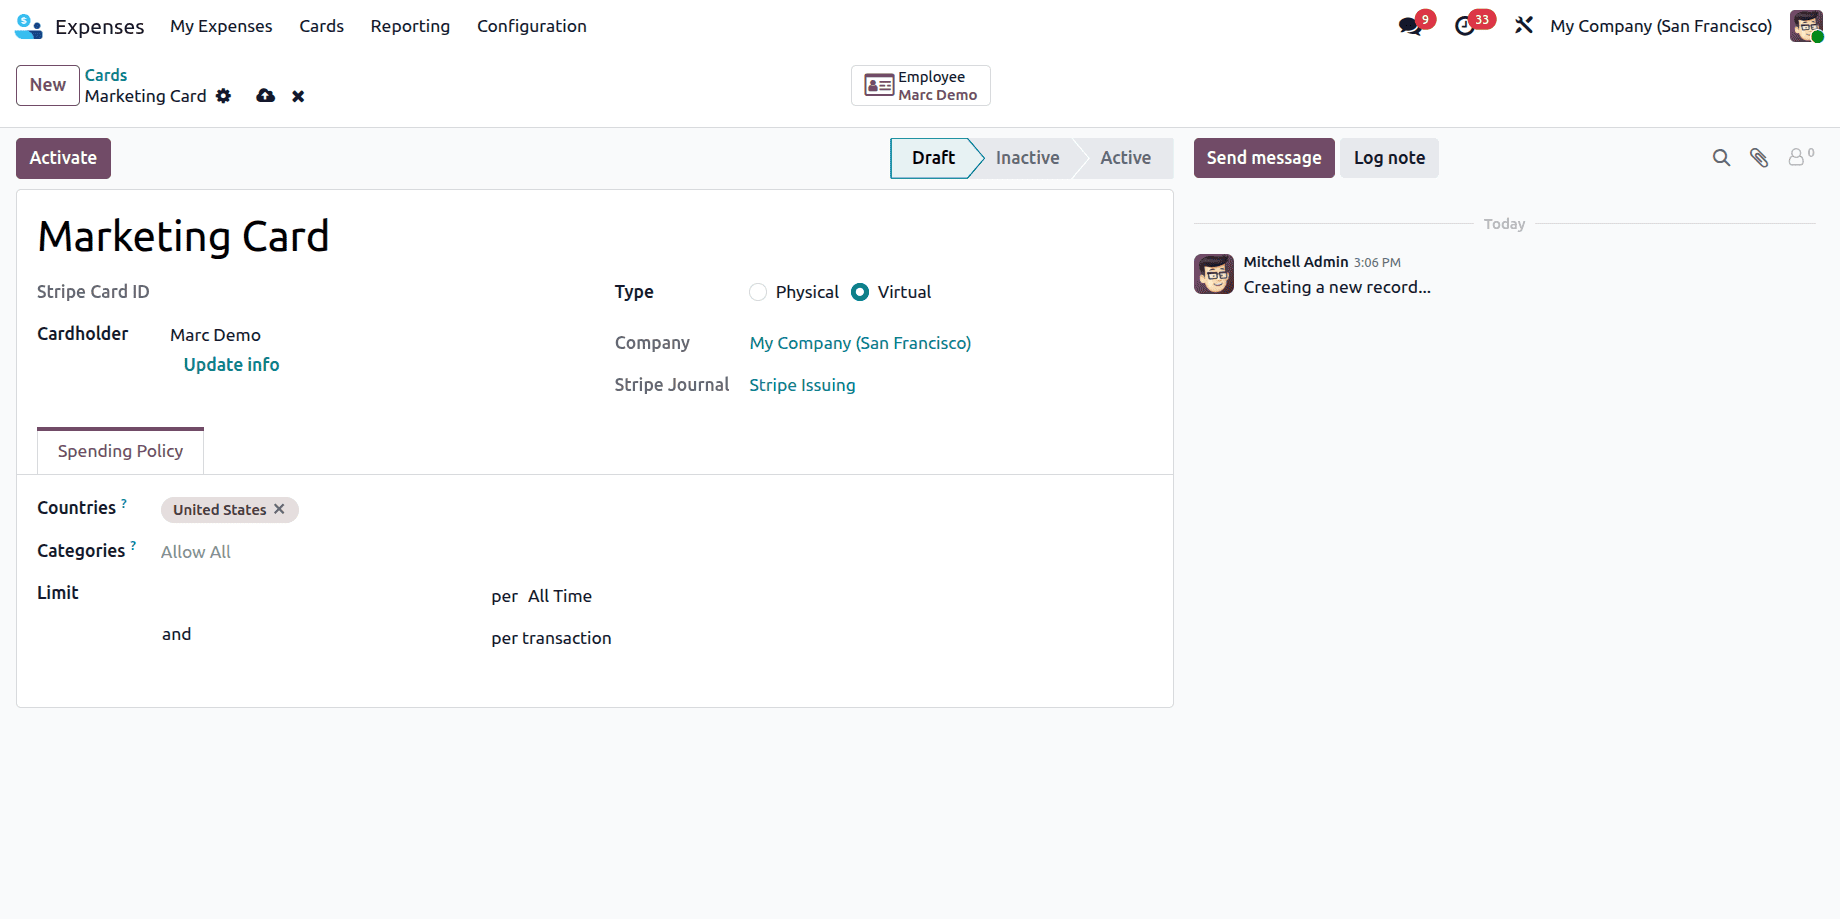
Once all the details are filled in, an Activate button appears at the top left. Clicking Activate sends the card creation request to Stripe and, once processed, the card moves from Draft to Active status and is ready to use.
Physical cards
When you select Physical as the card type, the form changes slightly. An additional Delivery Address field appears, since a physical card needs to be shipped to a location. This is where you enter the address where the card should be delivered to the employee.
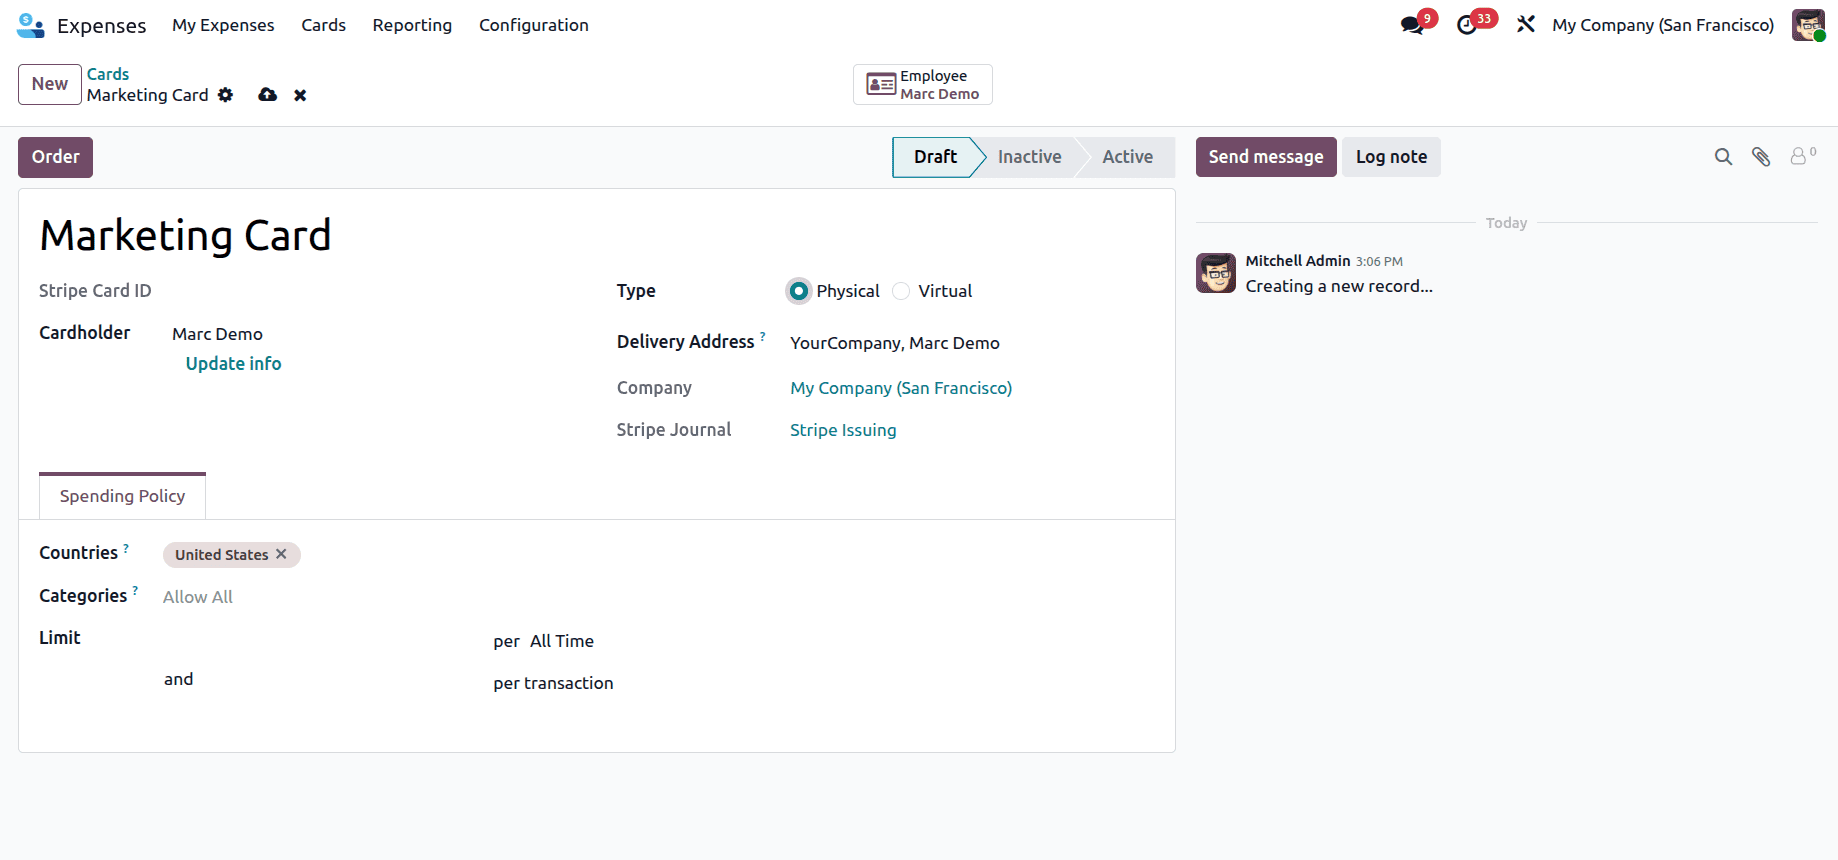
For physical cards, the button at the top changes from Activate to Order. Clicking Order places the card order through Stripe, which then arranges for the physical card to be produced and sent to the delivery address provided. Once the card arrives and is activated, it moves to Active status.
Spending Policy
Both virtual and physical cards have a Spending Policy tab at the bottom of the card creation form. This is one of the most useful parts of the Expense Card feature because it lets you control exactly how and where the card can be used, without having to rely entirely on the employee's judgment.
The Spending Policy tab has three fields:
- Countries - this field lets you restrict the card to specific countries. In the screenshots, the card is restricted to the United States, meaning the card can only be used for transactions in that country. This is useful for keeping travel expenses within expected regions.
- Categories - this field lets you restrict the card to specific spending categories, such as travel, meals, or office supplies. If it is set to Allow All, the card can be used for any category of purchase. You can narrow this down if the card is meant for a specific type of expense only.
- Limit - this field lets you set a spending limit for the card. You can set a maximum amount per All Time (a total cap on the card's lifetime spending) and also a separate limit per transaction, which prevents any single purchase from going above a set amount. These two limits work together to give you fine-grained control over how much the employee can spend.
The Expense Card feature in Odoo 19 is a practical and well-designed tool for businesses that want to move away from the traditional employee reimbursement cycle. By issuing prepaid virtual or physical cards directly through Odoo and Stripe Issuing, companies can give employees the means to make approved purchases without out-of-pocket spending, while maintaining full control through the spending policy settings. Whether you need a quick virtual card for an online subscription or a physical card for a field employee, Odoo 19 makes the whole process straightforward to set up and easy to manage from one place.
To read more about How to Set Up and Use the Odoo 19 Expenses Module, refer to our blog How to Set Up and Use the Odoo 19 Expenses Module.